
In this article, we will run through how to delete a pod from a Kubernetes (K8S) node with examples using a cluster running on AKS (Azure Kubernetes Service).
Deleting a pod from a node is commonly required to manually scale down your cluster for troubleshooting purposes when pods need to be removed from a particular node or to clear pods off a node completely when it needs maintenance.
Delete All the Pods From a Node
To delete all the pods from a particular node, first, retrieve the names of the nodes in the cluster, and then the names of the pods. You can use the -o wide option to show more information.
kubectl get nodes -o widekubectl get pods -o wide
In the above examples, I have two nodes running in my AKS cluster with 11 pods, all running on one node. If I have a problem with that node, I may wish to delete all the pods from the node and have them run on the other node.
Once they have been confirmed as safe to be removed, you can go ahead and remove the pods from the node using the kubectl drain command. The drain command uses the Kubernetes eviction API, so it respects PodDisruptionBudgets (PDBs) and other safety checks. When the pods are successfully evicted, they are rescheduled on other ready nodes in the cluster.
kubectl drain aks-agentpool-39678053-vmss00000a
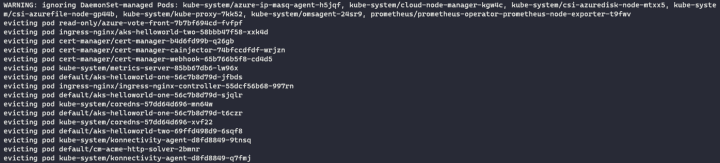
Here I see a couple of errors:
- cannot delete DaemonSet-managed Pods (use — ignore-daemonsets to ignore)
- cannot delete Pods with local storage (use — delete-emptydir-data to override)
kubectl drain aks-agentpool-39678053-vmss00000a --ignore-daemonsets --delete-emptydir-dataThe drain command will first cordon the node. This ensures that no new pods will get scheduled to the node while you are preparing it for removal or maintenance.
You can manually cordon the node using the kubectl cordon command if you wish. The logs will be streamed to the console as the pods are moved across.
Once complete, I can verify that my pods are now running on my other node called aks-agentpool-39678053-vmss00000b.
kubectl get pods -o wide
When you are finished with the troubleshooting or maintenance work on the node, you can use kubectl uncordon to make it available for scheduling pods again. Without doing this, you will see SchedulingDisabled under the status of the node, meaning no pods can be placed on it.
kubectl get nodes -o wide
kubectl uncordon aks-agentpool-39678053-vmss00000aThe status now shows as Ready:

I can now drain the pods from node aks-agentpool-39678053-vmss00000b if required, and they will safely be scheduled back on aks-agentpool-39678053-vmss00000a.
Error ‘Cannot evict pod as it would violate the pod’s disruption budget’
When using the kubectl drain command, you may notice an error:
Cannot evict pod as it would violate the pod’s disruption budget.
A PodDisruptionBudget is a Kubernetes resource that limits how many replicas of an application can be down at the same time due to voluntary disruptions such as drains, rolling updates, or planned maintenance. The Kubernetes documentation describes it as:
As an application owner, you can create a PodDisruptionBudget (PDB) for each application. A PDB limits the number of Pods of a replicated application that are down simultaneously from voluntary disruptions. For example, a quorum-based application would like to ensure that the number of replicas running is never brought below the number needed for a quorum. A web front end might want to ensure that the number of replicas serving load never falls below a certain percentage of the total.
The Pod disruption budget can be viewed using the following command:
kubectl get poddisruptionbudget -A
They can also be deleted:
kubectl delete poddisruptionbudget <pod name>You will notice that even though the error is shown, retries occur automatically on a configurable timeout. In my case, the pods were moved successfully after a short period, as once the pod came up on the other node. The min available was then 1 (the same as the configured PDB), and it was able to be deleted from the node I was draining.
Also, anything that can be run via kubectl can be run within a Spacelift stack. Spacelift helps you manage the complexities and compliance challenges of using Kubernetes. It brings with it a GitOps flow, so your Kubernetes Deployments are synced with your Kubernetes Stacks, and pull requests show you a preview of what they’re planning to change. It also has an extensive selection of policies, which lets you automate compliance checks and build complex multi-stack workflows. If you want to learn more about Spacelift, create a free account today or book a demo with one of our engineers.
Delete a Single Pod
You can simply delete pods using the kubectl delete pod command:
kubectl delete pod aks-helloworld-two-69ffd498d9-sfg7tThis will cause the scheduler to re-create the pod with a different name.
kubectl get podsIf you want to guarantee that the pod doesn’t end up on the same node, cordon the node first before deleting the pod.
Scale the Number of Pods
Scaling the number of pods on the node up that are running before deleting a pod might be necessary if you need to run a minimum number at all times for application availability purposes.
For example, three pods may be required at all times, so you could scale up to four running pods before deleting one. If your pods are controlled by a StatefulSet, this is not an option. However, if they are controlled by a ReplicaSet or Deployment, you can use the kubectl scale command to achieve this.
To view my current deployments:
kubectl get deploymentsHere I have a deployment with three pods.
kubectl scale deployment aks-helloworld-one --replicas=4Check the number of running pods:
kubectl get pods
I can now delete a pod and then scale back down to three replicas to maintain my requirement of three running pods.
kubectl delete pod aks-helloworld-one-56c7b8d79d-9ffq6kubectl scale deployment aks-helloworld-one --replicas=3Force Pod Deletion
By default, kubectl delete pod performs a graceful deletion: the Pod object is marked as Terminating, the kubelet sends termination signals to the containers, and it waits up to terminationGracePeriodSeconds before force-killing any that remain.
When you add --grace-period=0 --force, kubectl asks the API server to delete the Pod object immediately, skipping the normal graceful termination period. The kubelet on the node may still need a short time to actually stop the containers, and on an unreachable node they can even continue running for a while, but from the API’s point of view the Pod is gone.
This is especially risky for pods that are part of a StatefulSet, which gives each pod a stable identity.
If you force-delete such a pod from the API while it might still be running on the node, the StatefulSet controller can create a replacement pod with the same name on another node. You can end up with two pods with the same identity running at the same time, which can corrupt data or cause split-brain issues for stateful applications.
For that reason, you should only use --grace-period=0 --force as a last resort, when a normal graceful deletion has failed and you fully understand the impact—especially for StatefulSets and other stateful workloads.
kubectl delete pods <pod name> --grace-period=0 --forceIf the pod is stuck in the unknown state, run this command to remove it from the cluster:
kubectl patch pod <pod name> -p '{"metadata":{"finalizers":null}}'Delete Completed Pods
Completed pods are pods that have a status of Succeeded or Failed. To delete this kind of pods you would first need to identify them:
kubectl get pods --namespace <namespace_name> --field-selector=status.phase=Succeeded,status.phase=FailedThis will show all the pods that have a status of Succeeded or Failed in a specific namespace. If you want to view the pods in all the namespaces, you can modify the above command to:
kubectl get pods --all-namespaces --field-selector=status.phase=Succeeded,status.phase=FailedTo delete the completed pods in a particular namespace, you can run:
kubectl delete pods --namespace <namespace_name> --field-selector=status.phase=Succeeded,status.phase=FailedSimilarly, to delete the completed pods in all of the namespaces you can use:
kubectl delete pods --all-namespaces --field-selector=status.phase=Succeeded,status.phase=FailedWhen you are deleting in bulk, you should proceed with caution. Before running the actual command, add the --dry-run=client flag and an output format (-o yaml or -o json) so you can see what would be deleted without making any changes.
Key Points
Pods can be deleted simply using the kubectl delete pod command. However, the challenge is usually to maintain application uptime and avoid service disruption. To do this, you can use the kubectl drain command to gracefully bring pods up on another node before they are deleted. You should also consider the pod disruption budget configuration to avoid errors and consider scaling the number of pods appropriately before deleting them.
Cheers!
The most Flexible CI/CD Automation Tool
Spacelift is an alternative to using homegrown solutions on top of a generic CI. It helps overcome common state management issues and adds several must-have capabilities for infrastructure management.
