
In a world where applications are updated several times a day, software teams cannot rely on manual builds and deployment methods. But it is challenging to deliver faster releases safely. Jenkins Pipeline solves the problem by enabling automation of every step of software deployment.
Imagine a development team that pushes code updates several times in a single day. Without a proper automation system, they spend hours setting up the builds and deploying changes manually. Mistakes occur because each developer may approach the process slightly differently. With Jenkins Pipeline, this entire flow becomes automated and consistent.
Jenkins itself is an open source automation server. It is widely used for continuous integration and continuous delivery. The pipeline feature inside Jenkins enables the definition of build and deployment workflows as code. We can store this code in a version control system like Git and use it across environments.
In this guide, we will explore Jenkins Pipeline in detail. We will start by learning:
- What is Jenkins Pipeline?
- Why use Jenkins Pipeline?
- How Jenkins Pipeline works
- Types of Jenkins pipeline
- Jenkins Pipeline tutorial
- Tips for testing and debugging pipelines
- Use cases of Jenkins Pipeline
- What is a multibranch pipeline?
By the end of this guide, you will know exactly how to create and run pipelines in Jenkins.
What is Jenkins Pipeline?
Jenkins Pipeline is a scripted or declarative process that automates the steps required to build, test, and deploy code within Jenkins. It defines these steps in a version-controlled file, typically named Jenkinsfile, which is stored alongside the application’s source code.
Teams gain a clear history of changes and can easily review them. The pipeline becomes a living document of how the system ships software.
Key components of a Jenkins pipeline include:
- Pipeline script: It is the core program that controls the workflow. It tells Jenkins which agents to use, which stages to run, and which actions to perform before or after a run.
- Stage: A stage is a significant section of the workflow. One stage may compile the source code. Another stage may test suites. A later stage may perform deployment to an environment.
- Step: A step is a single action inside a stage. One step may run a shell command. Another step may call a build tool. A final step may be to publish an artifact or a report.
- Node or agent: A node is a machine that executes pipeline work. It can be a physical machine, a virtual machine, or a container pod. Jenkins schedules steps on these machines based on labels and availability.
- Jenkins File: It is the text file that stores the pipeline script. We keep it in version control with the application code. Jenkins loads it and runs the workflow exactly as written.
Why use Jenkins Pipeline?
Before we start building a pipeline, it’s important to understand why teams rely on it instead of older freestyle jobs in Jenkins. Pipeline provides a structured, automated approach to continuous software delivery. It helps to reduce manual errors and create a consistent process that both development and operations teams can trust.
The primary reasons for using Jenkins Pipeline are as follows:
- Code-based configuration – Pipelines are stored in Jenkins files that reside in version control systems, such as Git. This means every pipeline change is tracked just like code, enabling review and rollback at any time to reproduce workflows across environments.
- Flexibility to define complex workflows – A pipeline can describe very complex tasks and parallel builds with conditional steps. It explains different integration setups with external systems and provides complete control over the build and delivery process.
- Improved visibility and error handling – Jenkins Pipeline show every stage of execution in the Jenkins interface. If a step fails, we know exactly where and why. We can add post actions to notify teams or handle errors gracefully.
- Support for parallel execution and scalability – Pipelines can run multiple stages simultaneously. One stage may execute unit tests while another stage executes integration tests. Running them in parallel shortens the overall build time and gives faster results to the team. This approach keeps feedback quick and enables the workflow to scale smoothly, even as projects and teams grow larger.
What is the difference between using Jenkins Pipeline and freestyle projects?
Freestyle projects are simpler and configured through the Jenkins web UI. They work well for basic tasks, such as single-step builds or running scripts, but lack support for advanced flow control and integration with infrastructure-as-code practices.
Pipelines are better suited for teams that need flexibility, code-based workflows, and long-term maintainability, while freestyle jobs are faster to set up but limited in capability.
| Feature | Freestyle jobs | Jenkins Pipeline |
| Configuration method | Set through the Jenkins web interface | Defined in a Jenkins file as code |
| Version control | Not stored in source repositories | Stored alongside project code in Git |
| Reproducibility | Hard to reproduce across environments | The same Jenkins file runs consistently everywhere |
| Complex workflows | Limited chaining of jobs | Supports multiple stages, conditions, and loops |
| Parallel execution | Not supported | Built-in support for running stages concurrently |
| Collaboration | Manual updates by individuals | Changes tracked, reviewed, and shared as code |
| Scalability | Difficult to manage for large projects | Scales well with microservices and big teams |
How Jenkins Pipeline works
Pipelines in Jenkins work by using a file called a Jenkinsfile. This file contains the full definition of the workflow.
Instead of creating jobs manually in the Jenkins interface, you can define every action as code. Jenkins reads this file and executes the instructions one step at a time. This design makes pipelines consistent across environments and easier to maintain for long-term projects.
The role of a Jenkinsfile in pipeline execution
A Jenkinsfile uses a clear, structured syntax. It begins with the pipeline block, which serves as the root of the configuration. Within this block, you declare the agents the job should run on, the stages of the build, validations, and other steps.
You can also define post actions to specify what happens after the pipeline finishes. Because the Jenkinsfile is stored in the repository, it evolves alongside the source code, keeping development and delivery aligned.
Pipeline structure example
The overall structure of a pipeline is simple – at the top level, you declare which agent will run the pipeline. Then you define a sequence of stages, each of which contains steps. These steps perform individual tasks such as building the project or running CLI commands.
To try this out, create a file named Jenkinsfile in your repository and paste the following example:
pipeline {
    agent any

    stages {
        stage('Build') {
            steps {
                echo "Compiling source code..."
                bat 'echo Simulating build on Windows'
            }
        }

        stage('Test') {
            steps {
                echo "Running test cases..."
                bat 'echo Simulating tests on Windows'
            }
        }

        stage('Deploy') {
            steps {
                echo "Deploying application..."
                bat 'echo Simulating deployment step'
            }
        }
    }

    post {
        always {
            echo "Pipeline execution completed."
        }
    }
}
Save this Jenkinsfile in your project folder, commit it to Git, and configure Jenkins to pull the repository. When you trigger the pipeline job, Jenkins detects the file and runs each stage sequentially.
On a Windows system, the bat commands run in the local shell, making it easy to follow along with this test.
The key to understanding a Jenkinsfile lies in the directives it uses. To make this more straightforward, let’s break down these directives further:
- agent: This defines where the pipeline or a specific stage should run. This could be any machine with a matching label or a container. On your Windows setup, using agent any allows Jenkins to pick the default available executor.
- stages: These represent the main parts of the pipeline. Each stage is a logical milestone, such as build, test, or deploy. Jenkins also shows stage progress visually in the UI, making pipeline troubleshooting easier.
- steps: These are the actual commands or tasks that Jenkins executes. For example, running a batch command, executing a script, or calling a build tool like Maven. Without steps, a stage has no actions to perform.
- post: This defines additional actions that run after the main stages. The post conditions can be set to run always, only on success, or only on failure. This is useful for validations and sending notifications, or cleaning up environments.
Using these directives, you can create a comprehensive delivery pipeline that encompasses all tasks, from source code to deployment. Each directive has a clear purpose, and together they create a system that is easy to read, reliable, and adaptable to new requirements.
Once you understand this structure, you can create multiple such pipelines and extend your Jenkinsfile with more advanced features, such as parallel execution, environment variables, or shared libraries.
Types of Jenkins Pipeline
Jenkins supports two main types of pipelines: Declarative and Scripted.
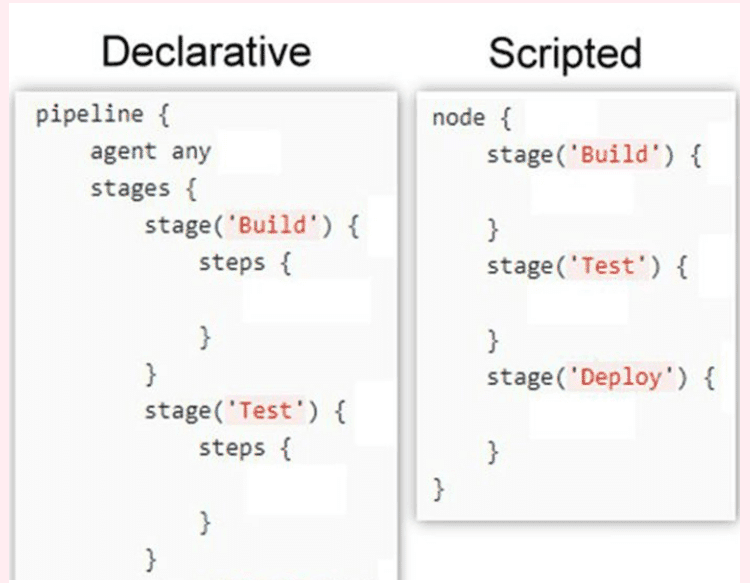
Declarative Pipeline uses a structured, opinionated syntax that simplifies pipeline creation. The pipeline is defined with specific blocks like agent, stages, and steps, making it easier to read, validate, and maintain. This model aligns with most standard CI/CD workflows and encourages best practices through convention and syntax validation.
Declarative Pipeline is recommended for beginners and teams that want to standardize their continuous integration flows. It provides options such as environment blocks, parallel execution, and error handling in a very readable manner.
On the other hand, Scripted Pipeline uses the Groovy scripting language. It offers more flexibility and power. Scripted Pipeline enables complex programming logic, loops, and dynamic behavior. It is helpful for advanced scenarios where declarative syntax cannot express the workflow.
Scripted Pipeline can handle unusual deployment flows or advanced integrations, but it is harder to read and maintain. Teams should use Scripted Pipeline only when they require the extra power. In most projects, Declarative Pipeline is sufficient.
Advanced features of Jenkins Pipeline
Jenkins Pipeline offers more than basic build-and-deploy flows. It provides advanced features that improve speed, reuse, and maintainability:
- Parallel execution – Multiple stages can run concurrently (for example, unit and integration tests), shortening build times and providing developers with faster feedback.
- Environment variables and credentials – Pipelines can use environment variables for configuration and securely reference sensitive data via Jenkins credentials, injecting them only when needed.
- Shared libraries – Common pipeline logic can be stored in shared libraries and reused across projects, reducing duplication and making updates easier to apply consistently.
- Post-build actions – After core stages complete, pipelines can trigger additional steps, such as sending Slack notifications or archiving artifacts, to enhance visibility without requiring manual checks.
Jenkins Pipeline tutorial
Before we start building our own pipeline, it is important to understand how the setup process works. A pipeline involves more than writing a script. We need to prepare Jenkins and ensure the appropriate plugins are in place.
In this section, we will walk through everything that needs to be done before writing our first Jenkinsfile. You can install Jenkins on Windows by downloading the installer from the official site. Once installed, start Jenkins as a service and open it in your browser at http://localhost:8080.
Pre requisites
- Jenkins offers two pipeline syntaxes:
- Scripted Pipeline – requires basic knowledge of Groovy.
- Declarative Pipeline – uses a syntax similar to YAML, which is generally easier to learn.
- Ensure Jenkins is properly installed before working with pipelines: Jenkins can run as a Windows service, a Docker container, or inside a Kubernetes cluster. For a simple local setup on a Windows laptop, install Jenkins as a standalone Windows service.
- Install the required plugins in advance to avoid errors later:
- At a minimum, install the Pipeline plugin to enable Jenkinsfile syntax and pipeline execution.
- If you plan to store your Jenkinsfile in GitHub or GitLab, also install the Git plugin.
- Depending on your workflow, consider plugins for tools like Docker or Kubernetes.
- To install plugins in Jenkins: Navigate to Manage Jenkins → Plugins → Available plugins. Search for each required plugin and click Install.
Step 1: Create a Jenkins Pipeline
The first step in working with Jenkins Pipeline is to create a new pipeline job in the Jenkins dashboard. This is where Jenkins will run the pipeline definition and show us the execution results.
We start by logging into our Jenkins instance. Open your browser and go to http://localhost:8080 (or the NodePort URL if you are running on Kubernetes). Once logged in, the Jenkins dashboard appears, where we can manage jobs and system settings.
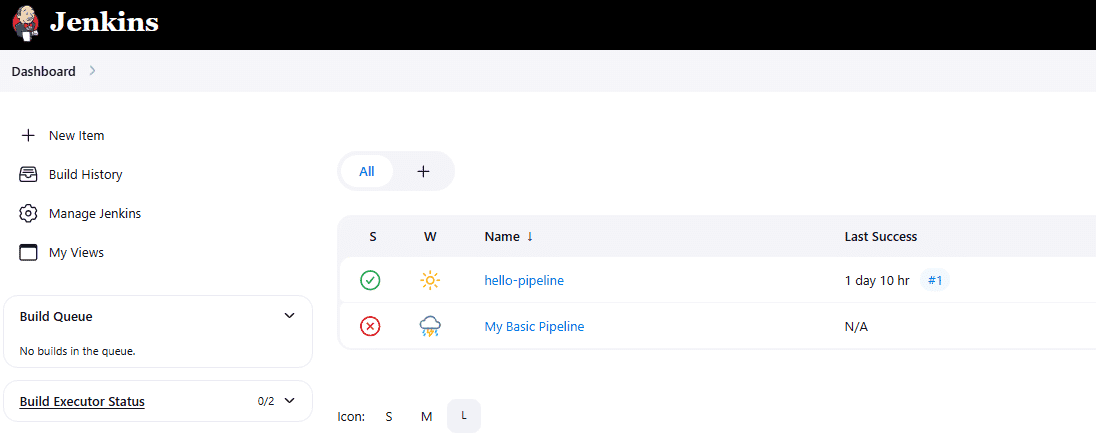
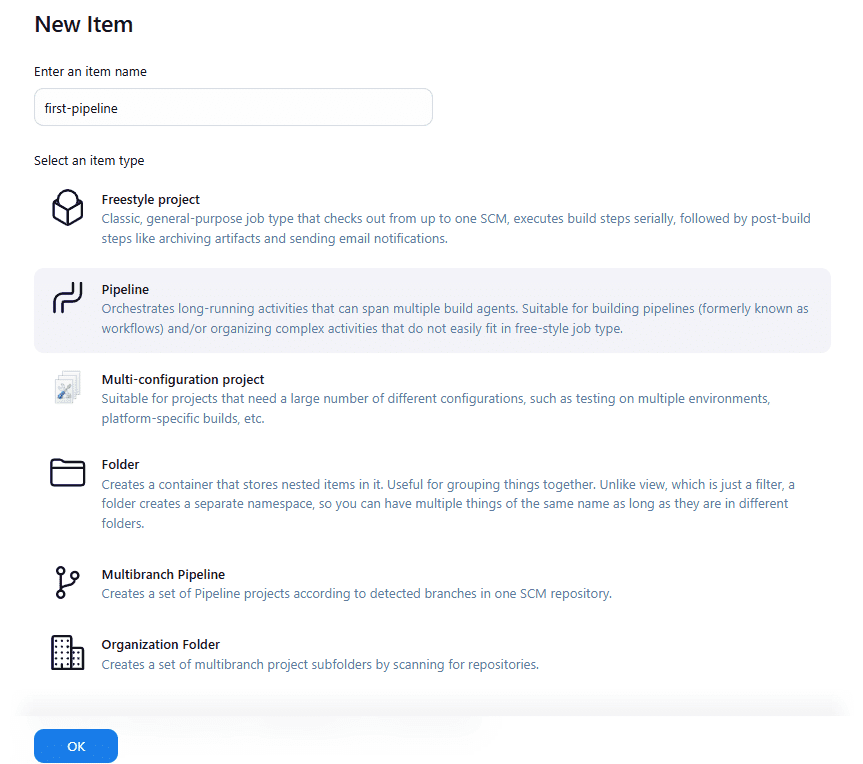
On the left-hand side of the dashboard, click on New Item. This will take us to a page where we define the name and type of the job we want to create. In the text box, enter a name such as first-pipeline. Below the name field, we see different job types.
Select Pipeline as the job type. This will enable the definition of stages and steps using a Jenkinsfile. Once selected, click the OK button at the bottom of the page.
Jenkins now takes us to the configuration page of the new pipeline job. Scroll down to the section titled Pipeline. This is where we define the instructions that Jenkins will execute. In the Definition drop-down, select Pipeline script.
This option allows us to paste pipeline code directly into Jenkins, rather than retrieving it from a repository. In the script text box, we add the following code:
pipeline {
    agent any

    stages {
        stage('Build') {
            steps {
                echo "Starting build process..."
                bat 'echo Compiling project on Windows'
            }
        }

        stage('Test') {
            steps {
                echo "Running test cases..."
                bat 'echo Executing unit tests'
            }
        }

        stage('Deploy') {
            steps {
                echo "Deploying application..."
                bat 'echo Deployment simulated successfully'
            }
        }
    }

    post {
        always {
            echo "Pipeline has finished execution."
        }
    }
}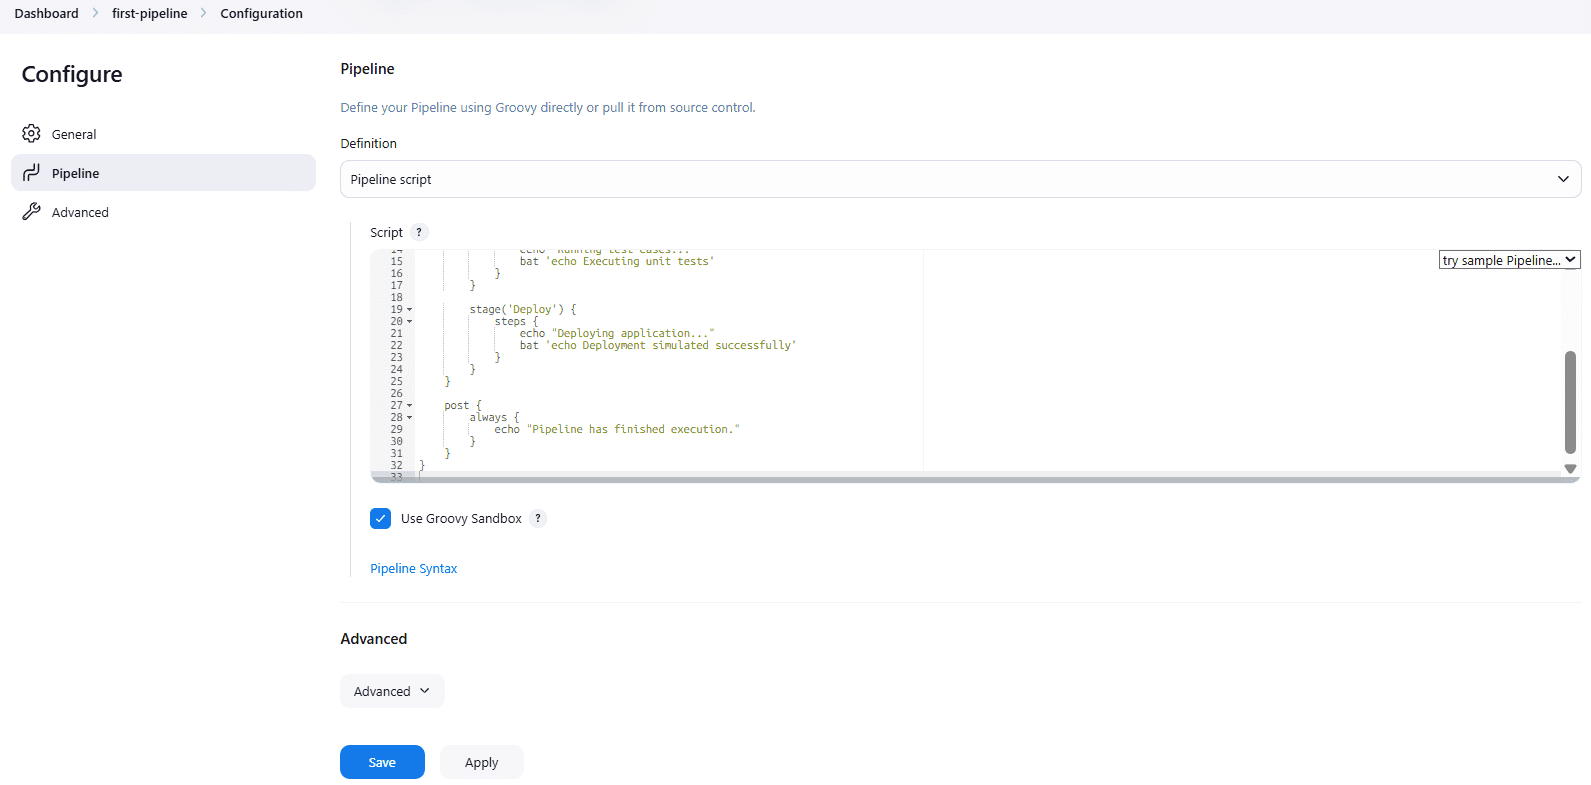
This script describes a simple pipeline with three stages: Build, Test, and Deploy. Each stage contains steps that use the echo command to print messages and the bat command to simulate Windows commands. The post block ensures that a final message is printed once the pipeline has completed, regardless of whether the operation was successful or not.
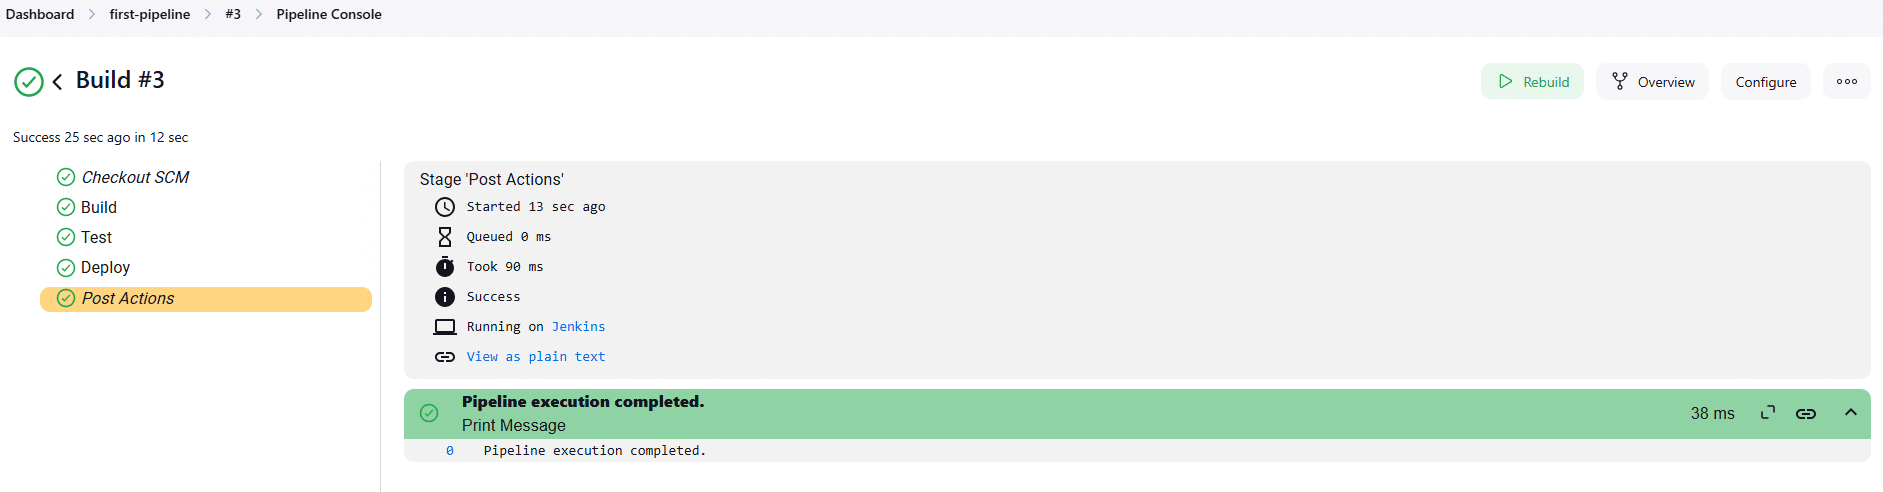
After pasting the script, click Save to store the job configuration. On the job page, click Build Now from the left menu. A new build number will appear in the Build History section.
Click on the build number, and then select Console Output to see the logs. You will notice that Jenkins executes the Build stage, followed by the Test stage, and then the Deploy stage.
Each echo and bat line produces output, and the final line indicates Pipeline has finished execution.
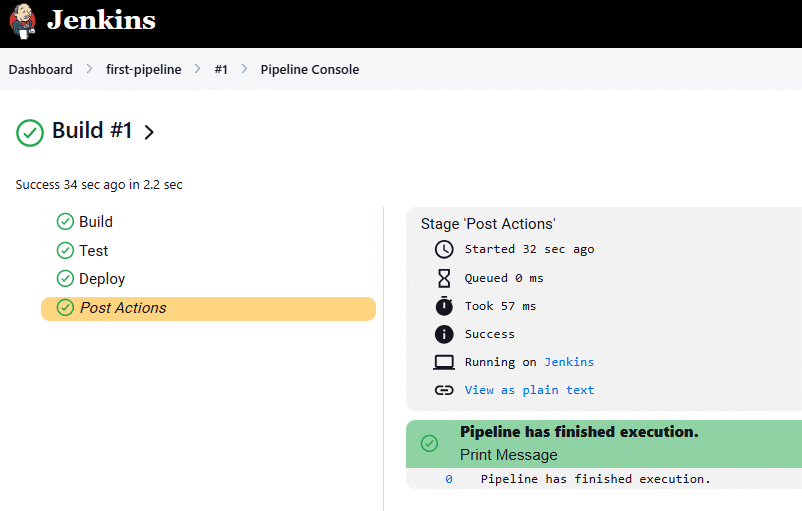
The outcome of this step is a working Jenkins Pipeline that runs directly inside your Jenkins server. Although the commands are straightforward, they illustrate the complete pipeline process, encompassing definition, saving, execution, and review.
This prepares us for the next step, where we will connect Jenkins to a source control system so that it can read the Jenkinsfile directly from a repository.
Step 2: Choose Pipeline source
Now that the pipeline job is created, the next step is to instruct Jenkins where to source the pipeline definition. We can either paste the script directly into Jenkins or point it to a source code repository.
In most real-world projects, the pipeline is stored in Git alongside the application code. This makes it version-controlled and easier to maintain.
First, configure the Git Tool from Dashboard > Manage Jenkins > Tools and provide the correct path to the Git executable file as per your system.

Next, from the Jenkins dashboard, open the job you created in Step 1 and click Configure. Scroll down to the Pipeline section. Under “Definition,” select “Pipeline script” from SCM. Then choose Git from the SCM drop-down.
In the Repository URL field, paste the URL of your GitHub repository. Next, set the Branch Specifier to the branch where your Jenkinsfile is stored. If you committed it to the main branch, enter “*/main”. Leave the Script Path as Jenkinsfile if the file is located in the repository’s root directory. If you stored it in a subfolder, provide that folder path. Once this is done, click Save.
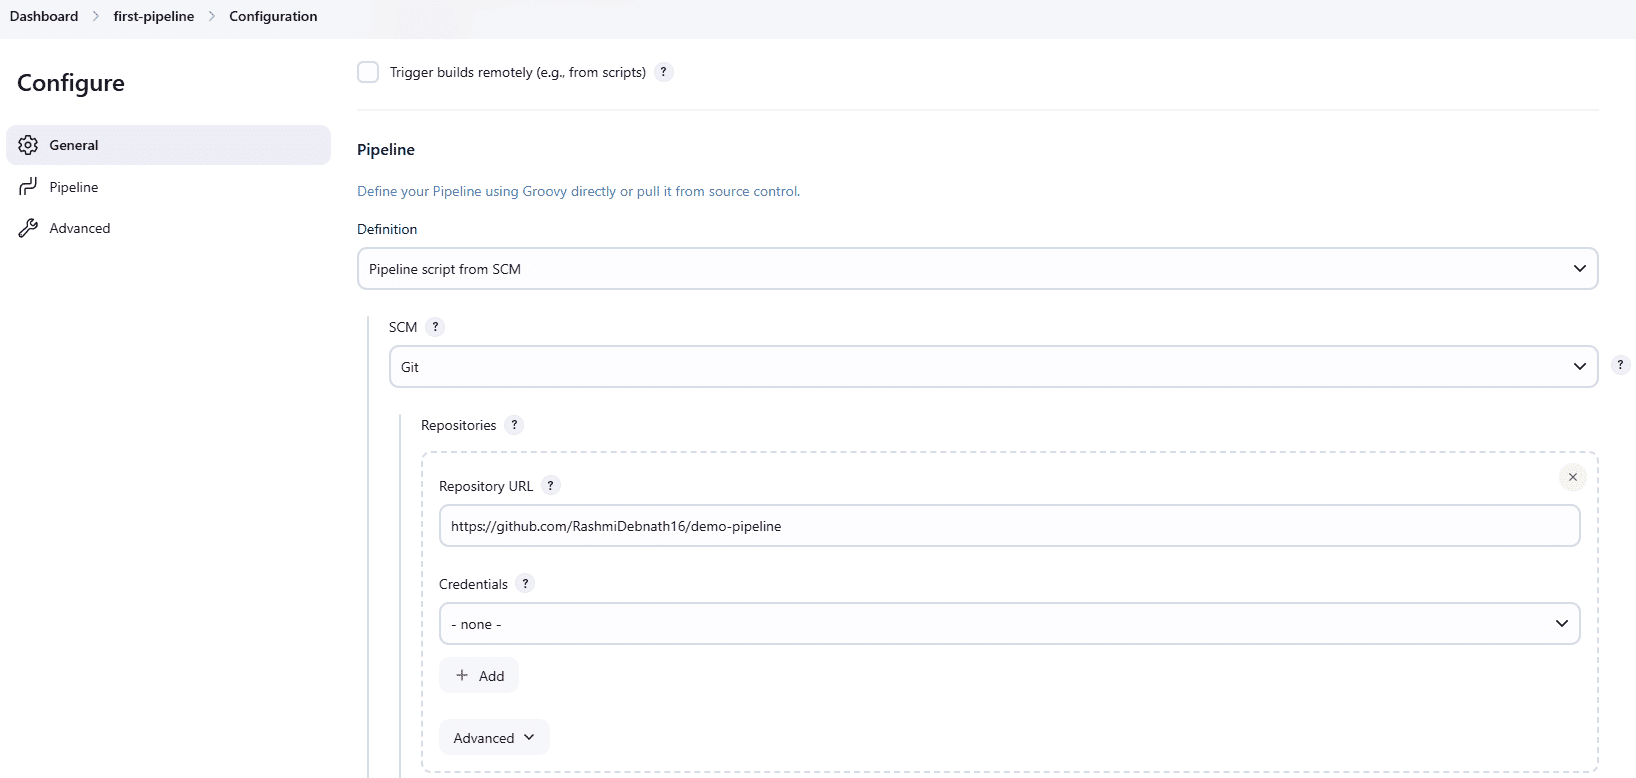
At this point, Jenkins knows where to fetch the pipeline script from. The outcome of this step is that every build will now pull the Jenkinsfile from Git and execute it, making the job reproducible across environments.
Step 3: Write a basic Jenkinsfile
With the pipeline source configured, we need to provide the Jenkinsfile that defines the workflow. The Jenkinsfile is simply a text file residing in your repository that describes the stages Jenkins will execute.
For this example, we will create a straightforward pipeline with three stages: Build, Test, and Deploy.
Open your project folder on your Windows machine. Create a new file named Jenkinsfile (no extension). Paste the following content into it:
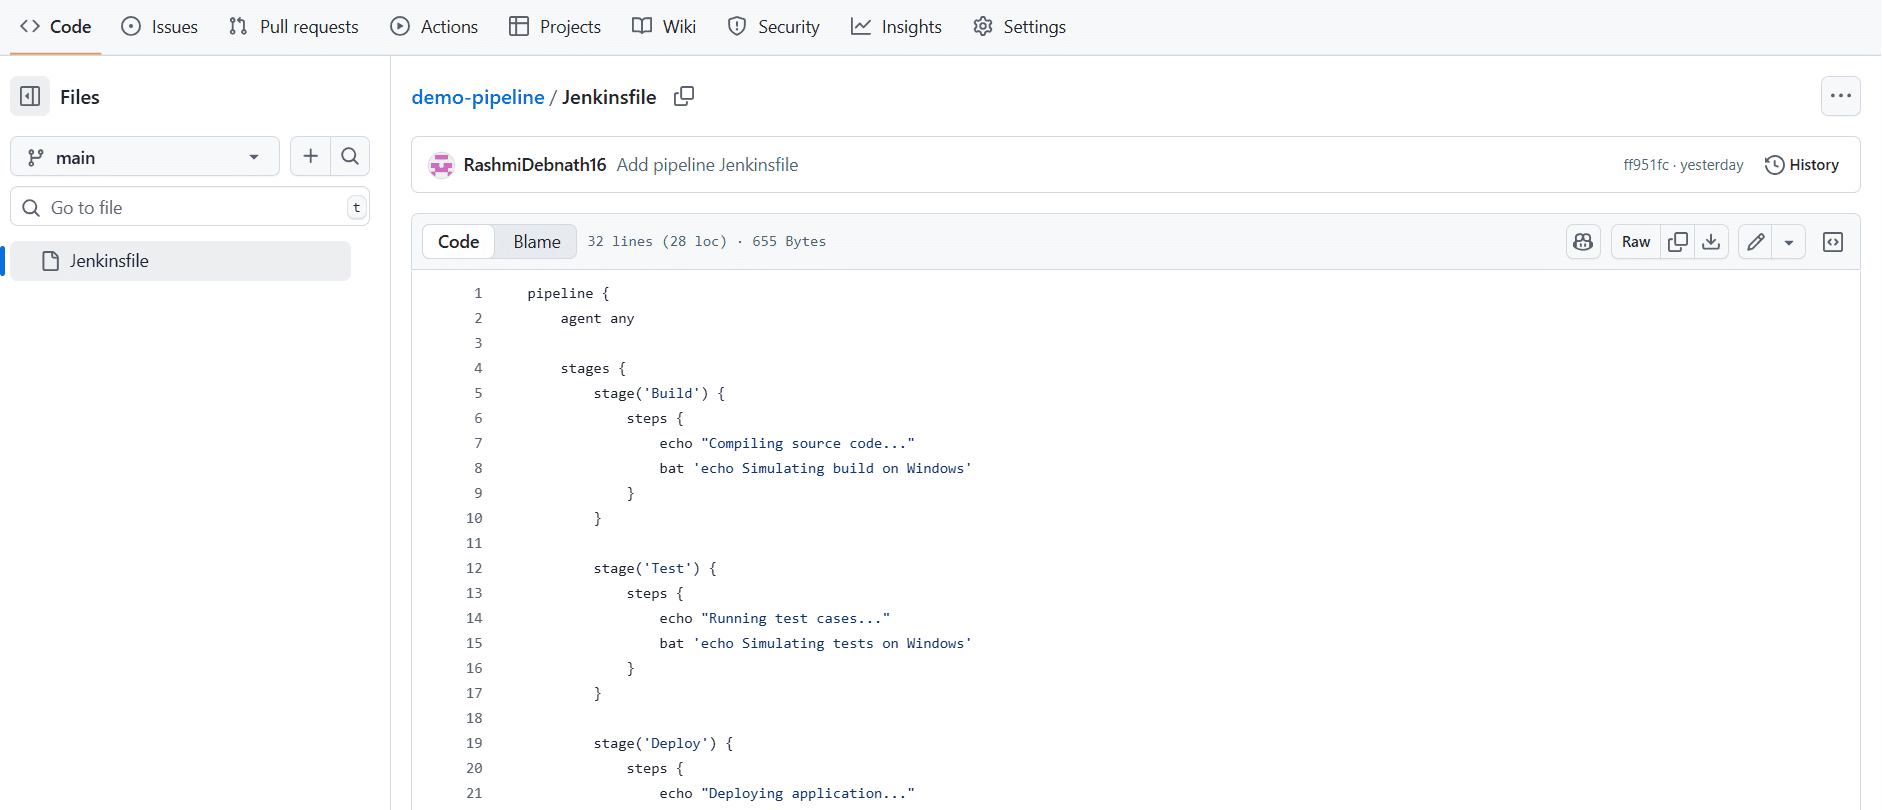
Save this file, add it to Git, and push it to your repository. Once done, the Jenkinsfile becomes part of your project and will be available whenever Jenkins pulls the repository.
The outcome of this step is that you now have a working pipeline definition stored in version control. The Jenkinsfile clearly demonstrates how stages and steps work, and it can be easily extended later with real build and test commands.
Step 4: Configure the Pipeline in Jenkins
Now that the Jenkinsfile is ready and has been pushed to the repository, we return to Jenkins and ensure the job points to it correctly. Open your pipeline job and click Configure again. Scroll to the Pipeline section, confirm the following, and click Save.
- The definition is set to the Pipeline script from SCM
- SCM is set to Git
- The Repository URL is your GitHub repository
- Branch Specifier is set to
*/main - Script Path is
Jenkinsfile
Once saved, click Build Now from the left-hand menu of the job. Jenkins will fetch the repository, detect the Jenkinsfile, and execute the pipeline. You can watch the logs by clicking the build number in the history and opening Console Output.
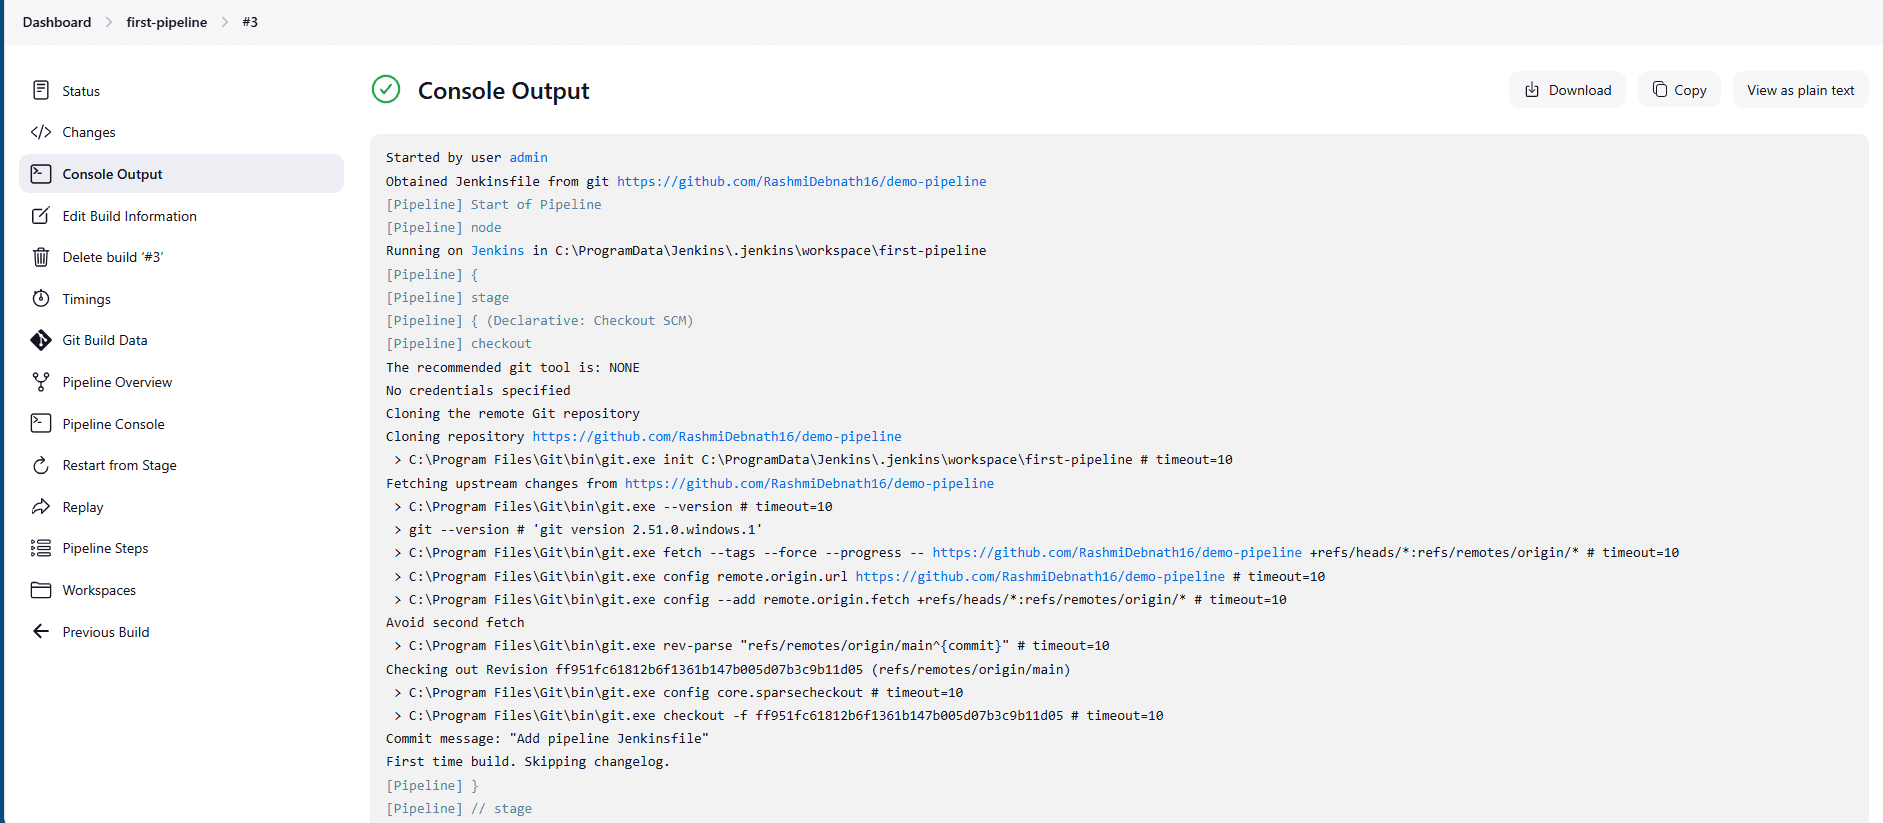
You should see each stage — Build, Test, and Deploy — run in sequence with the echo messages printed. The final line will confirm that the pipeline finished execution.
The outcome of this step is a fully working pipeline job that fetches its definition from Git. Every time you change the Jenkinsfile and push to the repository, Jenkins will use the updated version, creating a smooth connection between code and automation.
Tips for testing and debugging Jenkins Pipeline
The tips below will help you test Jenkins Pipeline, debug Jenkinsfile issues, and stabilize your builds.
Git tool not configured
Jenkins needs to know the path to Git on Windows. If Git is installed but Jenkins cannot find it, you must set the Git executable path.
Go to Manage Jenkins and open the Tools section to check your Git installations. There, provide the full path to the Git executable on your system.
Wrong repository or branch
If Jenkins cannot fetch the Jenkinsfile, double-check the repository URL and branch name. Many users forget that GitHub switched the default branch from master to main.
Always confirm in GitHub which branch contains your Jenkinsfile and use that exact name in the pipeline job.
Pipeline stuck waiting for agent
Sometimes Jenkins shows a message like “Still waiting to schedule task.” This happens when no agent is available or the node is offline.
Ensure the built-in agent is enabled in Manage Jenkins. You can check the Nodes and Clouds configuration for the node where the job is supposed to run.
Jenkinsfile not found in repository
The pipeline might fail with an error stating that it cannot locate the Jenkinsfile. In this case, verify the Script Path setting.
By default, Jenkins looks for a file named Jenkinsfile in the root of the repository. If yours is inside a folder, update the path in the job configuration to match the folder’s location.
Pipeline syntax errors
If the build fails immediately, your Jenkinsfile may have a syntax error, such as a missing bracket or an incorrect directive.
Jenkins provides a Pipeline Syntax helper in the dashboard where you can test pipeline snippets. Use that tool to generate correct code blocks and then paste them into your Jenkinsfile.
Use cases of Jenkins Pipeline
Jenkins Pipeline goes beyond simply defining builds in code. Development teams rely on it to automate software delivery, enforce consistency across environments, and keep every step versioned and traceable.
- Continuous integration – Pipeline automatically triggers on every code change pushed to a version control system like GitHub. It compiles the code, runs unit tests, and provides fast feedback, helping teams catch bugs early instead of letting issues accumulate after multiple commits.
- Continuous deployment – Pipeline can promote applications to staging or production environments as soon as builds pass their tests. This makes manual deployments unnecessary, delivers consistent releases across environments, reduces human error, and accelerates the overall delivery cycle.
- Scheduled tasks – Teams can schedule automated jobs such as nightly builds or weekly reports. For example, a nightly job can compile the project and generate coverage reports. These recurring tasks provide up-to-date insights, run automatically, and help identify performance problems or build failures before users are affected.
- Multi-branch pipelines – Pipeline can automatically detect and handle each branch in repositories that use feature branches or microservices. Jenkins creates a dedicated pipeline per branch, ensuring that builds and tests run in isolation. This allows developers to validate changes on their own branches before merging them into the main branch.
What is a multibranch Pipeline in Jenkins?
A Multibranch Pipeline in Jenkins is a job type that automatically creates and manages Pipelines for every branch in a repository.
Instead of manually setting up jobs for main, develop, and each feature branch, Jenkins:
- Scans your source control for branches
- Looks for a
Jenkinsfilein each branch - Creates a separate Pipeline job per branch
- Keeps separate build history and logs for each one
At its core, a Multibranch Pipeline is built on top of the standard Jenkins Pipeline concept. Jenkins Pipeline represents a single CI/CD workflow defined as code, typically using a Declarative or Scripted Jenkinsfile. This workflow describes all steps required to build, test, and deliver software.
Whereas a standard Pipeline is tied to one job and usually one branch, a Multibranch Pipeline acts as an orchestrator, automatically creating and updating multiple Pipeline jobs — one per branch or pull request.
Why use Spacelift for your IaC?
When it comes to infrastructure orchestration, generic CI/CD platforms such as Jenkins or CircleCI are not specialized enough to manage everything you might need in your workflows. That’s where Spacelift shines.
Spacelift is an IaC management platform that helps you implement DevOps best practices. It provides a dependable CI/CD layer for infrastructure tools, including OpenTofu, Terraform, Pulumi, Kubernetes, Ansible, and more, letting you automate your IaC delivery workflows.
Spacelift is designed for your whole team. Everyone works in the same space, supported by robust policies that enforce access controls, security guardrails, and compliance standards. This means you can manage your DevOps infrastructure far more efficiently without compromising on safety.
| Spacelift | Jenkins | |
| SaaS | ✅Yes | ❌No |
| Configuration process | ✅The SaaS version requires almost no configuration; the self-hosted version is easy to configure | ⚠️Requires manual setup and configuration, which can be complex |
| Maintenance | ✅No maintenance is required for SaaS; you are in charge of updates for self-hosted | ❌Requires regular maintenance |
| Ease of use | ✅Easy to use – you don’t need to learn a new language | ❌Can be hard to use – you need to learn Groovy |
| Dependencies workflows | ✅Yes – works out of the box | ⚠️Requires complex configuration – you need to change your code configuration and pipeline(s) to accommodate a use case like this |
| Drift detection | ✅Yes – works out of the box | ⚠️Yes – not supported natively but can be configured using third-party tools (hard process) |
| Self-service workflows | ✅Yes – works out of the box | ⚠️Requires complex configuration == build dedicated pipelines for self-service that can be hard to maintain |
| Advanced scheduling | ✅Yes – works out of the box | ⚠️Requires complex configuration – dedicated pipelines required |
| Dynamic credentials for AWS, Azure, GCP | ✅Yes – works out of the box | ❌No |
| Policy as code | ✅Yes – works out of the box | ⚠️Yes – you need to implement the policy + the pipeline logic. |
Let’s see how Spacelift avoids the limitations of generic CI/CD tools:
- Policies to control what kind of resources engineers can create, what parameters they can have, how many approvals you need for a run, what kind of task you execute, what happens when a pull request is open, and where to send your notifications
- Stack dependencies to build multi-infrastructure automation workflows with dependencies, having the ability to build a workflow that, for example, generates your EC2 instances using Terraform and combines it with Ansible to configure them
- Self-service infrastructure via Blueprints, enabling your developers to do what matters – developing application code while not sacrificing control
- Creature comforts such as contexts (reusable containers for your environment variables, files, and hooks), and the ability to run arbitrary code
- Drift detection and optional remediation
To learn more about Spacelift, create a free account today or book a demo with one of our engineers.
Wrapping up
You can think of Jenkins Pipeline as an innovative and practical way to automate software delivery. It allows us to define continuous deployment workflows as code andprovide flexibility through configuration visibility, enabling the reproduction of processes using builds.
By learning Pipeline, we can move from manual builds and deployments to a fully automated workflow. With Declarative Pipeline, we get a clear and simple syntax. Scripted Pipeline offers advanced controls. Once configured, Jenkins Pipeline saves time and reduces errors.
This guide explains how to set up Jenkins Pipeline using Git and run builds. It shows use cases with examples to explore their advanced features. By following these steps, we can confidently utilize Jenkins Pipeline in real projects.
Solve your infrastructure challenges
Spacelift is an alternative to using homegrown solutions on top of a generic CI. It helps overcome common state management issues and adds several must-have capabilities for infrastructure management.
Frequently asked questions
What is the difference between Jenkins and GitHub pipeline?
Jenkins is a self-hosted automation server that runs CI/CD pipelines using its own plugins and configuration. It offers extensive flexibility, supports many build tools, and works across diverse environments. GitHub Actions, sometimes referred to as GitHub pipeline, is GitHub’s integrated CI/CD tool that uses YAML workflows triggered by repository events.
How do I pass parameters into Jenkins Pipeline?
To pass parameters into a Jenkins Pipeline, define them at the top of your Jenkinsfile using the parameters block. These appear as input fields in the UI when a build is triggered. You can then reference them with params.<paramName>.
What’s the difference between a Jenkins job and a pipeline?
A Jenkins job is a generic term for any runnable task configured in Jenkins, such as a freestyle project. It typically handles simple, sequential steps through the UI. A pipeline, on the other hand, is a more advanced job type defined in code (usually with a Jenkinsfile) that supports complex workflows, stages, parallelism, and version control integration. Pipelines are more flexible and scalable, especially for modern CI/CD automation.
How do I secure credentials in Jenkins Pipeline?
Use Jenkins Credentials Manager to securely store secrets, such as API keys, SSH keys, or tokens. In pipelines, access them using withCredentials or environment variable bindings. This avoids hardcoding sensitive data directly in scripts.
