
You don’t need to log into every server to manage its services, but many organizations still do.
If you’re building IT infrastructure and managing distributed environments at scale, this practice can quickly create a bottleneck. As your systems grow, so do your risks: Downtime, human error, and inconsistent operations can severely affect business performance and customer experience.
This is where Ansible’s service module becomes a really useful tool in your automation toolkit.
Whether you’re deploying applications, hardening systems, or restarting services in response to configuration changes, the service module allows you to control and manage services remotely, repeatably, and efficiently.
In this article, you’ll learn how to use the Ansible service module to manage services across Linux and Windows environments. We’ll walk through real-world examples, show you how to automate multi-service operations, and explore how this module compares with systemd and other service management tools.
What we’ll cover:
Prerequisites
To follow the examples we’ll cover, configure your basic setup first. This will enable the Ansible service module to run smoothly and ensure you’re ready to test tasks on actual systems.
You’ll need to:
- Ensure that Ansible is installed on your local machine or control node (version 2.9+ is recommended).
- Launch and access a running AWS EC2 instance (Ubuntu).
- Have SSH access to the instance and include its details in your Ansible inventory.
- Understand the basic structure of an Ansible playbook (YAML syntax, tasks, modules).
- If you’re managing Windows services, ensure that WinRM is properly configured.
- Ensure the target machine has the service manager installed (e.g.,
systemd,init, orUpstart) for Linux.
What is the Ansible service module?
The Ansible service module is designed to help you manage system services, allowing you to start, stop, restart, reload, enable, disable, or check the status of services on your target machines.
“Services” in this context refers to binaries managed by the init system of your operating system. For Ubuntu machines, this will be Systemd.
The service module abstracts the complexity of different service management systems, providing consistent functionality across varied environments.
You don’t need to write complex shell scripts. Instead, you tell Ansible what you want your service to look like, and it fulfills the request the same way every time. This saves money by keeping downtime low and optimizing your server resources usage.
Here’s a quick example of the Ansible service module in action:
- name: Make sure Nginx is running
  ansible.builtin.service:
    name: nginx
    state: started
This single task makes sure Nginx stays active.
The Ansible service module works across different industries, projects, and infrastructures, offering consistent behavior whether you’re a managed service provider supporting multiple clients or running an internal DevOps team.
Service module: Windows vs. Linux support
The Ansible service module works well on Linux and Windows, but it behaves differently depending on which platform you’re using and what service manager runs underneath.
Service module on Linux
On Linux systems, the module interfaces with different service management backends, which include Systemd (systemctl), SysV init scripts, Upstart, etc.
Systemd lets you declare complex dependencies through unit files, whereas SysV init relies on the order of scripts and runtime relationships. Systemd also gives you stronger performance monitoring and resource control using cgroups (control groups), which are not supported by older init systems.
The Ansible service module works across both types, giving you consistent automation while still allowing access to advanced features like resource limits where supported.
For example, the following task demonstrates how to restart the Apache service on a Linux system:
- name: Restart Apache on Linux
  ansible.builtin.service:
    name: apache2
    state: restarted
This Ansible playbook uses the Ansible service module to restart the apache2 service, ensuring it’s refreshed without needing a full reboot.
Service module on Windows
For Windows environments, Ansible provides the win_service module, which is specifically designed to manage services on Windows systems.
Unlike the Linux-focused service module, win_service handles Windows-specific parameters like start_mode, dependencies, and service account details, all managed over WinRM.
This task makes sure the Windows print spooler service is up and running.
- name: Start Windows service
  ansible.windows.win_service:
    name: spooler
    state: started
With this playbook, the win_service module switches on the spooler service and keeps it running in the background, so you can print without having to open the Windows settings.
This platform-agnostic approach, where Ansible provides separate modules like service for Linux and win_service for Windows, enables teams to manage hybrid infrastructures seamlessly. This is especially valuable for SaaS vendors and organizations operating across multi-cloud or multi-OS environments.
Core use cases in real-world environments
In production systems, managing services is far more than toggling between start and stop commands.
Organizations operating on platforms like AWS, Microsoft Azure, or within hybrid infrastructures rely heavily on predictable service behavior to meet uptime commitments, service level agreement (SLA) targets, and security compliance standards.
The following are some key real-world use cases where the Ansible service module is essential:
1. Automating web server management in cloud infrastructure
Whether you’re running Apache, Nginx, or Tomcat on EC2 instances or containers, ensuring the service starts automatically on deployment is critical.
Infrastructure as code (IaC) practices commonly use the Ansible service module to start, enable, or restart services after a configuration change.
2. Managing microservices
Many organizations now manage distributed applications made up of microservices running across bare-metal servers or virtual machines.
The Ansible service module is really handy when you need to restart database services like postgresql or mysql during deployments or config changes.
By combining this module with service discovery tools or inventory scripts, operations teams ensure high availability.
3. Supporting managed service providers
Managed Service Providers (MSPs) use Ansible to manage infrastructure consistently across many client environments, even when those environments differ in platform or configuration.
For example, if a client is running services on AWS Managed Services or Azure Stack, Ansible helps MSPs ensure that critical services are always running, correctly configured, and start automatically after reboots.
This consistency reduces manual overhead, simplifies compliance, and ensures predictable service behavior across different customer setups.
4. Ensuring consistent service state across multiple nodes
In environments where configuration drift is a risk, such as large-scale enterprise deployments, the service module is often embedded in compliance playbooks.
These playbooks ensure key services like ssh, rsyslog, or firewalld stay up and running, and are set to come back automatically when the system restarts.
5. Handling service failures during patch management
Security patching is a regular task in any managed services model. After updates are applied, especially to system-level packages or libraries, services must be restarted.
Ansible helps automate this in a controlled sequence, ensuring services like sshd, docker, or monitoring agents come back online in the right order, minimizing downtime and user impact.
How to use the Ansible service module
The Ansible service module uses simple syntax for managing services across your servers. You write playbook tasks that tell it which service to target and what state you want.
The basic syntax is:
- name: Ensure nginx is running
  ansible.builtin.service:
    name: nginx
    state: started
    enabled: true
This example starts the nginx service and enables it to start on boot. The state parameter accepts started, stopped, restarted, or reloaded, while enabled controls autostart behavior. If the system uses systemd, Ansible automatically uses it behind the scenes.
The module remains easy to understand, yet powerful enough to support more complex automation workflows when needed.
Let’s explore the most common service-related actions you’ll perform using this module.
1. Starting a service
One of the first things you’ll likely automate when managing infrastructure is starting services. The Ansible service module makes this easy with a simple, consistent syntax that works across all your systems.
Here’s an example:
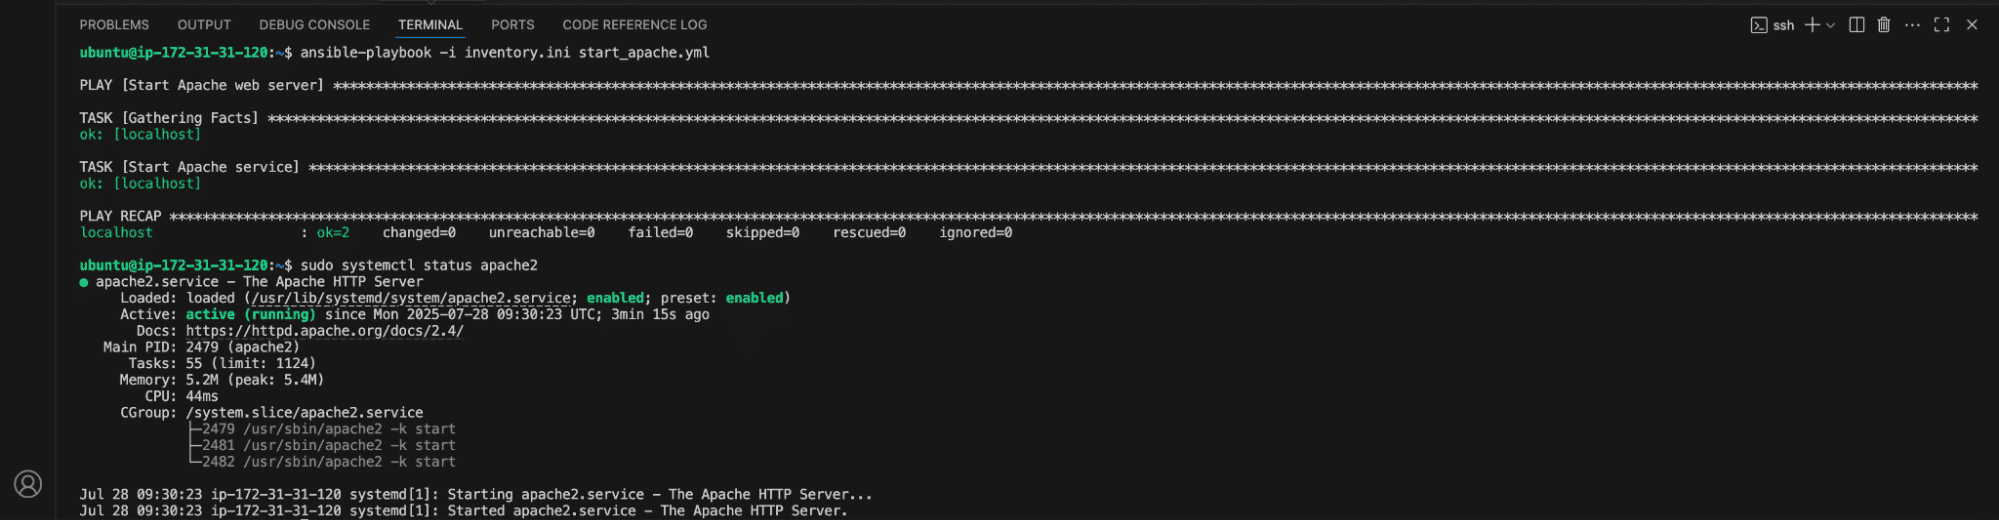
- name: Start Apache web server
  hosts: web_servers
  become: yes
  tasks:
    - name: Start Apache service
      ansible.builtin.service:
        name: apache2
        state: started
This simple playbook starts the Apache web server on your target hosts. The state: started tells Ansible to make sure Apache is running. If Apache is already running, Ansible won’t make any changes; it only acts when needed.
This result appears once the playbook runs:
2. Stopping a service
Shutting down services requires careful handling so you don’t lose data or disrupt your system. The service module provides a controlled emergency that acknowledges which services rely on others and helps you shut things down cleanly.
Below is an example:
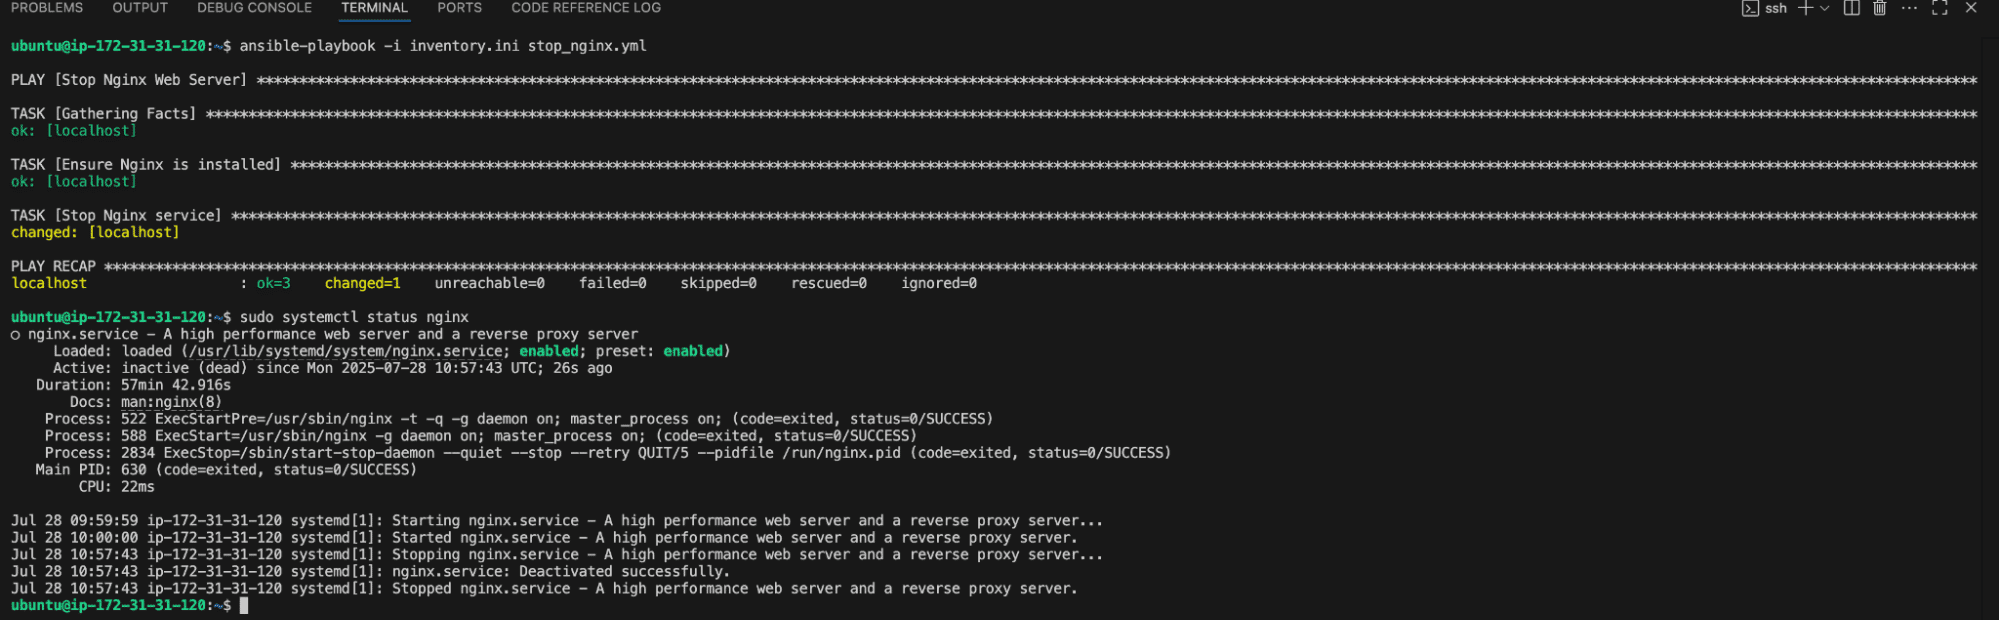
- name: Stop web server
  hosts: web_servers
  become: yes
  tasks:
    - name: Stop Nginx service
      ansible.builtin.service:
        name: nginx
        state: stopped
The example above shows how to stop a service.
Ansible will shut down Nginx properly, allowing it to finish handling any current requests before stopping completely.
The following output will be generated when the playbook is executed:
3. Restarting a service
When you restart services, they are stopped and fired back up in order, keeping downtime short while you modify the configs.
The service module handles restarts smartly and does only what is required, based on whatever’s happening with the service at the time.
For example:
- name: Restart web server
  hosts: web_servers
  become: yes
  tasks:

    - name: Restart Apache after config change
      ansible.builtin.service:
        name: apache2
        state: restarted
The following output will be generated when the playbook is executed:

4. Restarting multiple services in a loop
Applications with lots of moving parts need their services restarted in the correct sequence.
The Ansible service module handles mass restarts with loops that track which services rely on others and keep the sequence straight.
- name: Restart multiple services
  hosts: app_servers
  become: yes
  tasks:
    - name: Restart application services
      ansible.builtin.service:
        name: "{{ item }}"
        state: restarted
      loop:
        - redis
        - postgresql
        - myapp
Looping helps when you need to manage several services at once. This example restarts three services, one after another.
In cloud environments where scalability matters, looping over services improves automation and keeps playbooks clean. This is particularly useful in application service providers or when working with SaaS vendors.
The following output will be generated when the playbook is executed:

5. Starting services on boot/reboot
In many production environments, critical services should start automatically after a system reboot. You can achieve this using the enabled: yes option in the Ansible service module.
This ensures the service is tied to system initialization and comes online immediately when the system boots without requiring manual intervention.
Here’s an example:
- name: Enable service to start on boot
  hosts: production_servers
  become: yes
  tasks:
    - name: Make sure Nginx starts automatically
      ansible.builtin.service:
        name: nginx
        enabled: yes
        state: started
The enabled: yes command tells the system to start Nginx automatically when the server boots up.
The state: started command tells the system to start it right now, if it’s not already running.
The enabled parameter guarantees that the service remains in place through reboots. This is vital in environments managed via the AWS managed service or where consistent uptime is required for uninterrupted operations.
This result appears once the playbook runs:

6. Enabling and disabling a service
Ensuring critical applications remain available after a system reboot requires enabling their services to start automatically on boot.
The Ansible service module has a boot enablement feature that can be integrated into system initialization processes and keeps the service available, despite the system reboot.
For instance:
- name: Enable and disable services
  hosts: localhost
  become: yes
  tasks:
    - name: Gather available services on the host
      ansible.builtin.service_facts:

    - name: Enable production services
      ansible.builtin.service:
        name: "{{ item }}"
        enabled: yes
        state: started
      loop:
        - nginx
        - postgresql

    - name: Disable unnecessary services
      ansible.builtin.service:
        name: "{{ item }}"
        enabled: no
        state: stopped
      loop:
        - cups
        - bluetooth
      when: item + '.service' in ansible_facts.services
The playbook above is an example of how to turn on the services you need and turn off the ones that you do not.
The enabled: yes command makes services start automatically on boot, while the enabled: no command prevents them from starting automatically.
This is useful when onboarding new software stacks and avoiding conflicts during project migration or platform upgrades.
The following output will be generated when the playbook is executed:

7. Checking a service status
Monitoring services gives you a precise picture of what is happening within your systems.
The service module draws facts from the system via Ansible’s fact-gathering capabilities and allows you to make properly informed decisions about your configuration.
Let’s see this in action:
- name: Check service status
  hosts: all
  become: yes
  tasks:
    - name: Get service information
      ansible.builtin.service_facts:

    - name: Show Nginx status
      debug:
        msg: "Nginx is {{ ansible_facts.services['nginx.service'].state }}"
      when: "'nginx.service' in ansible_facts.services"
From the example above, the service_facts module collects information about all services on your system. You can then check if specific services are running, stopped, or in any other state.
The following output will be generated when the playbook is executed:

Service module error handling and troubleshooting
Powerful error processing ensures reliable service management across diverse infrastructure environments.
The service module includes universal error reporting and an error recovery system, helping teams maintain reliability and minimize downtime in production.
Let’s break it down with a practical example:
- name: Advanced error handling for service management
  hosts: all
  become: yes
  tasks:
    - name: Attempt service restart with error capture
      ansible.builtin.service:
        name: cron
        state: restarted
      register: service_result
      ignore_errors: yes

    - name: Handle service restart failure
      block:
        - name: Check service configuration
          ansible.builtin.command:
            cmd: systemctl status cron
          register: service_status

        - name: Display error information
          debug:
            msg: |
              Service restart failed
              Error: {{ service_result.msg }}
              Status: {{ service_status.stdout }}
      when: service_result is failed

    - name: Attempt service recovery
      ansible.builtin.service:
        name: cron
        state: started
      when: service_result is failed
      register: recovery_result

    - name: Report recovery status
      debug:
        msg: "Service recovery {{ 'successful' if recovery_result is succeeded else 'failed' }}"
      when: service_result is failed
Step-by-step breakdown of the playbook:
- Attempt service restart with error capture
This task tries to restart thecronservice. It usesignore_errors: yesto prevent the playbook from stopping execution even if the service fails to restart. The result is stored inservice_result. - Handle service restart failure
This block is triggered only if the previous task fails.
-
- The first task within the block runs
systemctl status cronto retrieve the current service’s status and stores the output inservice_status. - The second task displays a debug message containing both the failure message from the restart attempt (
service_result.msg) and the service’s current status (service_status.stdout), offering clear visibility into what went wrong.
- The first task within the block runs
- Attempt service recovery
If the restart fails, this task tries to start the service afresh. The recovery attempt is also conditionally executed based on the failure of the initial restart. - Report recovery status
This final debug task reports whether the service recovery was successful or not. It evaluates therecovery_resultto print either “successful” or “failed”.
How to capture the Ansible service module output
You can use the register command to capture the output of the Ansible service module and the debug or set_fact command to process it.
This technique helps build visibility into your Ansible pipelines and informs decisions, such as whether to skip specific tasks or send a notification to your team.
The following is an example:
- name: Capture service status
  ansible.builtin.service:
    name: nginx
    state: started
  register: nginx_status

- name: Display service response
  debug:
    var: nginx_status
From this playbook, the ansible.builtin.service module ensures that the nginx service is started.
The register keyword captures the result of this task and stores it in the nginx_status variable. This variable holds useful metadata like changed status, failed status, and messages from the service manager.
In the next task, the debug module prints the contents of nginx_status, giving real-time visibility into what happened during execution.
How to manage multiple services
Handling multiple services in complex cloud setups needs a structured, modular way of doing things.
You can:
- Use
rolesto group services by type (like web, database, monitoring). - Add
handlersto restart services only when stuff actually changes. - Set conditional logic to control services per environment or region.
- Use
tagsto isolate service management tasks.
For example, below is a production-only restart policy:
- name: Conditionally restart service
  ansible.builtin.service:
    name: nginx
    state: restarted
  when: ansible_env == "production"
From the playbook above, the ansible.builtin.service module restarts the nginx service only when the ansible_env variable equals "production".
The when conditional ensures that the restart occurs strictly in a production environment, avoiding disruptions in staging or development systems.
This kind of control reflects real-world deployment strategies, where conditional execution helps maintain stability across varied cloud environments.
Differences between the Ansible Systemd module and the service module
Choosing between Ansible’s service and systemd modules matters when automating service management across different systems. Although both control services, they serve distinct purposes tied to the target system’s init system and your automation scope.
The Ansible service module offers broad compatibility across platforms, whereas the systemd module provides granular control but only works on systems using systemd.
Here is a comparison table clarifying the distinctions:
| Feature | Service module | Systemd module |
| Platform support | Universal across Unix-like systems | Specific to systemd-enabled systems |
| Service manager detection | Automatic detection of underlying service manager | Direct systemd integration only |
| Advanced features | Basic service operations (start, stop, restart, enable) | Advanced systemd features (masking, daemon-reload, user services) |
| Dependency management | Limited dependency handling | Comprehensive systemd dependency management |
| Unit file management | No direct unit file manipulation | Direct unit file creation and modification |
| Socket management | Not supported | Full socket unit support |
| Performance | Lightweight, minimal overhead | Feature-rich with additional overhead |
| Portability | High portability across different init systems | Limited to systemd environments |
| State management | Basic state control | Advanced state management with service properties |
Why use Spacelift for your Ansible projects?
Spacelift’s vibrant ecosystem and excellent GitOps flow are helpful for managing and orchestrating Ansible. By introducing Spacelift on top of Ansible, you can easily create custom workflows based on pull requests and apply any necessary compliance checks for your organization.
Another advantage of using Spacelift is that you can manage infrastructure tools like Ansible, Terraform, Pulumi, AWS CloudFormation, and even Kubernetes from the same place and combine their stacks with building workflows across tools.
You can bring your own Docker image and use it as a runner to speed up deployments that leverage third-party tools. Spacelift’s official runner image can be found here.
Our latest Ansible enhancements solve three of the biggest challenges engineers face when they are using Ansible:
- Having a centralized place in which you can run your playbooks
- Combining IaC with configuration management to create a single workflow
- Getting insights into what ran and where
Provisioning, configuring, governing, and even orchestrating your containers can be performed with a single workflow, separating the elements into smaller chunks to identify issues more easily.
If you want to learn more about using Spacelift with Ansible, check our documentation, read our Ansible guide, or book a demo with one of our engineers.
Key points
The Ansible service module simplifies service control across different Linux systems by providing a consistent interface that works regardless of whether your servers use systemd, SysV init, or other service managers. Instead of learning different commands for each distribution, you use the same Ansible syntax everywhere, making your automation portable and reliable.
The most important takeaway is that the service module makes service management predictable and reliable. Whether you’re ensuring a web server starts on boot or coordinating the restart sequence for a simple application stack, these fundamental operations form the building blocks of dependable infrastructure automation.
Manage Ansible better with Spacelift
Managing large-scale playbook execution is hard. Spacelift enables you to automate Ansible playbook execution with visibility and control over resources, and seamlessly link provisioning and configuration workflows.
