
Over time, resources deployed with Terraform undergo certain configuration changes. The causes may lie in the application layer and the processing logic of various automation tools and processes. This introduces the probability of resources being modified in an undesired manner.
In such situations, it is often prudent to replace these cloud resources with new instances to avoid failures resulting from misconfigurations. Since Terraform manages the cloud resource lifecycle, it also provides a solution to address this problem using CLI commands: taint, untaint, and replace.
In this post, we explore how the CLI commands – taint, untaint, and replace – help address these issues, along with the right way to approach them with the help of an example.
TL;DR
terraform taint was a CLI command that marked a resource for forced recreation on the next terraform apply. It is deprecated since v0.15.2 and replaced by terraform apply -replace=<resource>, which performs the destroy-and-recreate in a single atomic step.
Prerequisites for the example setup: Two EC2 instances
In the example below, we create two EC2 instances using Terraform. The resources are defined in main.tf.
resource "aws_instance" "my_vm_1" {
ami           = var.ami //Ubuntu AMI
instance_type = var.instance_type

tags = {
  Name = "VM 1",
}
}

resource "aws_instance" "my_vm_2" {
ami           = var.ami //Ubuntu AMI
instance_type = var.instance_type

tags = {
  Name = "VM 2",
}
}
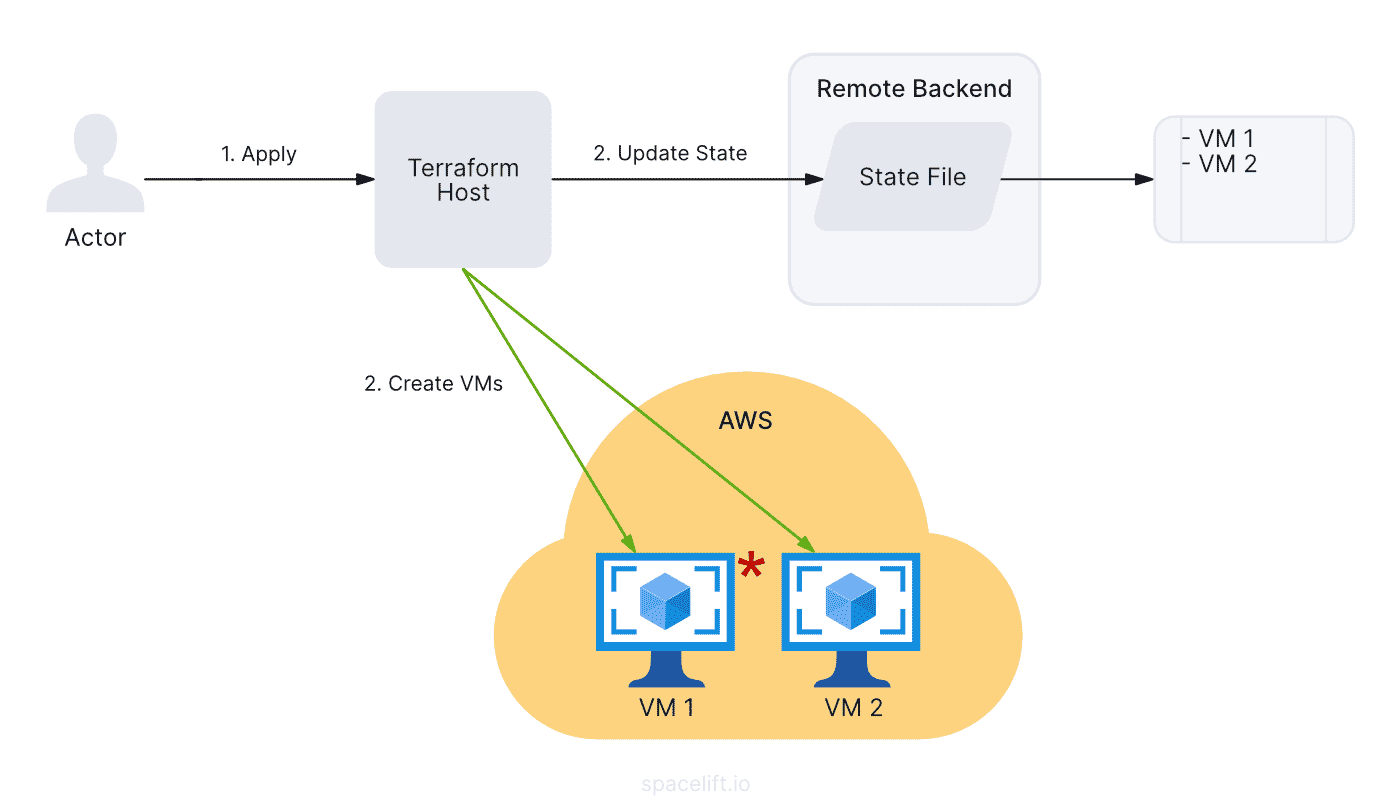
The above diagram represents the process of creating these resources and can be summarized below.
- When we apply the configuration, Terraform validates the same with the state file hosted in the remote backend.
- Since these EC2 instances do not exist, it creates them in AWS and names them as “VM 1” and “VM 2” respectively.
- After these instances are created, Terraform updates the state file with information about them.
Terraform Taint
What is Terraform taint?
Terraform taint marks a resource as degraded or damaged, indicating that this resource will be destroyed and recreated during the next apply operation. This can be particularly useful when a resource is in an undesirable or unexpected state, but its configuration hasn’t changed. Terraform basically forces the recreation of resources even if the configuration matches the current state.
This command is deprecated, and you should use the “-replace” option of terraform apply to achieve the same behavior.
Terraform maintains a state file that contains information regarding the real-world resources managed by Terraform IaC. This is a crucial piece of information, as all the task executions of Terraform depend on this file for coordination.
As established earlier, when a resource becomes misconfigured or corrupt, it is desirable to replace it with a new instance. The taint command updates the corresponding resource state as a “tainted” resource so that in the next apply cycle, Terraform replaces that resource.
Note: The taint command is deprecated since Terraform version 0.15.2. If you are using a version that is lower than this, continue using taint and untaint. Otherwise, it is recommended to use the replace command discussed below.
To improve your Terraform workflow, see the Terraform Best Practices.
How to use Terraform taint (before v0.15.2)
Let us assume our development teams and various business users are using these VMs for their purposes. The operations team happens to perform certain changes on these instances, which have caused VM 1 to have undesirable behavior.
The reasons could be anything – the configuration changes might have exposed VM 1 to security vulnerabilities, or certain processes might be running particularly slowly, leading to fewer requests being processed by this EC2 instance than by its peers, etc.
In this case, instead of recreating the entire infrastructure, it would be easier to replace only VM 1, which causes the issue. We can do this by using Terraform’s taint command. By specifying which resource to be marked as tainted, we let Terraform know about the faulty resource in the state file.
To mark the resource as tainted, run the command below in the terminal. The taint command takes the resource identifier as a parameter to understand which resource needs to be marked as tainted.
sumeetninawe@Sumeets-MacBook-Pro tftaintuntaintreplace % terraform taint aws_instance.my_vm_1
Resource instance aws_instance.my_vm_1 has been marked as tainted.
The output above confirms that VM 1 has been marked as tainted and will be replaced in the next apply cycle. To verify the same, run the terraform plan command and observe the output.
sumeetninawe@Sumeets-MacBook-Pro tftaintuntaintreplace % terraform plan
aws_instance.my_vm_2: Refreshing state... [id=i-023541a5c6d3b18cb]
aws_instance.my_vm_1: Refreshing state... [id=i-026cde214ed10b112]

Terraform used the selected providers to generate the following execution plan. Resource actions are indicated with the following symbols:
-/+ destroy and then create replacement

Terraform will perform the following actions:

  # aws_instance.my_vm_1 is tainted, so must be replaced
-/+ resource "aws_instance" "my_vm_1" {
      ~ arn                                  = "arn:aws:ec2:eu-central-1:532199187081:instance/i-026cde214ed10b112" -> (known after apply)
      ~ associate_public_ip_address          = true -> (known after apply)
      ~ availability_zone                    = "eu-central-1b" -> (known after apply)
      ~ cpu_core_count                       = 1 -> (known after apply)
      ~ cpu_threads_per_core                 = 1 -> (known after apply)
.
.
.
.
          ~ iops                  = 100 -> (known after apply)
          + kms_key_id            = (known after apply)
          ~ tags                  = {} -> (known after apply)
          ~ throughput            = 0 -> (known after apply)
          ~ volume_id             = "vol-089a00090663cfe71" -> (known after apply)
          ~ volume_size           = 8 -> (known after apply)
          ~ volume_type           = "gp2" -> (known after apply)
        }
    }

Plan: 1 to add, 0 to change, 1 to destroy.
At the beginning of the output, we can see that Terraform has taken note of the aws_instance.my_vm_1 as tainted and is prepared to replace it. This is currently reflected only in the state file, and no action has been performed in AWS.
Run terraform apply now, and see what happens to VM 1.
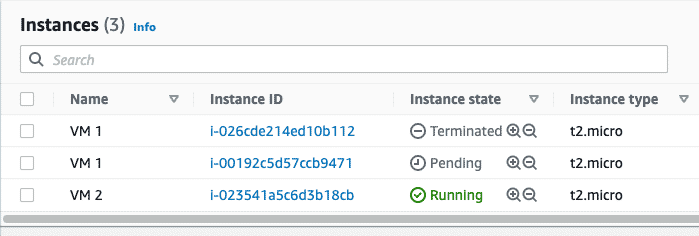
In the AWS EC2 console, we can see that one EC2 instance named VM 1 is terminated, and another instance with the same name is being created. This process is represented in the diagram below.
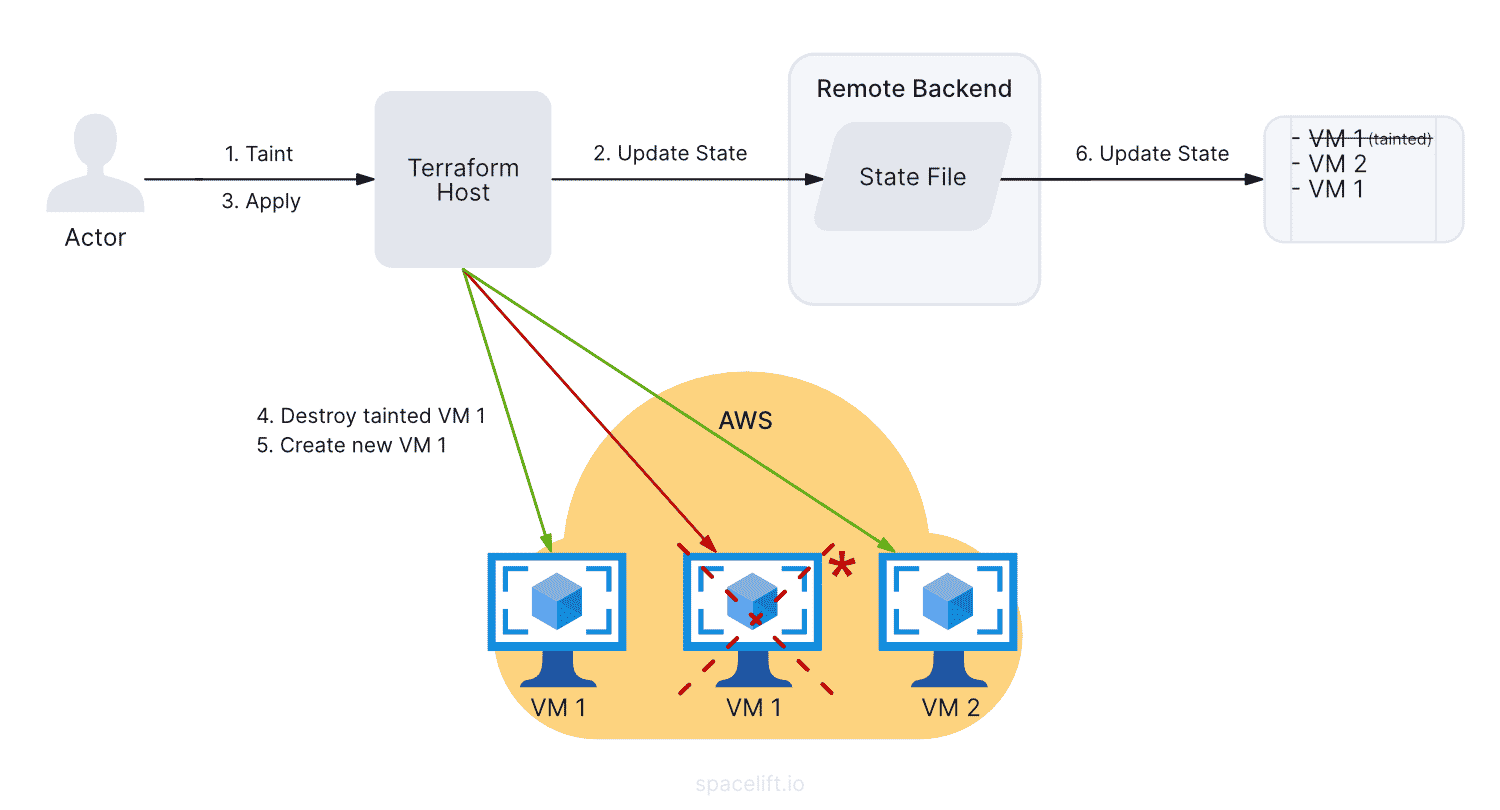
- The developer marks the resource as tainted using the taint command.
- Terraform updates the state file accordingly. The same is seen in the plan output above.
- The developer executes the same configuration by running
terraform apply. - This destroys tainted VM 1.
- This is followed by the creation of a new instance of VM 1.
- Terraform updates the state file by removing the older VM 1 object and replacing it with a new VM 1 EC2 instance.
Count and for_each example
Let’s suppose you are using count to create your resources and you want to taint only one of them.
resource "aws_instance" "my_vm" {
 count         = 3
 ami           = var.ami
 instance_type = var.instance_type


 tags = {
   Name = format("VM_%d", count.index)
 }
}


# aws_instance.my_vm[0]
# aws_instance.my_vm[1]
# aws_instance.my_vm[2]
At a terraform plan, you are going to see three resources, for a count equal to three, so in order to taint the first one, for example, what you have to do is:
terraform taint "aws_instance.my_vm[0]"If you are using for_each, things will get a little more complicated when it comes to the tainting syntax. This is happening because you will need to use some escape characters for when you are specifying the keys.
data "aws_ami" "ubuntu" {
 most_recent = true


 filter {
   name   = "name"
   values = ["ubuntu*"]
 }
}


locals {
 instances = {
   instance1 = {
     ami           = data.aws_ami.ubuntu.id
     instance_type = "t3.micro"
   }
   instance2 = {
     ami           = data.aws_ami.ubuntu.id
     instance_type = "t3.micro"
   }
   instance3 = {
     ami           = data.aws_ami.ubuntu.id
     instance_type = "t3.medium"
   }
 }
}


resource "aws_instance" "my_vm" {
 for_each      = local.instances
 ami           = each.value.ami
 instance_type = each.value.instance_type


 tags = {
   Name = format("VM_%s", each.key)
 }
}


# aws_instance.my_vm["instance1"]
# aws_instance.my_vm["instance2"]
# aws_instance.my_vm["instance3"]
Just as before, we are going to see three resources at a terraform plan. If we want to taint the instance that has instance2 as the key, we simply:
terraform taint "aws_instance.my_vm[\"instance2\"]"Terraform Untaint
What is Terraform untaint?
Terraform untaint is the opposite operation of Terraform taint. If a resource has been marked as taint which signifies it will be recreated in the next apply, the untaint command will remove this mark, ensuring the resource stays unchanged in the following operations.
This is useful when resources have been marked as taint by mistake, or if there are changes in operational decisions. As the taint workflow is deprecated, if you are not using it at all, the untaint command will also be obsolete.
Note: terraform untaint was deprecated at the same time as terraform taint, in Terraform v0.15.2.
How to use Terraform untaint (before v0.15.2)
In the current example, let us mark VM 2 as tainted to prove the above. Run the command below in the terminal.
sumeetninawe@Sumeets-MacBook-Pro tftaintuntaintreplace % terraform taint aws_instance.my_vm_2
Resource instance aws_instance.my_vm_2 has been marked as tainted.
To confirm if VM 2 is marked as tainted, run plan command and observe the output as below.
sumeetninawe@Sumeets-MacBook-Pro tftaintuntaintreplace % terraform plan
aws_instance.my_vm_1: Refreshing state... [id=i-00192c5d57ccb9471]
aws_instance.my_vm_2: Refreshing state... [id=i-023541a5c6d3b18cb]

Terraform used the selected providers to generate the following execution plan. Resource actions are indicated with the following symbols:
-/+ destroy and then create replacement

Terraform will perform the following actions:

  # aws_instance.my_vm_2 is tainted, so must be replaced
-/+ resource "aws_instance" "my_vm_2" {
      ~ arn                                  = "arn:aws:ec2:eu-central-1:532199187081:instance/i-023541a5c6d3b18cb" -> (known after apply)
      ~ associate_public_ip_address          = true -> (known after apply)
      ~ availability_zone                    = "eu-central-1b" -> (known after apply)
      ~ cpu_core_count                       = 1 -> (known after apply)
      ~ cpu_threads_per_core                 = 1 -> (known after apply)
      ~ disable_api_termination              = false -> (known after apply)
.
.
.
.
          ~ throughput            = 0 -> (known after apply)
          ~ volume_id             = "vol-0fd65c8e61226dace" -> (known after apply)
          ~ volume_size           = 8 -> (known after apply)
          ~ volume_type           = "gp2" -> (known after apply)
        }
    }

Plan: 1 to add, 0 to change, 1 to destroy.
The EC2 instance named VM 2 is now tainted. If this was a mistake, then we can revert this by using the untaint command as below.
sumeetninawe@Sumeets-MacBook-Pro tftaintuntaintreplace % terraform untaint aws_instance.my_vm_2
Resource instance aws_instance.my_vm_2 has been successfully untainted.
Like taint, a resource identifier is also supplied to untaint command. Confirm the same by running terraform plan command and making sure the plan does not suggest replacement.
sumeetninawe@Sumeets-MacBook-Pro tftaintuntaintreplace % terraform plan
aws_instance.my_vm_2: Refreshing state... [id=i-023541a5c6d3b18cb]
aws_instance.my_vm_1: Refreshing state... [id=i-00192c5d57ccb9471]

No changes. Your infrastructure matches the configuration.
Terraform has compared your real infrastructure against your configuration and found no differences, so no changes are needed.
Why you should stop using terraform taint?
Tainting a resource until it is replaced by explicitly executing the apply command makes the Terraform workflow vulnerable in this brief period.
As we saw in the example above, when we mark the resource as tainted with the taint command, it modifies the state file but does not ensure the changes are applied. In a shared development environment, if another developer generates and executes a plan at this time, the target EC2 instance will be replaced.
This is an unintentional change. The resource was marked as tainted by one developer but was replaced due to the apply statement executed by another developer.
In our example, we are dealing with only a couple of EC2 instances. The changes thus made are still noticeable and can be avoided. But in real-world implementations where the entire infrastructure is being developed by teams, the risk of avoiding these unintentional replacements increases.
Starting with Terraform version 0.15.2 and onwards, the taint command is deprecated, and it is suggested to use apply command with the -replace flag. Let us discuss this in the next section.
Replace (-replace) - Terraform taint alternative
Terraform replace is a flag used with the Terraform apply command and is the suggested way to force Terraform to recreate specific resources. As the name suggests, it replaces the specified resource. Its value defines the resource identifier that should be replaced with the existing configuration mentioned in the same Terraform code.
How to use Terraform replace
Using replace eliminates the time between marking the resource as tainted and applying those changes. Thus, it avoids the drawback discussed in the previous section. Let us replace VM 2 in our example by running the command below.
sumeetninawe@Sumeets-MacBook-Pro tftaintuntaintreplace % terraform apply -replace="aws_instance.my_vm_2"
aws_instance.my_vm_2: Refreshing state... [id=i-023541a5c6d3b18cb]
aws_instance.my_vm_1: Refreshing state... [id=i-00192c5d57ccb9471]

Terraform used the selected providers to generate the following execution plan. Resource actions are indicated with the following symbols:
-/+ destroy and then create replacement

Terraform will perform the following actions:

  # aws_instance.my_vm_2 will be replaced, as requested
-/+ resource "aws_instance" "my_vm_2" {
      ~ arn                                  = "arn:aws:ec2:eu-central-1:532199187081:instance/i-023541a5c6d3b18cb" -> (known after apply)
      ~ associate_public_ip_address          = true -> (known after apply)
      ~ availability_zone                    = "eu-central-1b" -> (known after apply)
      ~ cpu_core_count                       = 1 -> (known after apply)
      ~ cpu_threads_per_core                 = 1 -> (known after apply)
      ~ disable_api_termination              = false -> (known after apply)
      ~ ebs_optimized                        = false -> (known after apply)
      - hibernation                          = false -> null
      + host_id                              = (known after apply)
      ~ id                                   = "i-023541a5c6d3b18cb" -> (known after apply)

.
.
.
.
~ throughput            = 0 -> (known after apply)
          ~ volume_id             = "vol-0fd65c8e61226dace" -> (known after apply)
          ~ volume_size           = 8 -> (known after apply)
          ~ volume_type           = "gp2" -> (known after apply)
        }
    }

Plan: 1 to add, 0 to change, 1 to destroy.

Do you want to perform these actions?
  Terraform will perform the actions described above.
  Only 'yes' will be accepted to approve.

  Enter a value: yes

aws_instance.my_vm_2: Destroying... [id=i-023541a5c6d3b18cb]
aws_instance.my_vm_2: Still destroying... [id=i-023541a5c6d3b18cb, 10s elapsed]
aws_instance.my_vm_2: Still destroying... [id=i-023541a5c6d3b18cb, 20s elapsed]
aws_instance.my_vm_2: Destruction complete after 30s
aws_instance.my_vm_2: Creating...
aws_instance.my_vm_2: Still creating... [10s elapsed]
aws_instance.my_vm_2: Still creating... [20s elapsed]
aws_instance.my_vm_2: Still creating... [30s elapsed]
aws_instance.my_vm_2: Creation complete after 31s [id=i-0099a439074ce7bf4]

Apply complete! Resources: 1 added, 0 changed, 1 destroyed.
sumeetninawe@Sumeets-MacBook-Pro tftaintuntaintreplace %
The output above confirms that Terraform replaces the target resource in a single step.
How to manage your Terraform resources with Spacelift
Managing resource lifecycle operations like terraform apply -replace is much safer and auditable with a proper CI/CD orchestration layer.
Spacelift is the infrastructure orchestration platform built for the AI-accelerated software era. It manages the full lifecycle for both traditional infrastructure as code (IaC) and AI-provisioned infrastructure, giving you access to a powerful CI/CD workflow and unlocking features such as:
- Policies (based on Open Policy Agent) – You can control how many approvals you need for runs, what kind of resources you can create, and what kind of parameters these resources can have, and you can also control the behavior when a pull request is open or merged.
- Multi-IaC workflows – Combine Terraform with Kubernetes, Ansible, and other IaC tools such as OpenTofu, Pulumi, and CloudFormation, create dependencies among them, and share outputs.
- Build self-service infrastructure – You can use Templates and Blueprints to build self-service infrastructure; simply complete a form to provision infrastructure based on Terraform and other supported tools.
- AI-powered provisioning and diagnostics – Spacelift Intelligence adds an AI-powered layer for natural language provisioning, diagnostics, and operational insight across your infrastructure workflows.
- Integrations with any third-party tools – You can integrate with your favorite third-party tools and even build policies for them. For example, see how to integrate security tools in your workflows using Custom Inputs.
Spacelift enables you to create private workers inside your infrastructure, which helps you execute Spacelift-related workflows on your end. Read the documentation for more information on configuring private workers.
You can check it for free by creating a trial account or requesting a demo with one of our engineers.
Key points
I hope this blog post was helpful to you in understanding and exploring the CLI commands – taint, untaint, and replace.
If you are struggling with Terraform automation and management, check out Spacelift. Get started on your journey by signing up for a free trial and taking it for a spin worldwide!
Note: New versions of Terraform are placed under the BUSL license, but everything created before version 1.5.x stays open-source. OpenTofu is an open-source version of Terraform that expands on Terraform’s existing concepts and offerings. It is a viable alternative to HashiCorp’s Terraform, being forked from Terraform version 1.5.6.
Terraform management made easy
Spacelift orchestrates your Terraform workflows end to end, including state management, policy as code, drift detection, resource visualization, context sharing, programmatic configuration, and support for complex, multi-step workflows.
Frequently asked questions
What is the difference between terraform taint and terraform destroy?
terraform taint marks a resource for recreation while preserving its place in the configuration. On the next apply, Terraform destroys and then immediately rebuilds it. terraform destroy, on the other hand, removes the resource entirely from the infrastructure. Taint is for replacing faulty resources, destroy is for permanent deletion.
Is terraform taint deprecated?
Yes, terraform taint was deprecated in Terraform v0.15.2 and is no longer recommended. The replacement is terraform apply -replace=”ADDRESS”, which marks a resource for replacement during the next apply rather than mutating state directly. This approach is safer, more explicit, and integrates with the standard plan and apply workflow.
What replaced terraform taint?
The terraform taint command was deprecated in Terraform 0.15.2 and replaced by the -replace option used with terraform apply. Instead of marking a resource for recreation in a separate step, you run terraform apply -replace=”aws_instance.example”, which plans and executes the replacement in one operation.
Does terraform apply -replace work in OpenTofu?
Yes, tofu apply -replace=ADDRESS works in OpenTofu exactly as it does in Terraform. It marks the specified resource for destruction and recreation on the next apply, replacing the deprecated -target workarounds and the older terraform taint command. You can pass the flag multiple times to replace several resources in one run.
