
OpenTofu is slowly but surely becoming the de-facto standard for IaC, gaining great adoption into the DevOps ecosystem. The best part about OpenTofu is the fact that it is developed with the community’s requests as the top priority, and by doing so, it ensures the platform continuously evolves to meet the needs and preferences of its users.
In this post, we will explore how you can enhance your OpenTofu workflow with Spacelift.
Spacelift features
Before jumping into the code examples, let’s review some of the most important Spacelift features.
Spacelift offers several features that enhance your OpenTofu workflow:
- Multi-infrastructure workflow – Apart from OpenTofu, Spacelift supports Terraform, Pulumi, CloudFormation, Kubernetes, Ansible, and Terragrunt.
- Policies
- plan policies to control what kind of resources engineers can create, what parameters these resources can have, and implement custom policies for your third-party tools
- approval policies to control how many approvals you need for a run or what kind of tasks you can run
- push policies to control what happens when you open a pull request or when the code is merged
- notification policies to control where to send notifications
- Contexts – reusable containers for your environment variables, mounted files, and lifecycle hooks that can be attached to how many stacks you want
- Cloud integrations – dynamic credentials for AWS, Microsoft Azure, and Google Cloud
- Blueprints – self-service infrastructure
- Dependencies – the ability to create dependencies between your stacks on how many nested levels you want the ability to share outputs
- Drift detection and remediation – the ability to detect infrastructure drift and optionally remediate it
- Task scheduling and stack deletion scheduling – the ability to schedule arbitrary tasks and even stack deletion
OpenTofu example – Using the OpenTofu provider for Spacelift
You can find the code that we will use here. This is the repository structure:
.
├── README.md
├── environments
│   ├── dev
│   │   └── main.tf
│   └── stage
│       └── main.tf
├── spacelift
│   ├── main.tf
│   ├── policies
│   │   └── tfsec.rego
│   └── variables.tf
└── tofu
   ├── ec2
   │   ├── main.tf
   │   └── variables.tf
   └── network
       ├── main.tf
       ├── output.tf
       └── variables.tf

9 directories, 11 files
Let’s start from the bottom, in the tofu folder we have two OpenTofu configurations, one that creates an AWS network and the other that creates EC2 instances. These configurations will be used to deploy our resources.
In the spacelift folder, we have a Spacelift OpenTofu module that will be in charge of implementing the logic of deploying Spacelift resources such as stacks, contexts, policies, and dependencies. We want to automate as much as possible, and be sure that our configurations are easy to replicate in other environments as well, so all the resources are created with for_each:
resource "spacelift_stack" "this" {
 for_each                = var.stacks
 branch                  = each.value.branch
 description             = each.value.description
 name                    = each.key
 project_root            = each.value.project_root
 repository              = each.value.repo
 terraform_workflow_tool = each.value.terraform_workflow_tool
 terraform_version       = each.value.version
 labels                  = each.value.labels
 space_id                = each.value.space_name
}

resource "spacelift_aws_integration_attachment" "integration" {
 for_each       = var.integrations
 integration_id = each.value.integration_id
 stack_id       = spacelift_stack.this[each.value.stack_name].id
 read           = each.value.read
 write          = each.value.write
}


resource "spacelift_stack_dependency" "dependencies" {
 for_each            = var.dependencies
 stack_id            = spacelift_stack.this[each.value.stack_name].id
 depends_on_stack_id = spacelift_stack.this[each.value.stack_depends_on].id
}

resource "spacelift_stack_dependency_reference" "output" {
 for_each            = var.dependency_references
 stack_dependency_id = spacelift_stack_dependency.dependencies[each.value.dependency_name].id
 output_name         = each.value.output_name
 input_name          = each.value.input_name
}
In the above code snippet, you can see that we can create dependencies between our stacks, share outputs, and even configure cloud integrations for dynamic credentials. You don’t need to rely on the terraform state remote data source, and you won’t need to fill in your credentials manually.
resource "spacelift_policy" "this" {
 for_each = var.policies
 name     = each.key
 body     = file("${path.module}/policies/${each.value.policy_name}.rego")
 type     = each.value.type
 space_id = each.value.space_name
}


resource "spacelift_policy_attachment" "policy_attachment" {
 for_each  = var.policy_attachments
 policy_id = spacelift_policy.this[each.value.policy_name].id
 stack_id  = spacelift_stack.this[each.value.stack_name].id
}


resource "spacelift_context" "this" {
 for_each    = var.contexts
 description = each.value.description
 name        = each.value.name
 before_init = each.value.before_init
 space_id    = each.value.space_name
}

resource "spacelift_environment_variable" "this" {
 for_each   = var.env_vars
 context_id = spacelift_context.this[each.value.context_name].id
 name       = each.value.name
 value      = each.value.value
 write_only = each.value.is_secret
}


resource "spacelift_context_attachment" "this" {
 for_each   = var.context_attachments
 context_id = spacelift_context.this[each.value.context_name].id
 stack_id   = spacelift_stack.this[each.value.stack_name].id
 priority   = each.value.priority
}
In this other snippet, we are configuring policies, and contexts and you can create how many you want and attach them to how many or how few stacks you want. This gives you full flexibility in building a really powerful workflow. We have configured even a before_init parameter to our context resource, which gives us the ability to take advantage of easily integrating any third-party tools, and because we have this policy resource, we can also easily create custom policies for these tools.
The contexts also have environment variables resources, giving you the ability to pass values easily to your OpenTofu configurations, and again, you can create as many of these environment variables resources as you want.
In the environments folder, we will call the Spacelift module for all environments and populate them according to your needs. Let’s take a look at the dev environment:
stacks = {
   stack1 = {
     branch                  = "main"
     description             = "Network Stack"
     project_root            = "tofu/network"
     repo                    = "spacelift_tofu"
     terraform_workflow_tool = "OPEN_TOFU"
     version                 = "1.7.0"
     labels                  = ["dev"]
   }


   stack2 = {
     branch                  = "main"
     description             = "EC2 Stack"
     project_root            = "tofu/ec2"
     repo                    = "spacelift_tofu"
     terraform_workflow_tool = "OPEN_TOFU"
     version                 = "1.7.0"
     labels                  = ["dev"]
   }
 }
We are creating two stacks, based on the network, and EC2 configurations. The EC2 configuration will need to use a subnet_id for the VMs, which must be received from the network. To do that, we will create a dependency between the stacks and share the output:
dependencies = {
   dependency1 = {
     stack_name       = "stack2"
     stack_depends_on = "stack1"
   }
 }
 dependency_references = {
   reference1 = {
     dependency_name = "dependency1"
     output_name     = "subnet_id"
     input_name      = "TF_VAR_subnet_id"
   }
 }
The output_name is an existing output defined in the network stack – this means that if you provide an output that doesn’t exist in the stack’s configuration, you will receive an error. In the EC2 configuration, we have an input variable called subnet_id, and because we will use an environment variable, the input_name will have to be prefixed with “TF_VAR”.
In both contexts, we have decided to install and run tfsec, so for both stacks, we will do security vulnerability scanning:
contexts = {
   context1 = {
     description = "Network context"
     name        = "network context"
     before_init = ["wget -O tfsec https://github.com/aquasecurity/tfsec/releases/download/v1.28.1/tfsec-linux-amd64", "chmod +x tfsec", "./tfsec -s --format=json . > tfsec.custom.spacelift.json"]
   }
   context2 = {
     description = "ec2 context"
     name        = "ec2 context"
     before_init = ["wget -O tfsec https://github.com/aquasecurity/tfsec/releases/download/v1.28.1/tfsec-linux-amd64", "chmod +x tfsec", "./tfsec -s --format=json . > tfsec.custom.spacelift.json"]
   }
 }
I saved the output of the tfsec run in a special file called “tfsec.custom.spacelift.json” to take advantage of the output of the tfsec command in a custom policy. This is the policy we will use:
package spacelift

warn [sprintf(message, [p])] {
   message := "You have a couple of high serverity issues: %d"
   results := input.third_party_metadata.custom.tfsec.results
   p := count({result | result := results[_]; result.severity == "HIGH"})
   p >= 1
}
sample = true
The policy verifies how many high-severity issues we have in our code, and if we have at least one, it will return a warning message on the run.
Let’s create the stack based on the dev folder using the UI. First, go to stacks and select create stack:
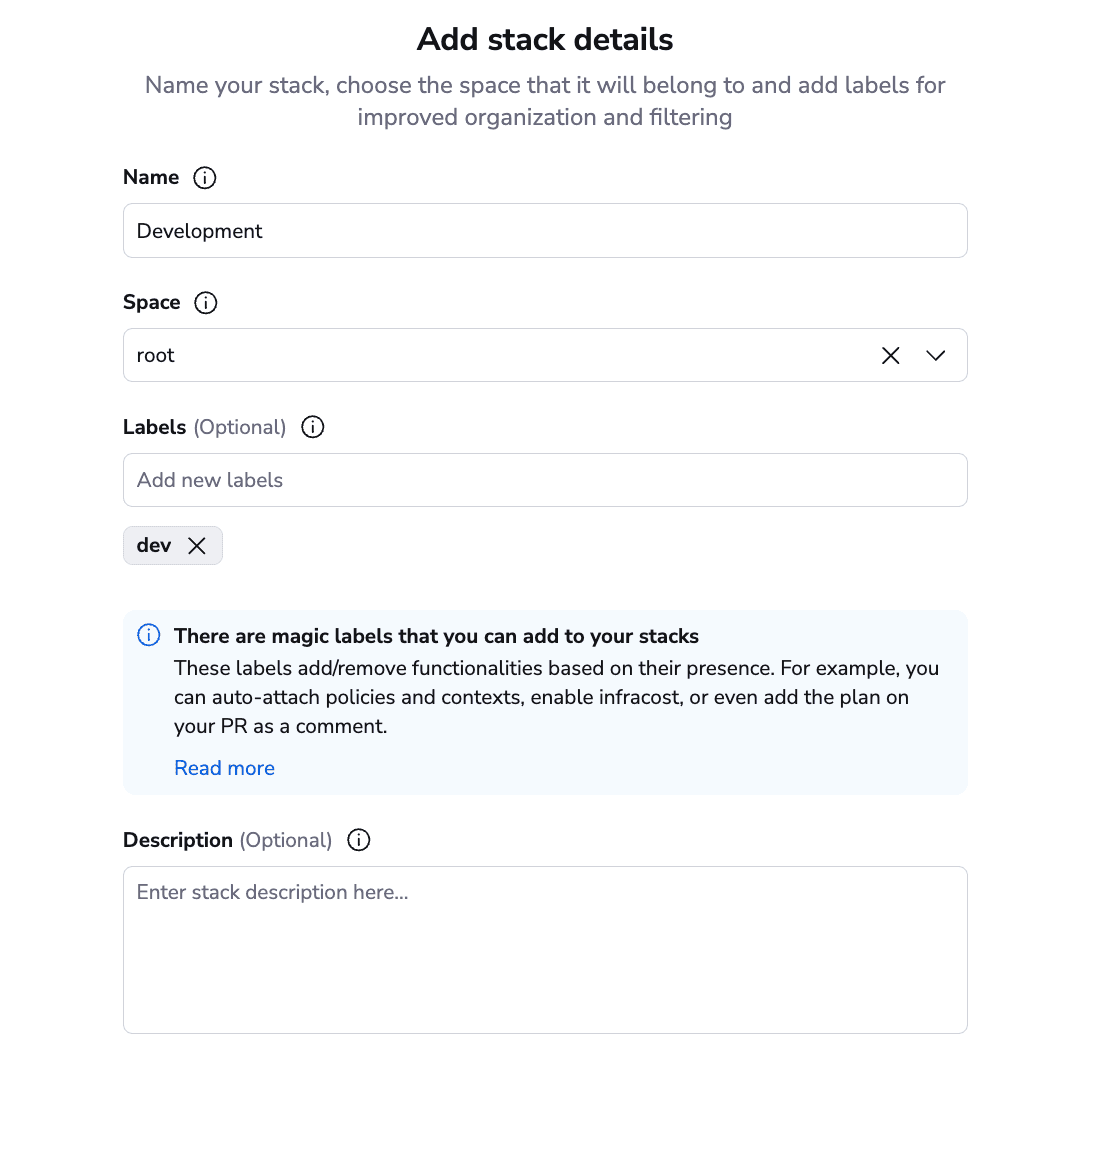
Add a name to your stack, select the space, and add optional labels and an optional description.
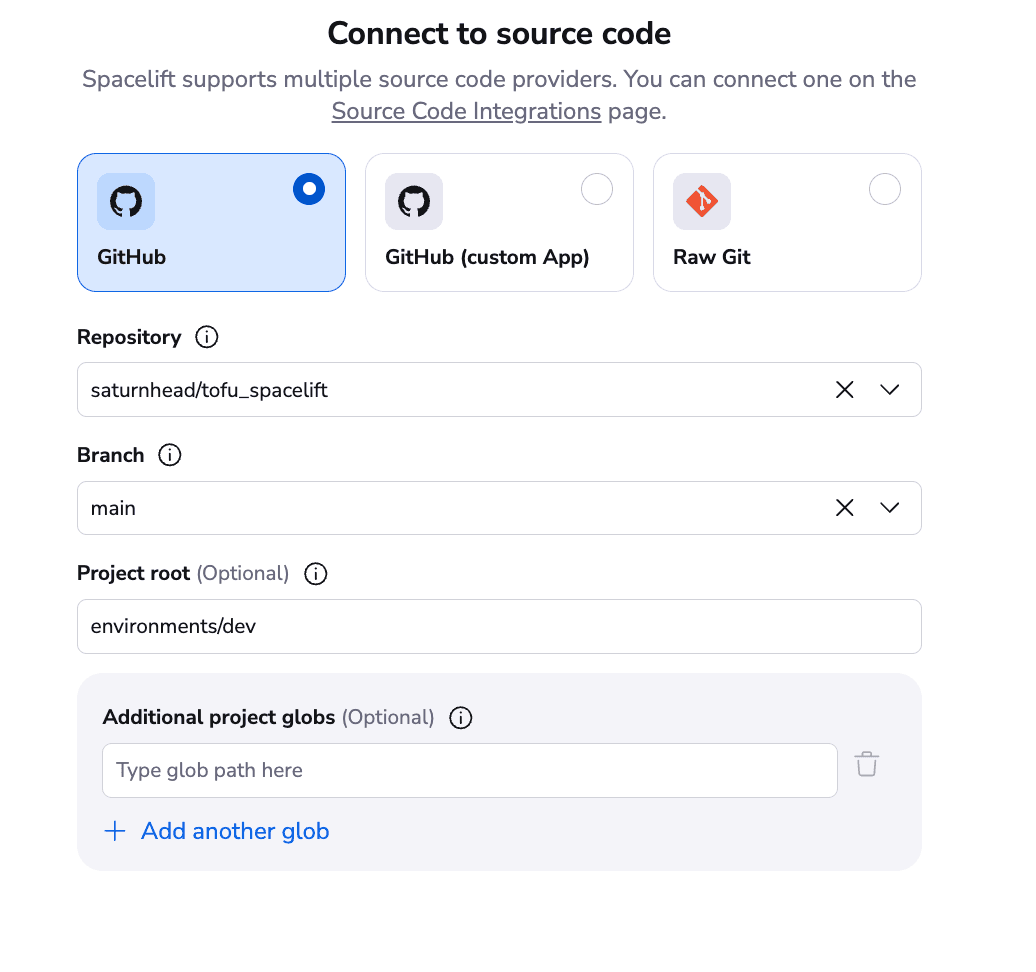
Next, select your repository, specify a branch, and then specify the folder from where to run your OpenTofu code.
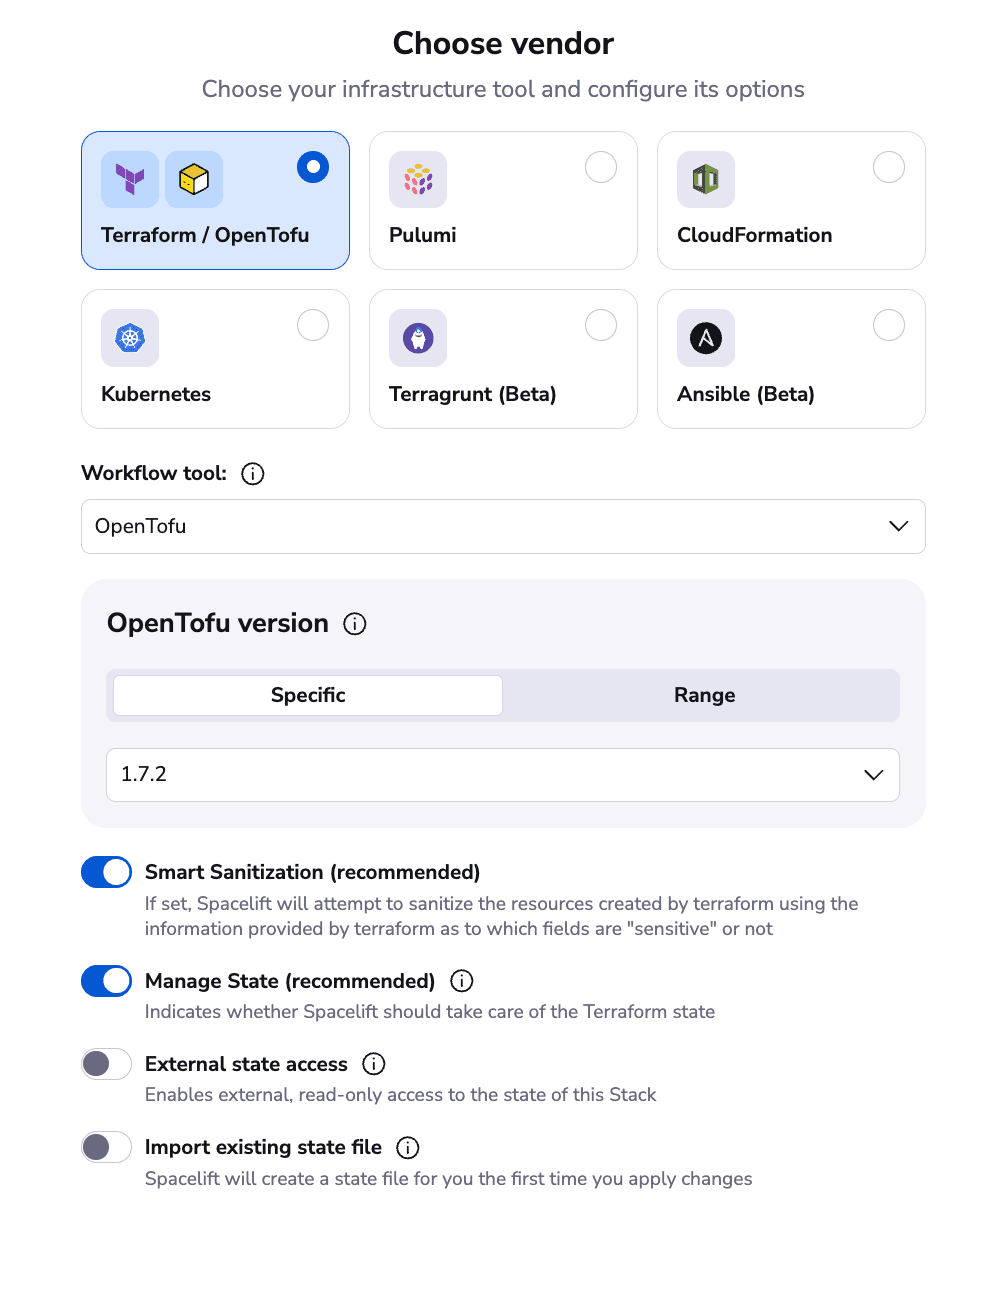
In the next screen, select OpenTofu for your workflow tool, and accept all the other defaults.
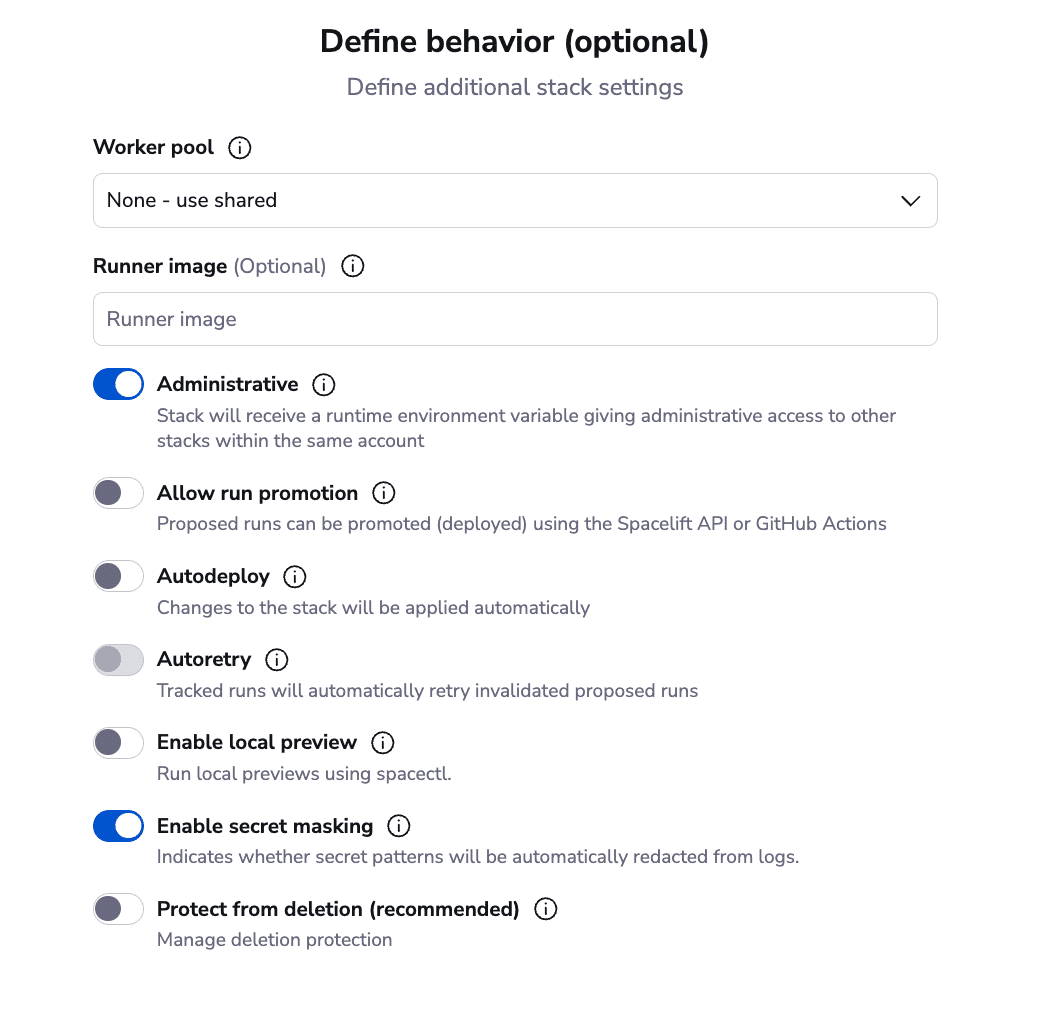
Ensure in the Define behavior tab, you have the Administrative option checked out. This option ensures that you can create Spacelift resources without providing any other credentials. Now skip to the summary and create the stack.
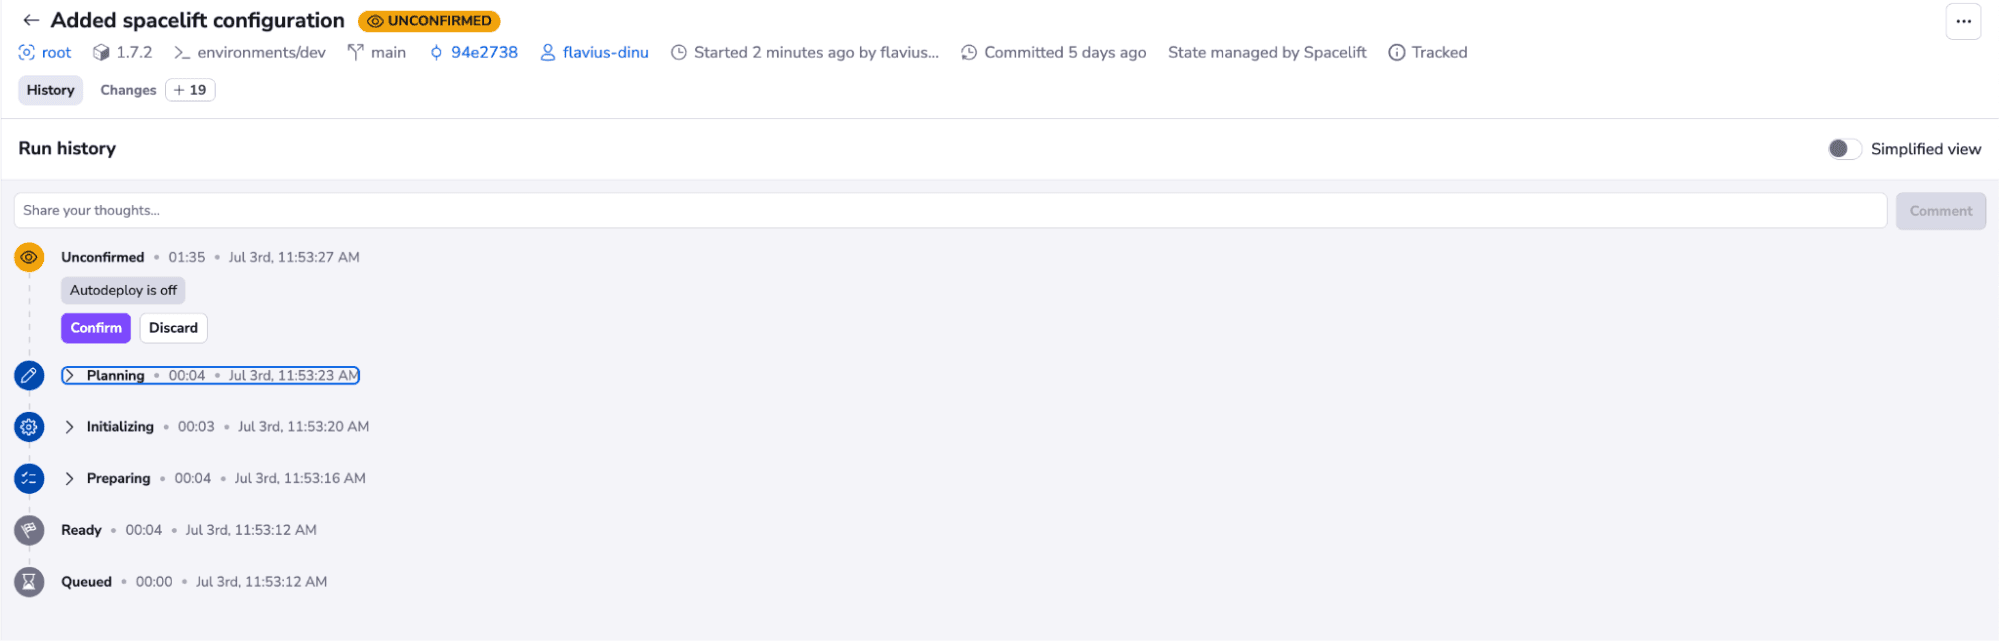
We can now trigger a run on this stack and wait for it to reach the unconfirmed state.
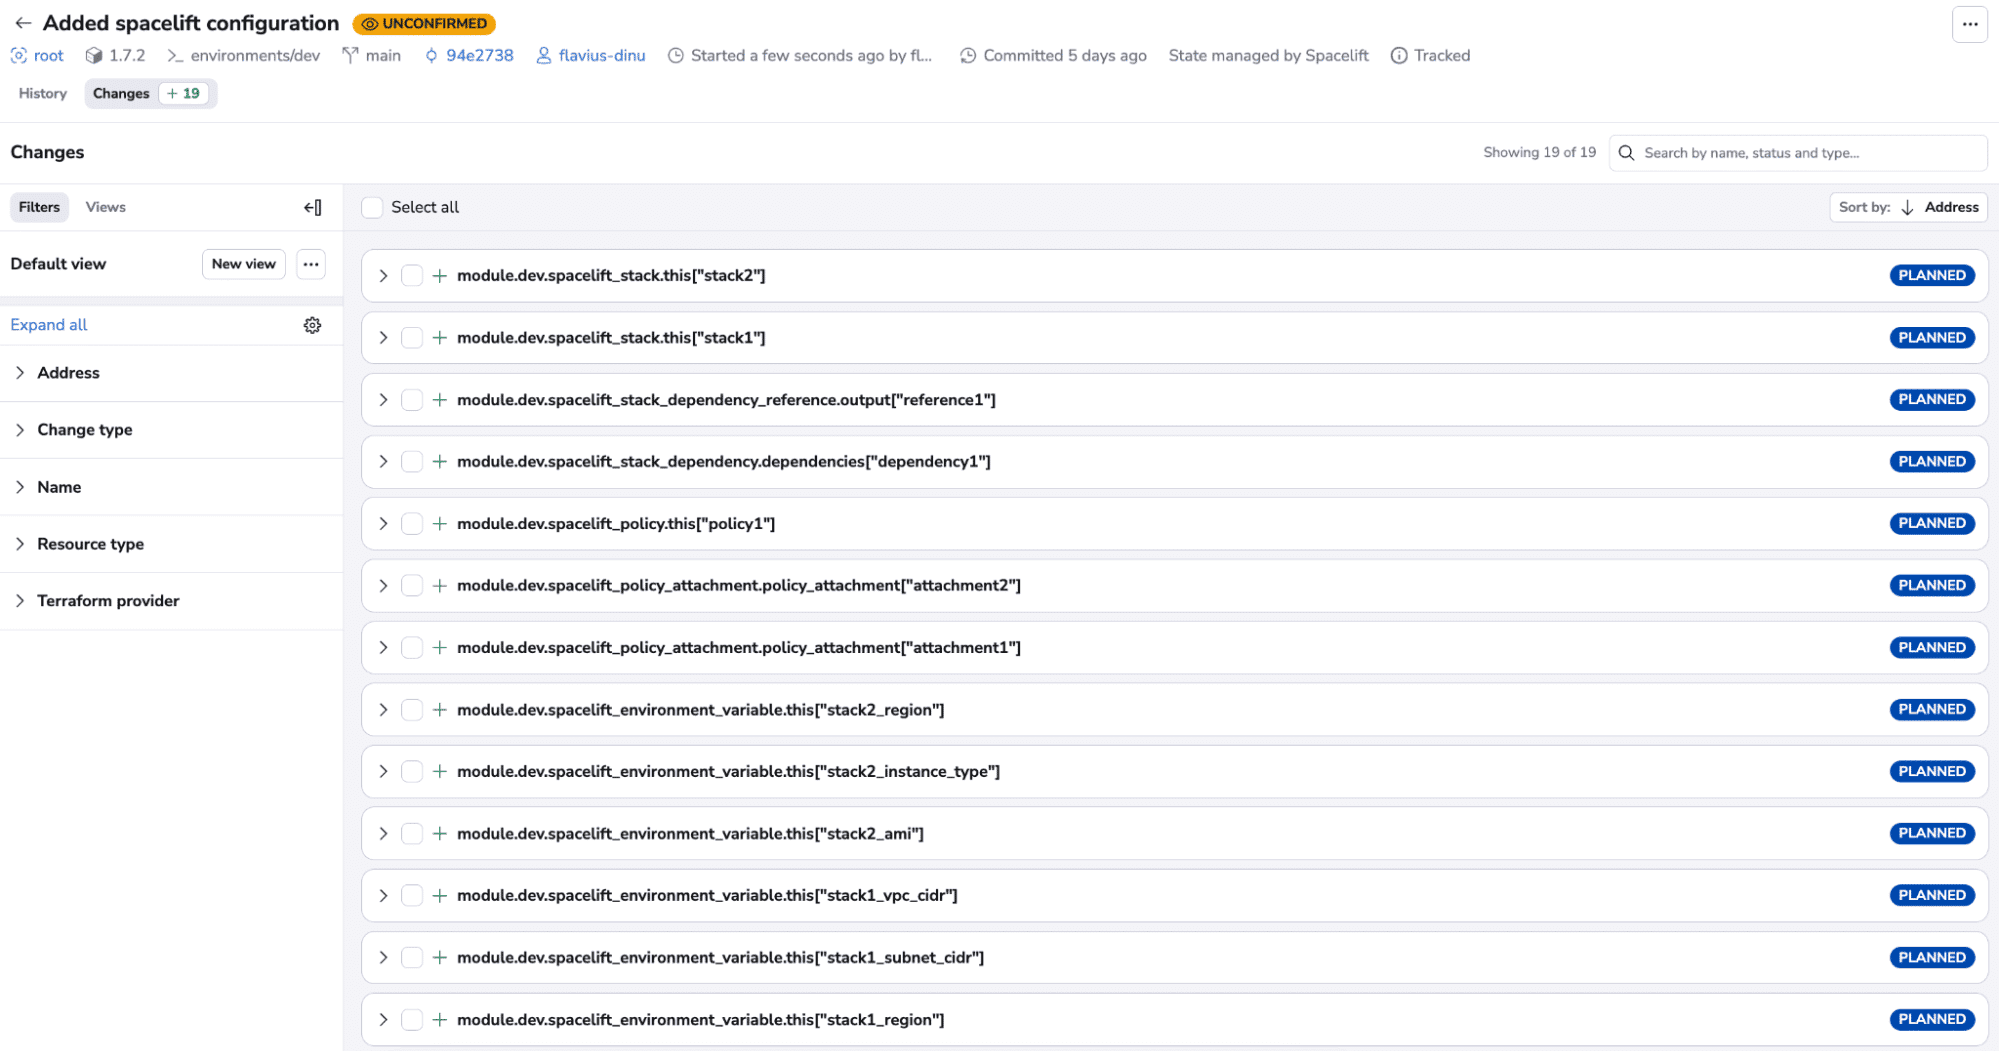
You can easily view all the resources that will be created. Let’s confirm the run and wait for these resources to be created:
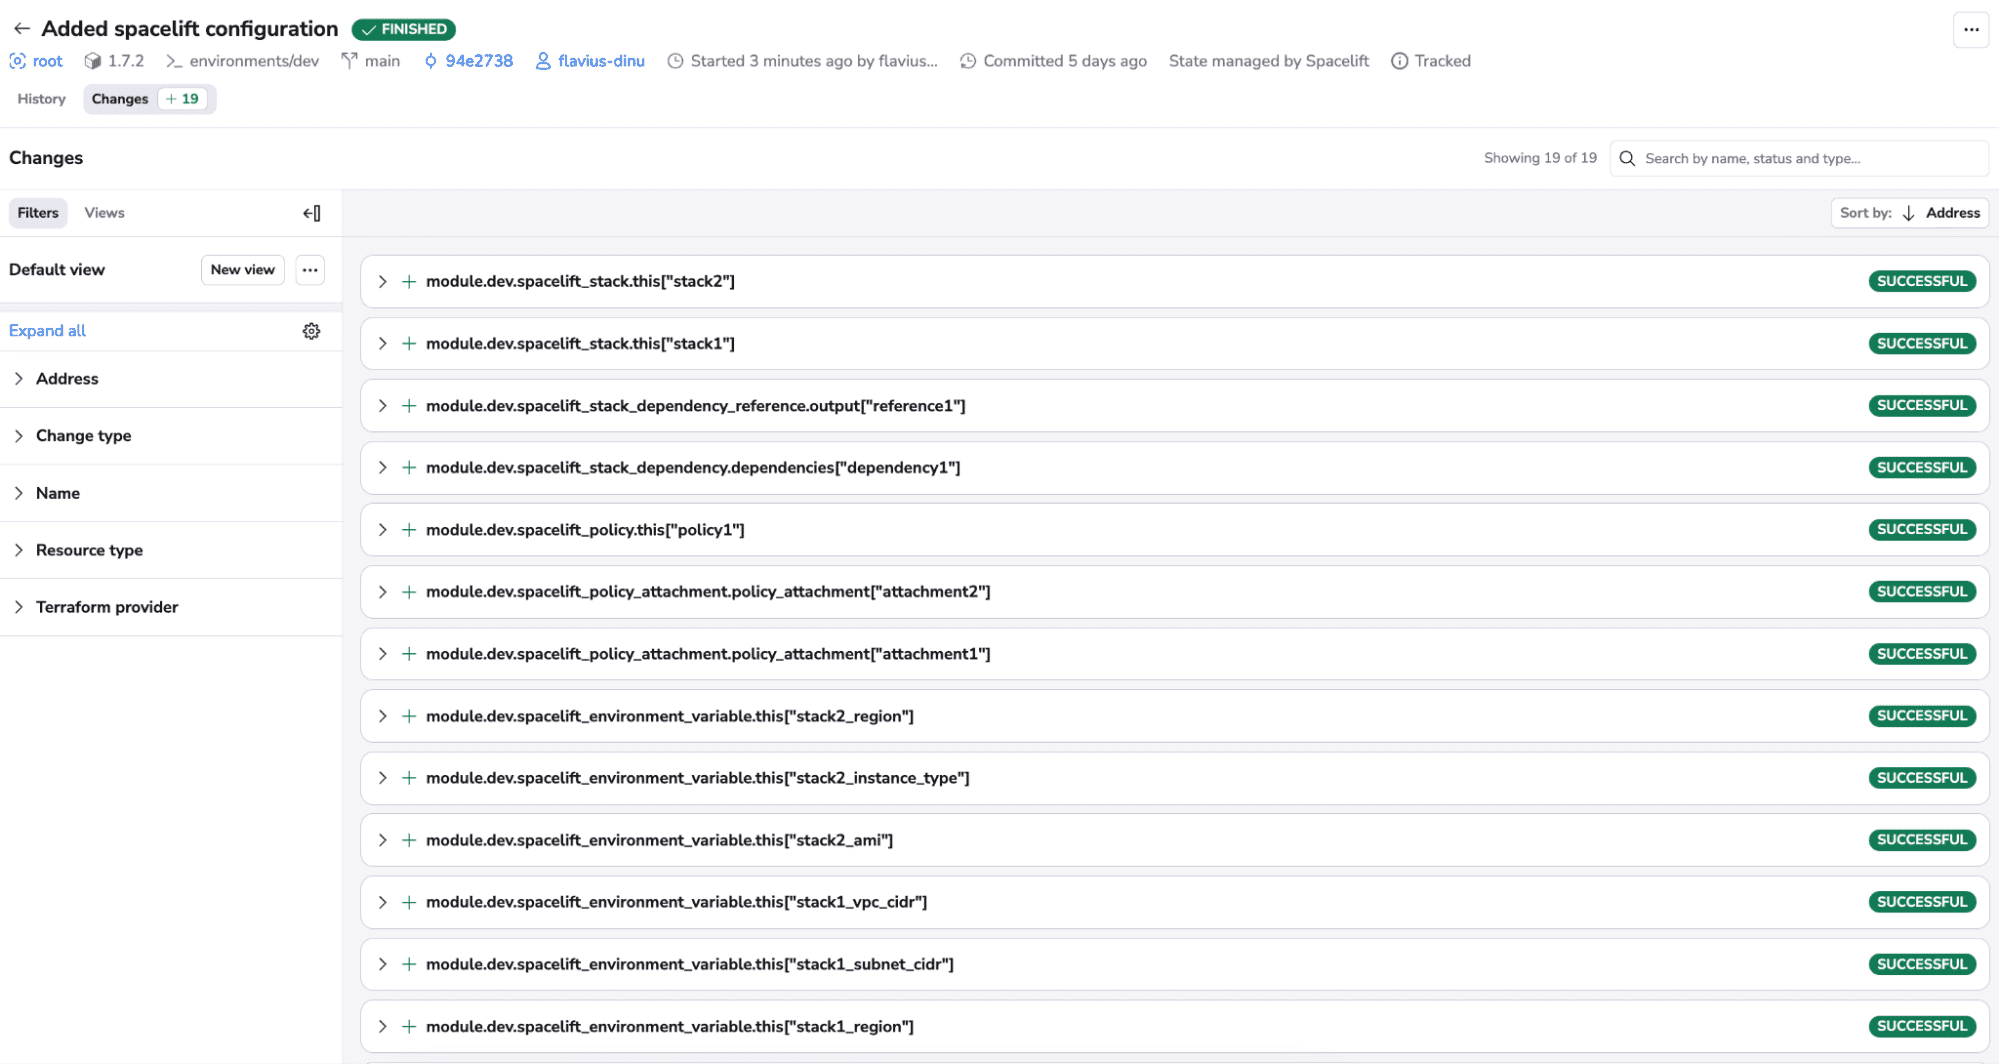
After confirming, you can see that all resources were created successfully:
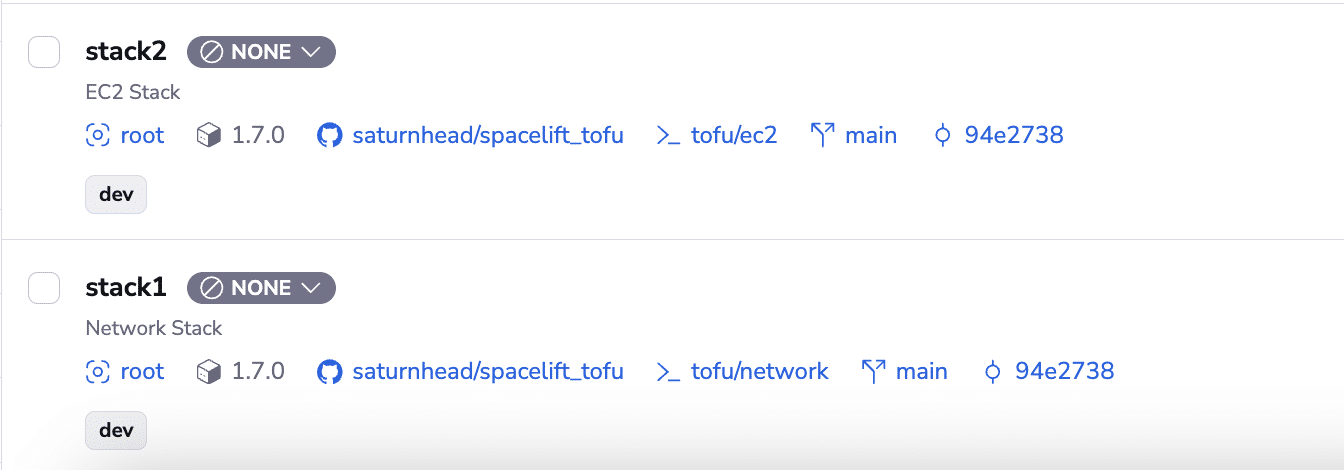
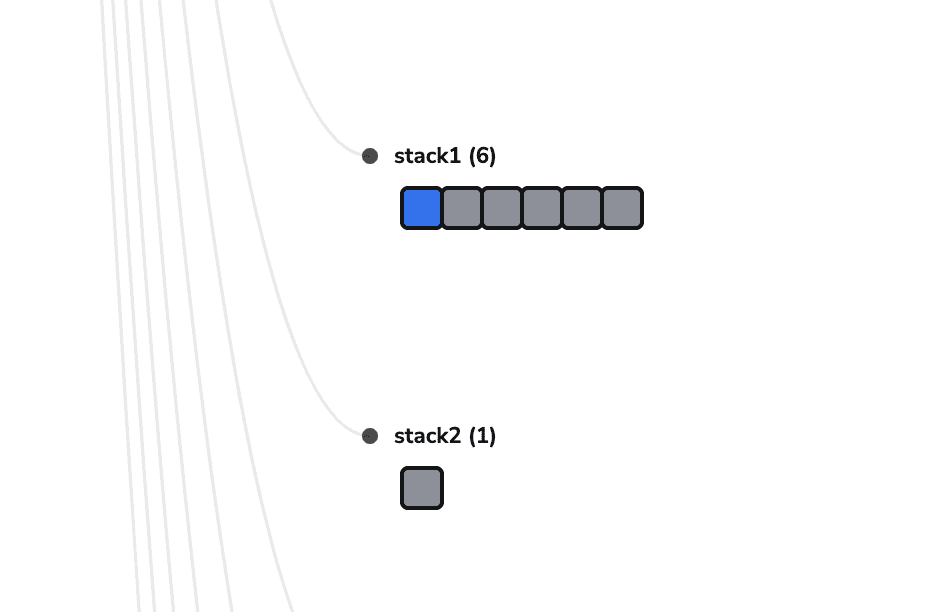
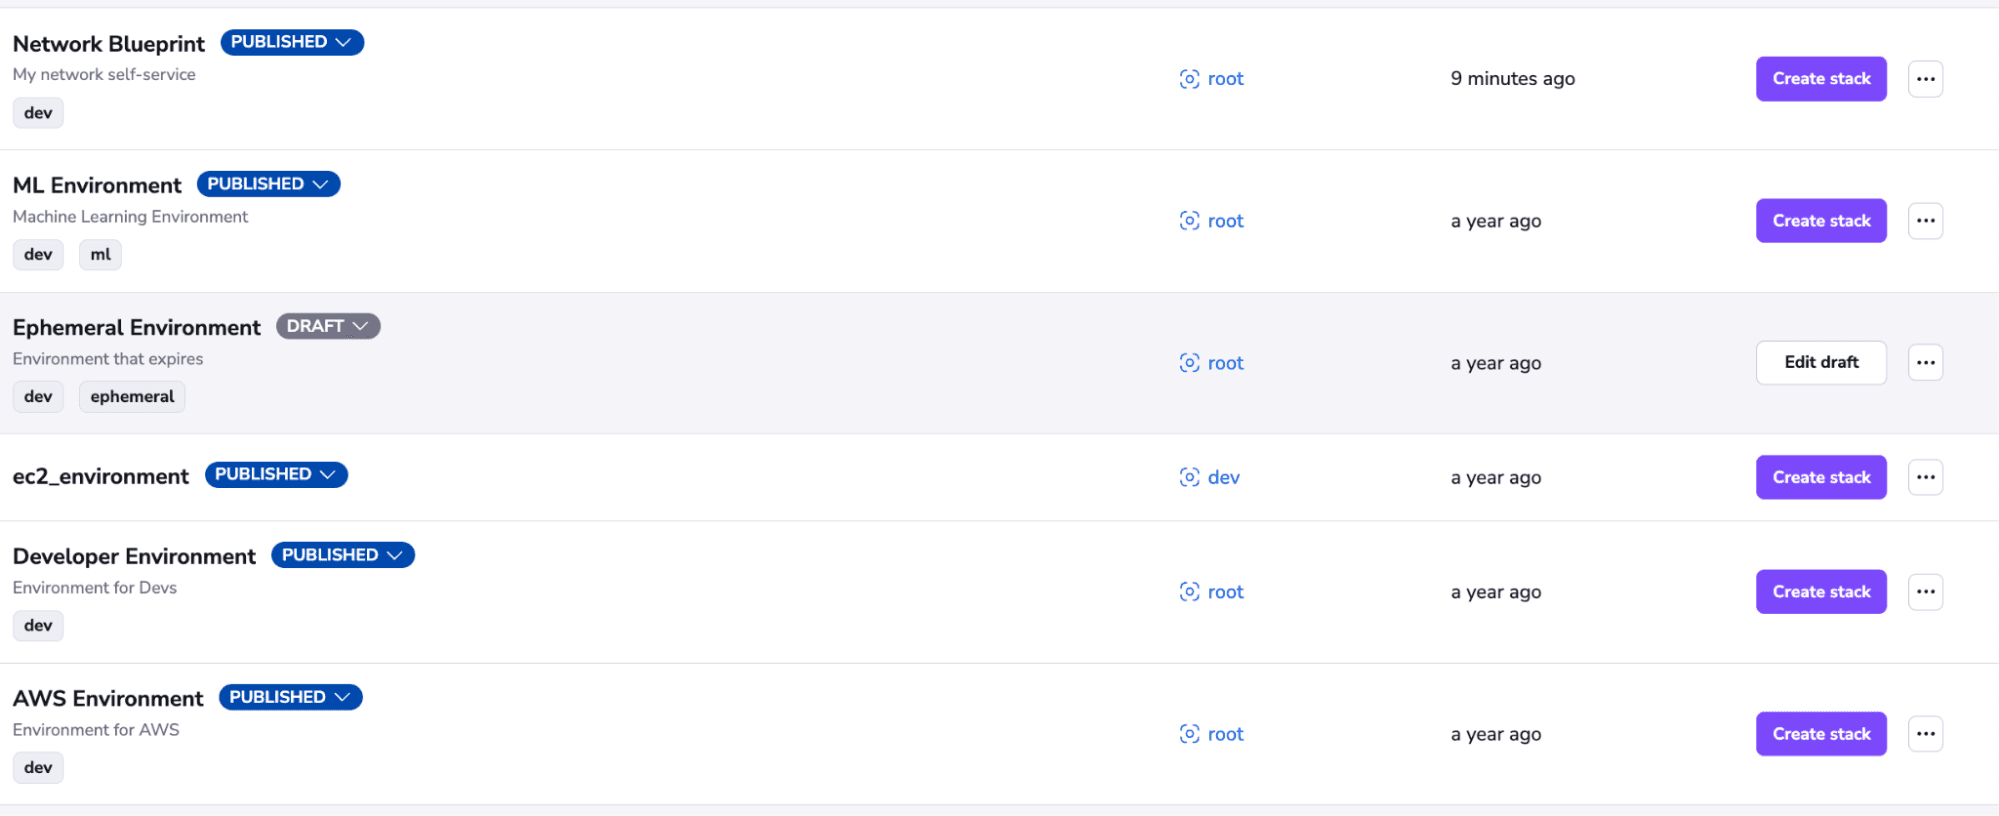
If we go back to our stacks view, we can see that two new stacks have been created:
Let’s trigger a run on stack1. This will trigger a run on stack2 as well, because of the dependency that we have created, but this will only run after stack1 finishes the run successfully:

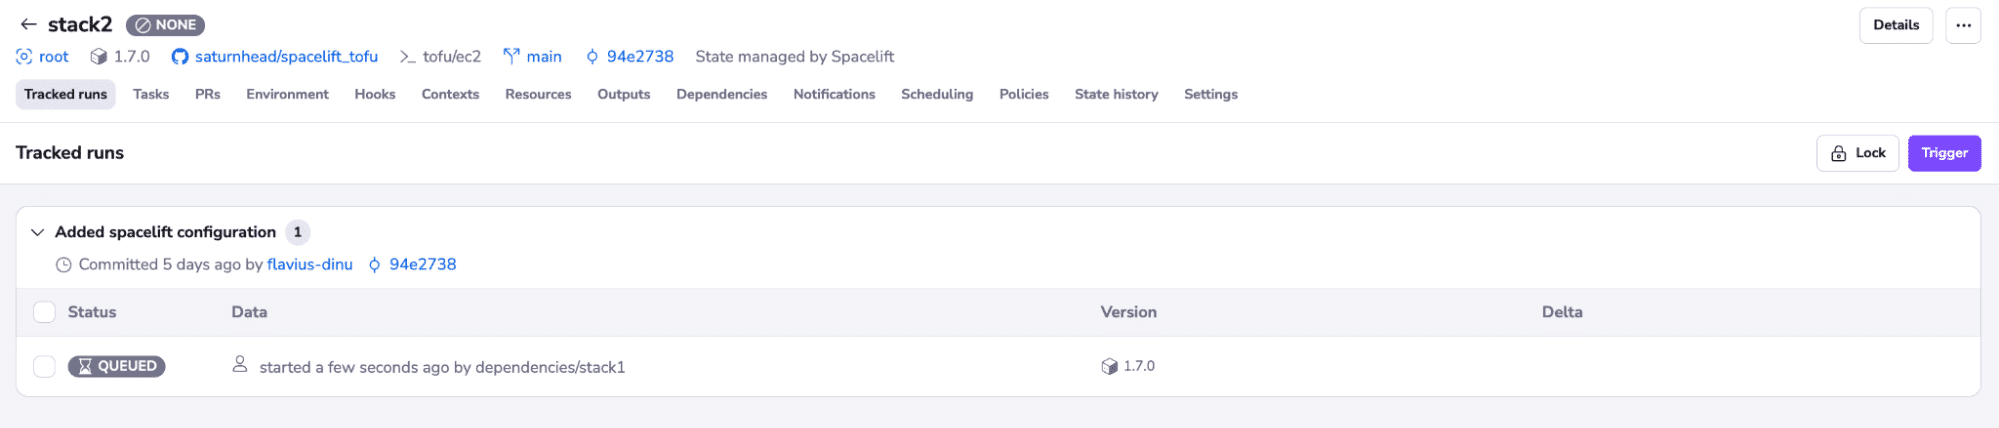
We can observe that a run is queued on stack2, and this will wait for the first one to finish.
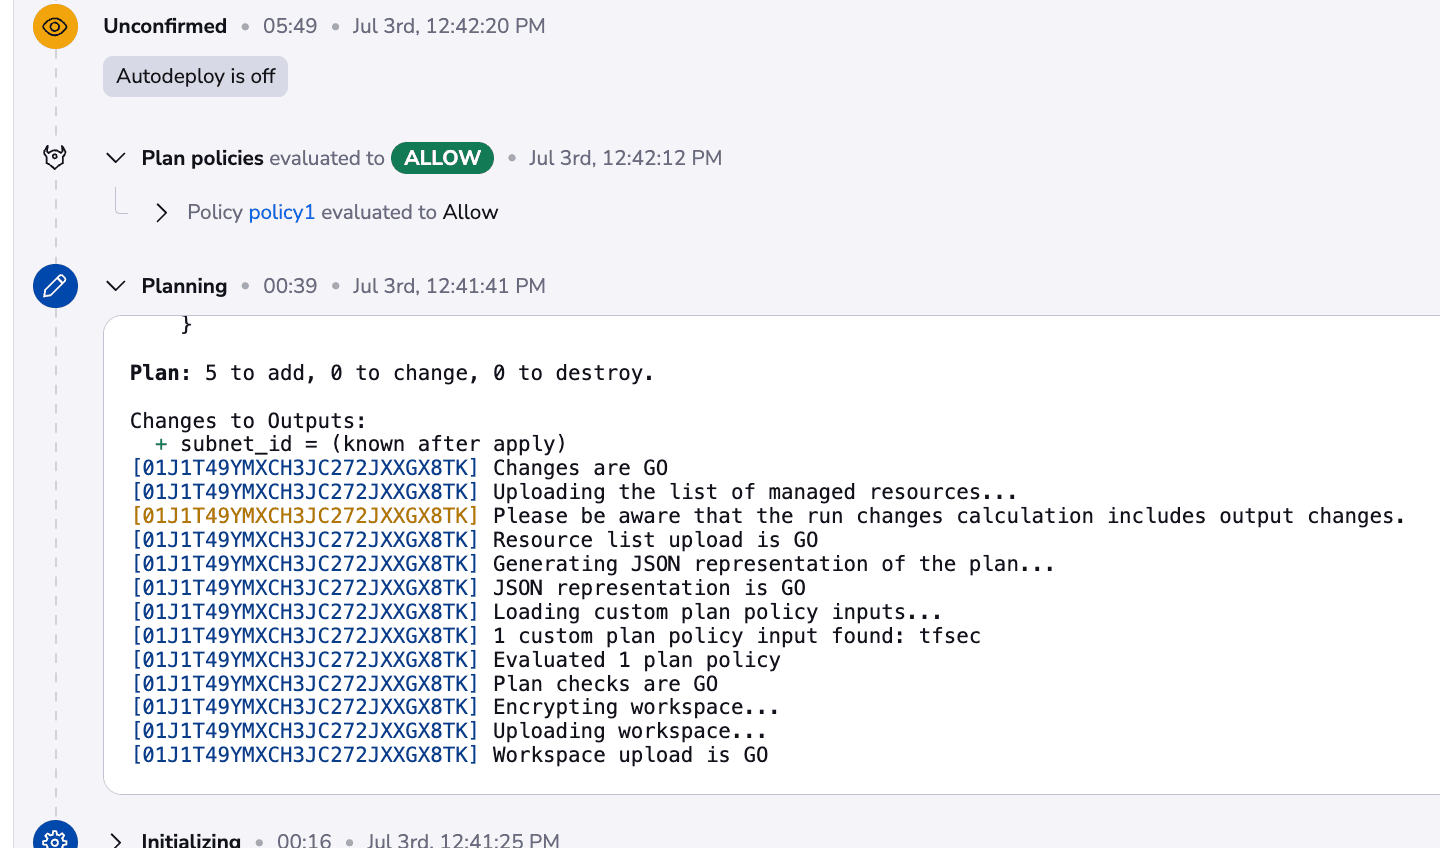
Stack1 has now reached an unconfirmed state and we can see what resources it will create:
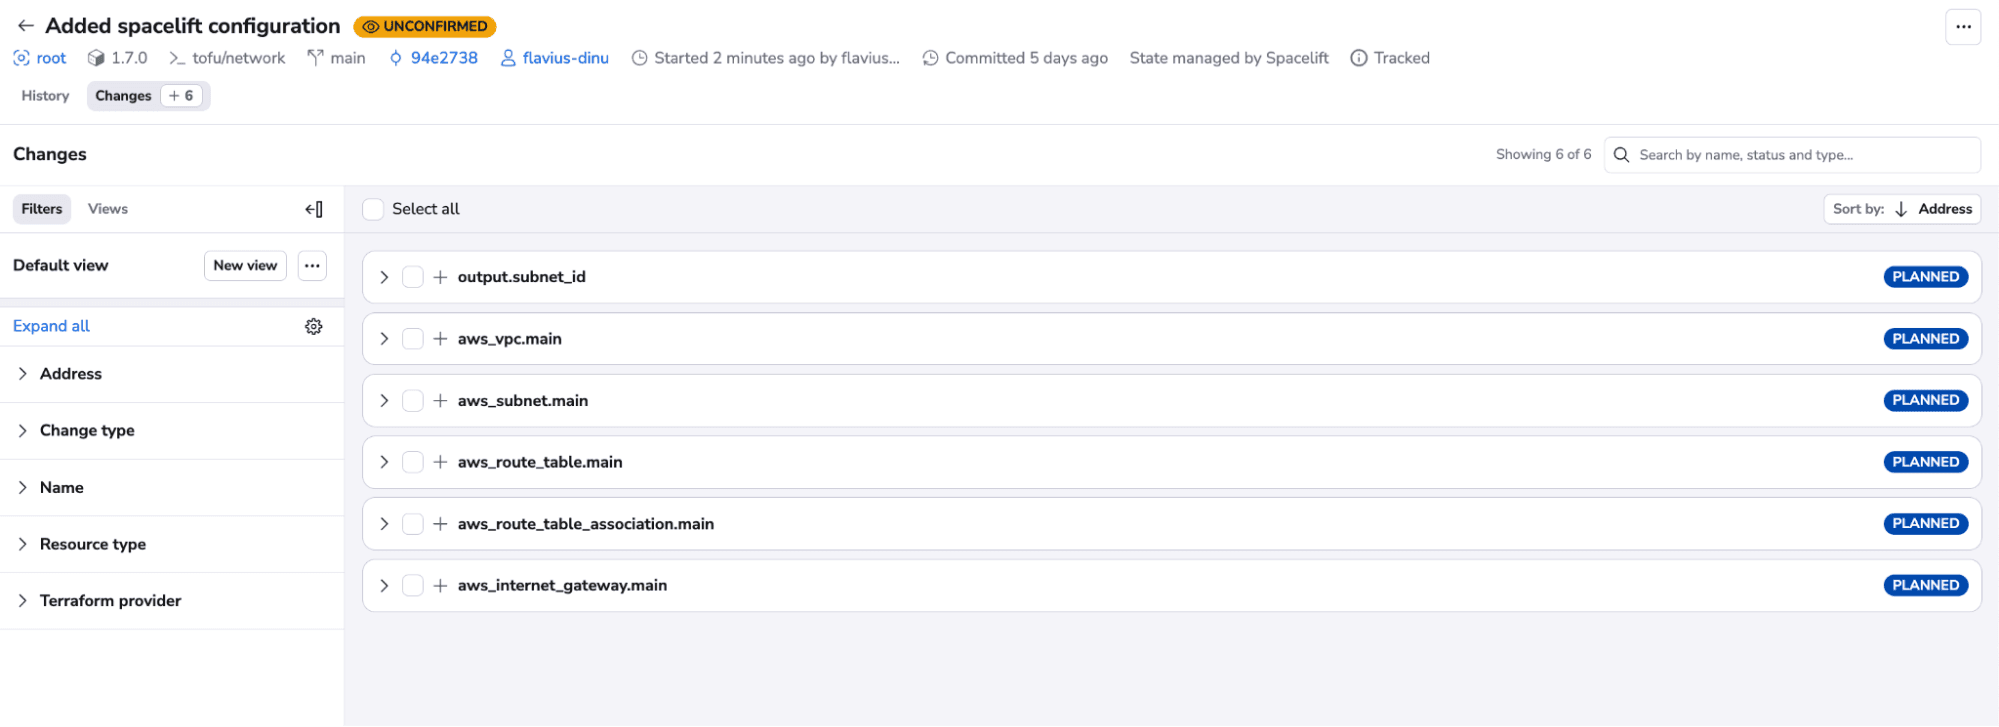
In addition, we didn’t have to provide any credentials, because our cloud integration took care of that. We can also see the policy allows the run and doesn’t show any warnings. This happens because we don’t have any high-severity issues with our code:

Let’s confirm the run and wait for it to finish:
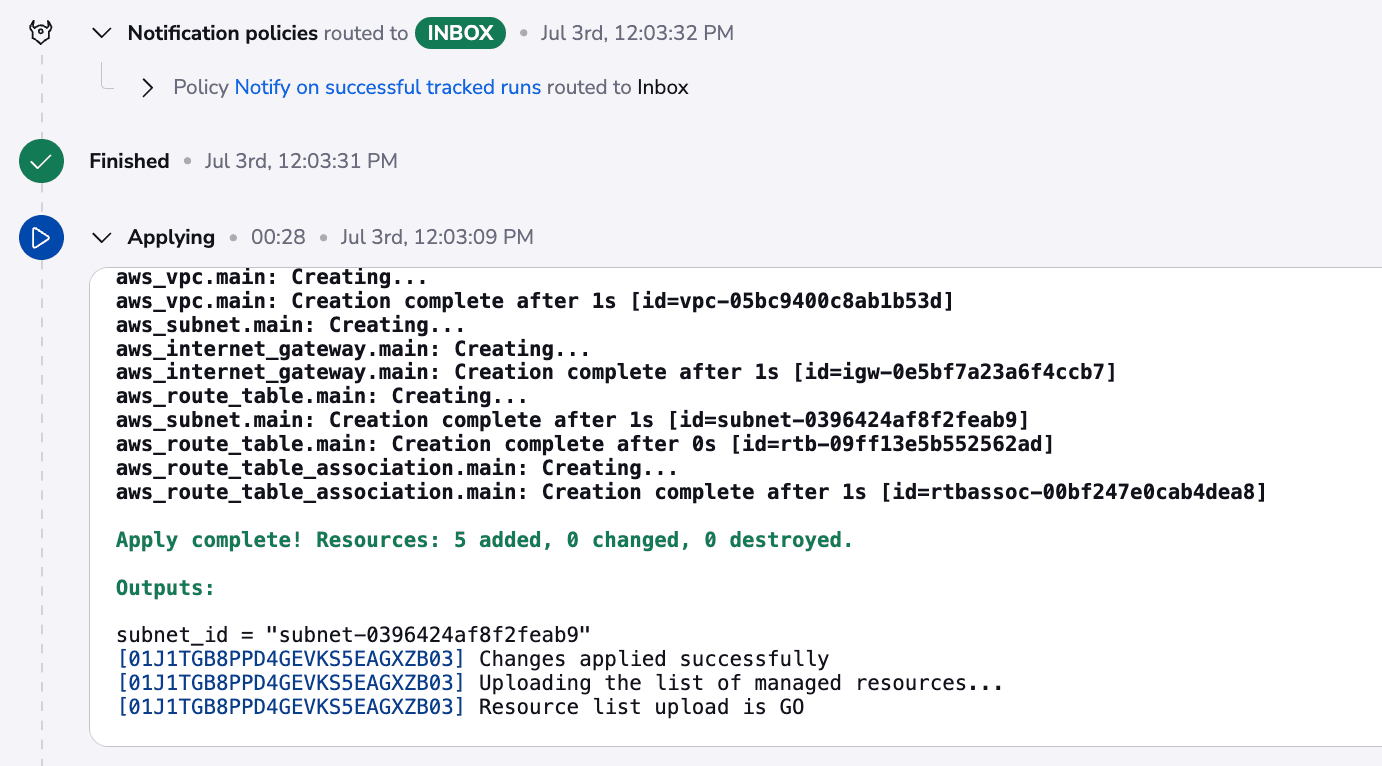
I also have an account-level notification policy that notifies about all successful and failed runs.
Now, because this run has finished successfully, it will allow the run on the second stack to be triggered:
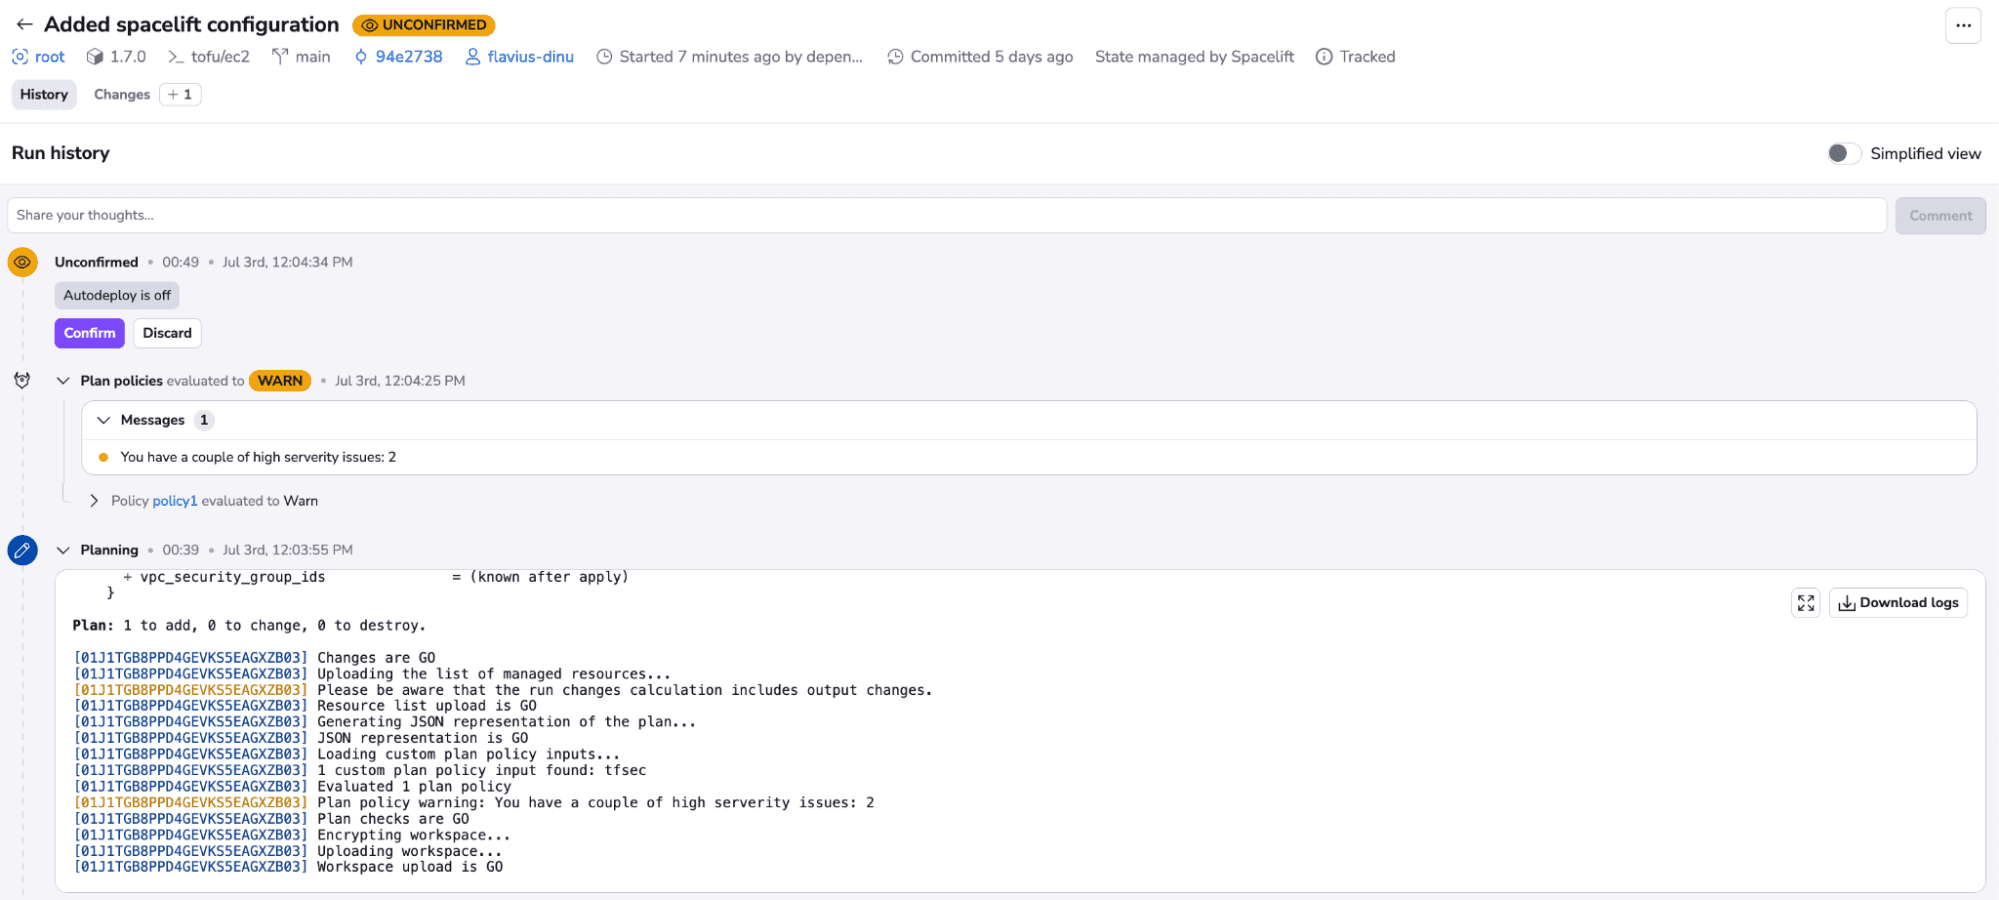
In this case, you can see that we have two high-severity issues, and because the policy has been set to show warnings, it allows us to run the code. If this had been set to deny, we wouldn’t be able to run it. Let’s confirm this run as well:

We can see that everything worked as we expected. Now, if there are any changes to the network configuration, a run will be triggered automatically for both the network and EC2. At the same time, if there are any changes to the EC2 stack, it will only trigger a run for the EC2 stack, and this is because the network doesn’t depend on the EC2; only the EC2 depends on the network.
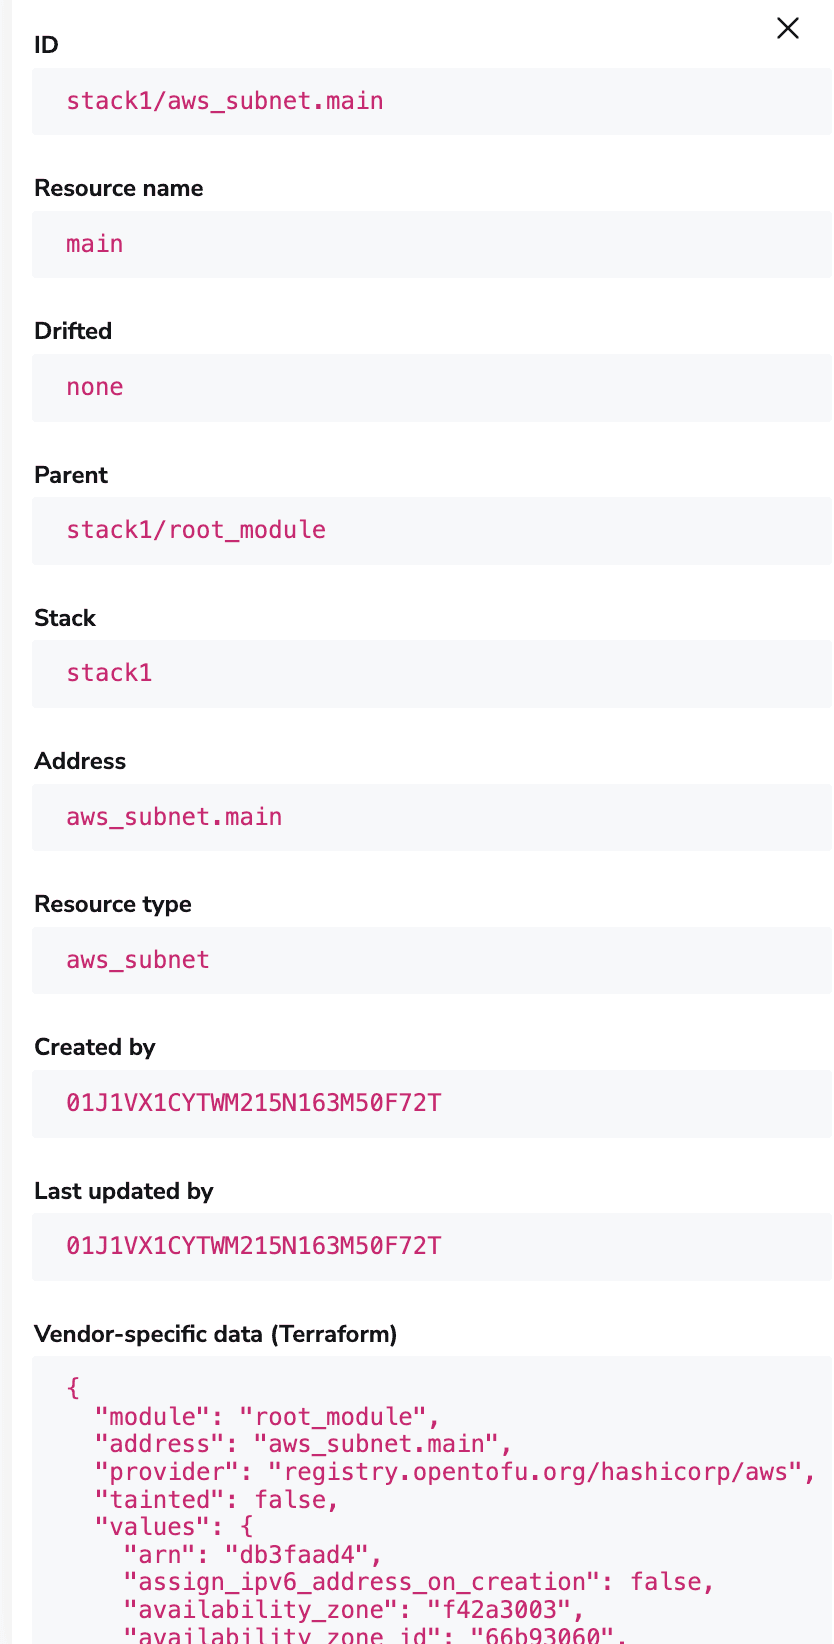
Spacelift also offers a resources view, in which you can see all the resources that have been deployed with your Spacelift account and also check information about these resources:
This was just a simple example, but here are some other things you could achieve with a setup like this:
- Full governance with policies – because of the nature of how the code was written, you could easily extend the number of policies you can attach to these configurations. You could easily add a policy that restricts instance types for your second stack, or even control how many approvals you need for runs
- Autodeploy – in my example, I had to provide manual confirmation for runs, if this is something you don’t want, this behavior can be easily changed
- Drift detection – you could easily enable drift detection and even activate remediation
- Multi-Infrastructure workflow – in my example, I’ve created a dependency between two OpenTofu stacks. We could’ve easily created dependencies between OpenTofu and other tools as well. This means you can have a stack for your network, one for EC2, and one for Ansible with dependencies between them, or you could have an EKS stack and another for Kubernetes. The sky is the limit to what you can achieve.
OpenTofu example – Self-service infrastructure with Blueprints
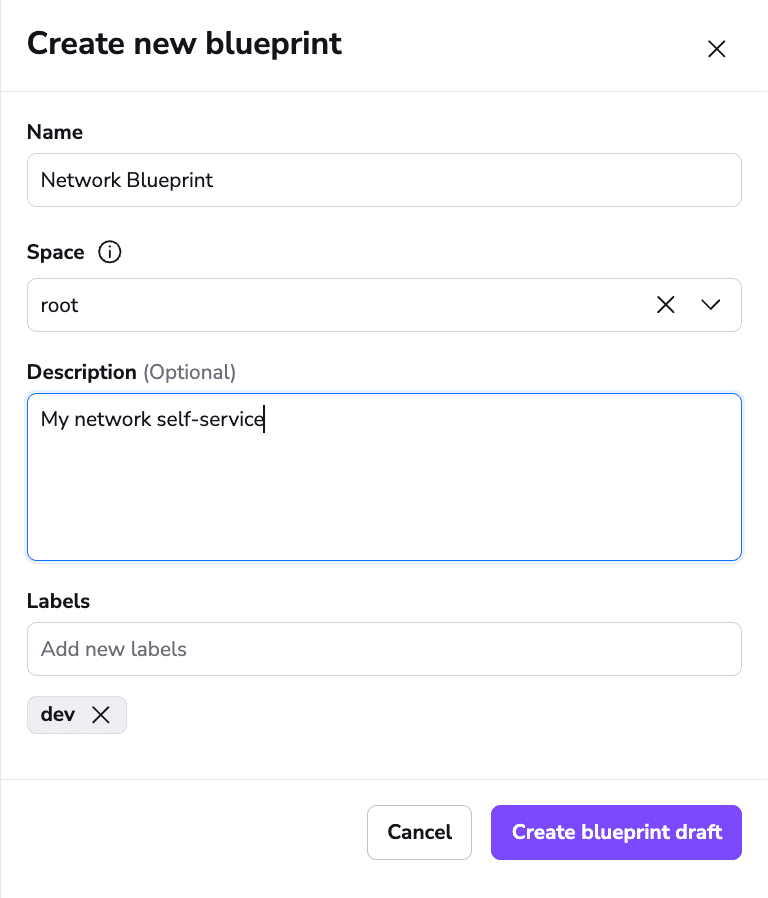
Blueprints offer you the ability to add self-service infrastructure for your configurations. Let’s create a blueprint for a network stack based on the code we mentioned before:
Now, let’s define the yaml configuration:
inputs:
 - id: stack_name
   name: The name of the stack
 - id: space
   name: Name of the space where the stack should be. Defaults to root.
   type: select
   default: root
   options:
     - legacy
     - root
 - id: subnet_cidr
   name: Add a subnet cidr for your stack
   default: "10.0.1.0/24"


stack:
 name: ${{ inputs.stack_name }}
 space: ${{ inputs.space }}
 description: >
   Stack created from a blueprint by ${{ context.user.name }} logged in as ${{ context.user.login }}
 labels:
   - "blueprints/${{ context.blueprint.name }}"
 vcs:
   branch: main
   repository: spacelift_tofu
   provider: GITHUB
   project_root: tofu/network


 environment:
   variables:
     - name: TF_VAR_subnet_cidr
       value: ${{ inputs.subnet_cidr }}
       description: The subnet cidr
       secret: true
 vendor:
   terraform:
     manage_state: true
     version: "1.7.2"
     workflow_tool: OPEN_TOFU
 attachments:
   contexts:
     - id: network-context
       priority: 0
   clouds:
     aws:
       id: 01H79…
       read: true
       write: true
   policies:
     - policy1
We’ve defined three inputs for our blueprint:
- Stack_name – this will be the name of the stack
- Space – choice of your Space between root and legacy
- Subnet_cidr – the cidr block of your subnet, it will override the value received from the context
Then, in the stack configuration, we are doing the following:
- specify the vcs repo and the path to use from that vcs repo
- specify the vendor (in our case OpenTofu)
- attaching the same context we’ve created with the first configuration
- attaching the same policy we’ve created with the first configuration
- specify what cloud integration to use
You can now publish the blueprint and create a stack from it:
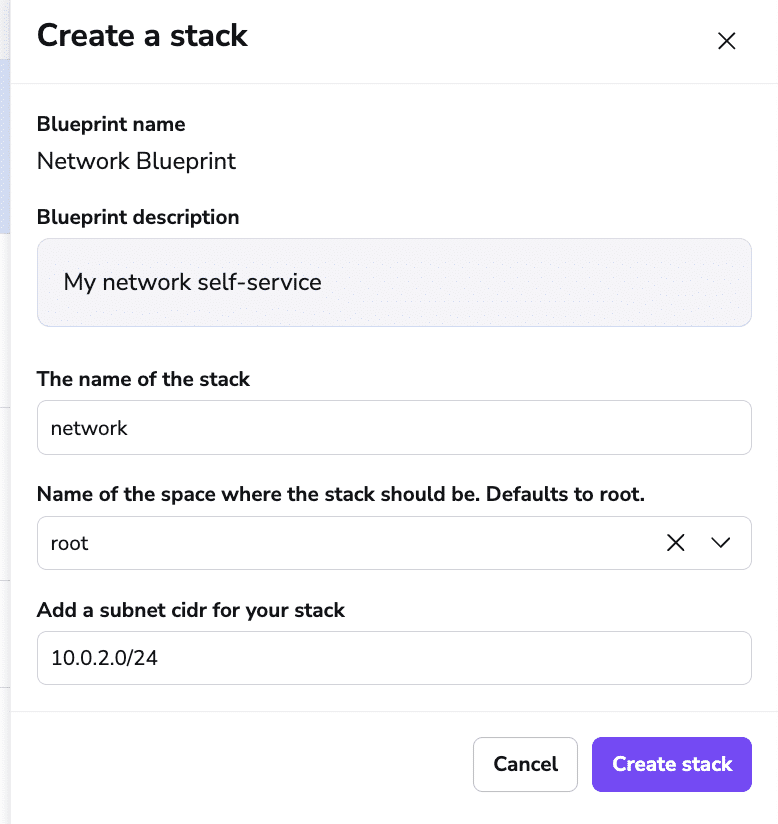
Let’s also trigger a run on it:

As you can see, the same checks are performed as in the first example, but the great thing about this is that your developers can easily replicate it without having any knowledge of infrastructure, or infrastructure as code. You can create blueprints for anything you want and you can reach, in the end, a service infrastructure catalog that can provision anything you want:
Key points
Spacelift enhances your OpenTofu workflow with many features and makes you focus on the development of your code, rather than always trying to figure out how to deploy fast while staying in control, and thinking about how to implement guardrails, compliance, or security.
If you want to learn more about Spacelift, create a free account today or book a demo with one of our engineers.
OpenTofu Commercial Support
Spacelift offers native and commercial support to ensure your OpenTofu success. If you need a reliable partner to run your critical workloads with OpenTofu, accelerate your migration, provide support coverage, or train your team – we are here to help.
