![How to Manage Kubernetes with Ansible [Tutorial]](/_next/image?url=https%3A%2F%2Fsecure.gravatar.com%2Favatar%2F65ae3b210fef45399182dae597e7688f%3Fs%3D48%26d%3Dmm%26r%3Dg&w=96&q=75)
Kubernetes is an open-source orchestration platform that simplifies managing containerized applications by automating tasks like scaling, load balancing, and resource allocation across clusters of machines. Its capabilities allow for a declarative management style comparable to Ansible, focusing on the application code rather than environmental issues.
Ansible, an automation tool for IT infrastructure, streamlines repetitive tasks, configuration management, and deployment through a server-client architecture. It utilizes playbooks for orchestration across managed nodes via SSH or WinRM. It leverages YAML’s declarative language and idempotency to avoid redundant deployments, promoting reusable code through roles for efficient application deployment.
Integrating Ansible with Kubernetes helps with resource deployment by harnessing the strengths of both platforms for efficient infrastructure and application management.
What we will cover:
- Why manage Kubernetes with Ansible?
- Prepare the environment to run Ansible with Kubernetes
- How to deploy Kubernetes cluster with Ansible
- How to manage Kubernetes resources with Ansible
- How to deploy Ansible playbook to Kubernetes on a cloud provider
- How to use Ansible for CI/CD in Kubernetes
- Automate Kubernetes updates and upgrades with Ansible
- How Spacelift can help you with Ansible and Kubernetes projects
Kubernetes is a powerful tool that helps save resources and costs. However, it’s a bit complex to set up and manage, as you use the command line and run ‘kubectl’ each time you want to deploy a Kubernetes resource. This process still requires some manual work and increases your margin of error.
This is comparable to a Linux environment. You can either run commands one by one or create a complex bash script that is not easily readable.
The way Ansible revolutionized Linux application deployments, you can now also do with Kubernetes using the kubernetes.core.k8s module. This module introduces an abstraction layer that simplifies Kubernetes setups into a more manageable and readable format.
Ansible allows you to use logic and variables to deploy the same playbook consistently to different environments. Ansible contains a large library of modules for specific tasks in the Linux environment, but a small library of modules is needed for Kubernetes. The reason is that Ansible and Kubernetes both use YAML’s declarative syntax, which allows Kubernetes code to be directly embedded into Ansible’s playbook task and allows them to complement each other.
Another benefit of using Ansible is that you can use one tool to deploy the infrastructure and application layers of a full Kubernetes ecosystem. As you will see below, we will be utilizing Ansible to deploy our Kubernetes cluster and an application on Kubernetes.
Ansible vs. Helm
Many people gravitate towards using Helm charts for their Kubernetes Deployments, appreciating the ability to bundle up all the Kubernetes Manifest files into a single Helm chart, inject variables, manage release versions, and deploy applications with one command. While Helm excels in Kubernetes-only environments by offering streamlined deployment processes, integrating it with Ansible can elevate the deployment strategy even further.
With its idempotent nature and extensive module support, Ansible introduces flexibility and the capability to handle more certain deployment scenarios, including conditional operations and integration with external systems. This combination of Ansible features allows for a sophisticated automation strategy that Helm charts alone might be limited to due to their focus on Kubernetes.
Starting with Ansible will provide immediate benefits and ensure adaptability for future needs, particularly for users new to Kubernetes. For environments that are already utilizing Helm, the integration is made smoother with Ansible’s ‘kubernetes.core.helm’ module, which uses Helm package management.
Utilizing both Helm and Ansible allows you to maximize both tools, which offers a comprehensive approach to managing Kubernetes deployments across various scenarios and tools.
Ansible vs. GitOps
In modern Kubernetes application deployment and scaling environments, GitOps tools like ArgoCD and Flux are becoming the standard for automation of the build-to-deployment process, complementing CI/CD pipelines.
Ansible integrates into this ecosystem by focusing on orchestrating initial setup tasks such as configuring Kubernetes clusters, setting up network policies, storage solutions, and other cloud infrastructure essentials. It excels in pre-deployment and post-deployment tasks, which facilitates a solid deployment strategy.
Ansible also works very well in managing diverse environments (Dev, QA, UAT, Prod) in your CI/CD setup with varying configurations and secrets. For hybrid and multi-cluster Kubernetes setups across various cloud and on-premises, Ansible ensures consistent and uniform automation.
For this article, I will use Ansible to deploy a full Kubernetes Cluster (1 Master Node and 2 Worker Nodes) using Ansible Playbooks, deploy a Kubernetes Task Manifest through an Ansible Playbook, utilize a Cloud Providers Kubernetes Cluster (Azure AKS), incorporate Ansible in a CI/CD pipeline, and manage updates and upgrades.
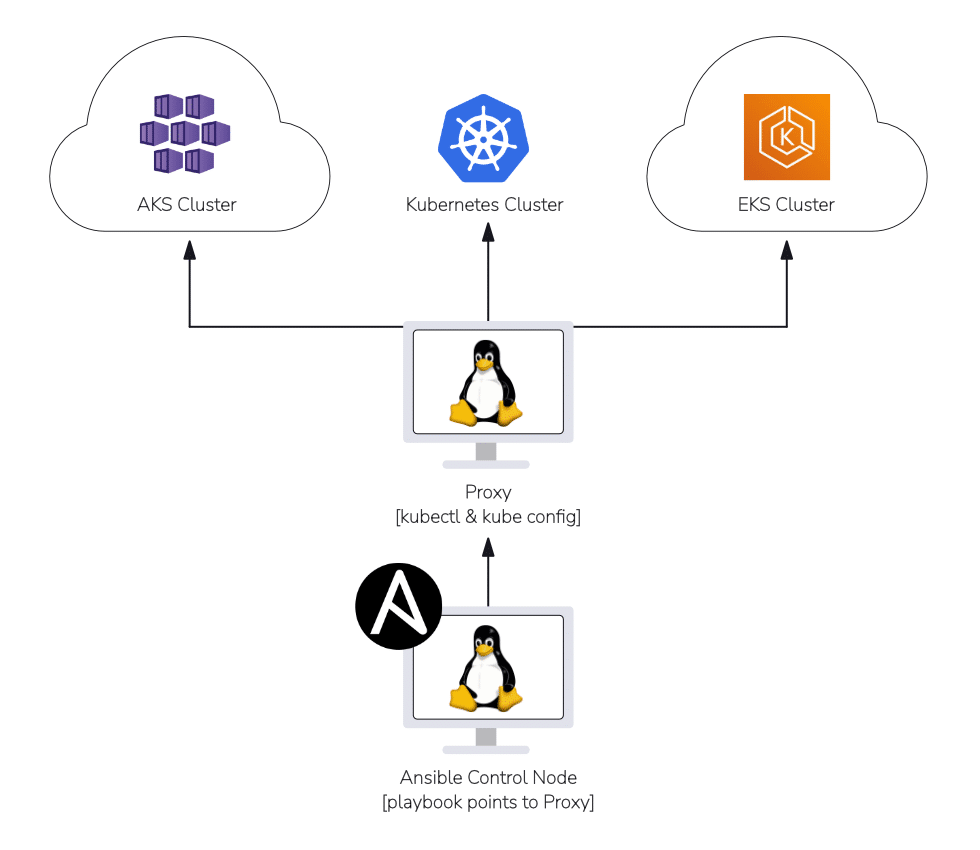
Before starting with Ansible and Kubernetes setup, let’s outline the architecture to understand how Ansible communicates with Kubernetes clusters.
We’ll have an Ansible Control Node that connects to a Proxy machine. This Proxy machine allows us to execute kubectl commands, facilitating access to various Kubernetes clusters. After establishing a link from the Ansible Control Node through the Proxy to the Kubernetes cluster, we’ll test some playbooks to confirm everything is operational.
Note: Kubernetes module in Ansible doesn’t come with kubectl tools for running tasks. You’ll need to install kubectl on the Proxy machine and ensure the ~/.kube/config file includes the clusters you intend to deploy to. This setup process will be explained in more detail later in this article.
On the Ansible Control Node, direct your playbook to the Proxy machine.
- For using Ansible locally, specify ‘localhost’ under the hosts
- For a remote proxy, input the server’s name/IP.
- For setups with multiple proxies leading to different clusters, you can create an inventory file with groups of servers. This file is then used as the ‘hosts’ in your ansible-playbook command, allowing for precise control over where playbooks are run.
We’ll follow the architecture in the diagram below to execute our playbooks on Kubernetes clusters.
To have Ansible run against a Kubernetes cluster, you will need the following setup before we continue.
- Ansible Control Node
- Proxy Machine (kubectl tools/kube config/python3) – might be easier if this is a Linux box
- Kubernetes cluster (either on-prem or using a cloud provider)
- SSH connectivity enabled between Ansible Control Node and Proxy Machine
Please note that I will be using the Debian OS family (apt) for my examples. However, the same should work for any other Linux distribution.
1. Set up Ansible Control node
On your Ansible Control node, run the following to install Kubernetes Collection (this includes the module and plugins):
ansible-galaxy collection install kubernetes.core
ansible-galaxy collection install community.kubernetes
ansible-galaxy collection install cloud.common

sudo apt install python3-pip
pip install kubernetes

mkdir -pv ~/ansible/playbook ~/ansible/inventory
2. Configure Proxy Machine with Kube Config and Kubectl tools
On the proxy machine, we will install kubernetes tools so we can use kubectl, cloud provider CLI tools (Azure CLI, AWS CLI, etc.) to connect to our Kubernetes cluster in the cloud. You can also manually add your Kubernetes clusters config onto the Proxy (~/.kube/config).
In our example, we will be using a Ubuntu Proxy that will connect to my Azure Kubernetes Cluster:
sudo apt update && sudo apt upgrade –y
sudo apt install python3-pip

#Download Kubernetes Tools using Curl:
curl -LO "https://dl.k8s.io/release/$(curl -L -s https://dl.k8s.io/release/stable.txt)/bin/linux/amd64/kubectl"

#Verify Checksum (Response should be kubectl:OK):
curl -LO "https://dl.k8s.io/release/$(curl -L -s https://dl.k8s.io/release/stable.txt)/bin/linux/amd64/kubectl.sha256"

echo "$(cat kubectl.sha256)  kubectl" | sha256sum --check

#Install Kubernetes Tools:
sudo install -o root -g root -m 0755 kubectl /usr/local/bin/kubectl

#Validate install:
kubectl version
Now that we have verified we can access our Kubernetes cluster from our proxy, we can move on to configuring our Ansible playbooks to run against our kubernetes cluster from our Ansible control node.
To use Ansible playbook to configure your Kubernetes cluster, you will need the following:
- All nodes should be Ubuntu 22.04 LTS to follow this example
- 1 Master Node – Minimum 2GB CPU & 4GB RAM
- 2 Worker Nodes – Minimum 2GB CPU & 4GB RAM
- SSH connectivity between Ansible and each of these Nodes (use ssh-copy-id username@node-ip from Ansible Control Node to copy your Public key over to these nodes)
Let’s go into our Ansible Control Node and create our inventory file kube_inventory (no extension needed) under ~/ansible/inventory and edit the file to include our Kubernetes nodes:
[master]
10.x.x.x

[workers]
10.x.x.x
10.x.x.x
Now, under ~/ansible/playbooks, add the following playbook kube_dependencies.yml to deploy your Kubernetes dependencies across all of your nodes (master and worker nodes).
I have packed this up into one playbook since we will need to install and configure all of the following into all of the nodes for our Kubernetes cluster.
- name: Kubernetes Dependencies
  hosts: all
  become: yes
  tasks:
    - name: Updates
      apt:
        update_cache: yes

    - name: Reboot
      reboot:

    - name: Disable SWAP
      shell: |
        swapoff -a

    - name: Disable SWAP in fstab
      replace:
        path: /etc/fstab
        regexp: '^([^#].*?\sswap\s+sw\s+.*)$'
        replace: '# \1'

    - name: Create an empty file for the containerd module
      copy:
        content: ""
        dest: /etc/modules-load.d/containerd.conf
        force: no

    - name: Configure modules for containerd
      blockinfile:
        path: /etc/modules-load.d/containerd.conf
        block: |
          overlay
          br_netfilter

    - name: Create an empty file for K8S sysctl parameters
      copy:
        content: ""
        dest: /etc/sysctl.d/99-kubernetes-cri.conf
        force: no

    - name: Configure sysctl parameters for K8S
      lineinfile:
        path: /etc/sysctl.d/99-kubernetes-cri.conf
        line: "{{ item }}"
      with_items:
        - "net.bridge.bridge-nf-call-iptables  = 1"
        - "net.ipv4.ip_forward                 = 1"
        - "net.bridge.bridge-nf-call-ip6tables = 1"

    - name: Apply sysctl parameters
      command: sysctl --system

    - name: Install APT Transport HTTPS
      apt:
        name: apt-transport-https
        state: present

    - name: Add Docker apt-key
      get_url:
        url: https://download.docker.com/linux/ubuntu/gpg
        dest: /etc/apt/keyrings/docker-apt-keyring.asc
        mode: "0644"
        force: true

    - name: Add Docker's APT repo
      apt_repository:
        repo: "deb [arch={{ 'amd64' if ansible_architecture == 'x86_64' else 'arm64' }} signed-by=/etc/apt/keyrings/docker-apt-keyring.asc] https://download.docker.com/linux/ubuntu {{ ansible_distribution_release }} stable"
        state: present
        update_cache: yes

    - name: Add Kubernetes apt-key
      get_url:
        url: https://pkgs.k8s.io/core:/stable:/v1.29/deb/Release.key
        dest: /etc/apt/keyrings/kubernetes-apt-keyring.asc
        mode: "0644"
        force: true

    - name: Add Kubernetes APT repository
      apt_repository:
        repo: "deb [signed-by=/etc/apt/keyrings/kubernetes-apt-keyring.asc] https://pkgs.k8s.io/core:/stable:/v1.29/deb/ /"
        state: present
        update_cache: yes

    - name: Install containerd
      apt:
        name: containerd.io
        state: present

    - name: Create containerd directory
      file:
        path: /etc/containerd
        state: directory

    - name: Add containerd configuration
      shell: /usr/bin/containerd config default > /etc/containerd/config.toml

    - name: Configuring Systemd cgroup driver for containerd
      lineinfile:
        path: /etc/containerd/config.toml
        regexp: "            SystemdCgroup = false"
        line: "            SystemdCgroup = true"

    - name: Enable the containerd service and start service
      systemd:
        name: containerd
        state: restarted
        enabled: yes
        daemon-reload: yes

    - name: Install Kubelet
      apt:
        name: kubelet=1.29.*
        state: present
        update_cache: true

    - name: Install Kubeadm
      apt:
        name: kubeadm=1.29.*
        state: present

    - name: Enable the Kubelet service
      service:
        name: kubelet
        enabled: yes

    - name: Load br_netfilter kernel module
      modprobe:
        name: br_netfilter
        state: present

    - name: Set bridge-nf-call-iptables
      sysctl:
        name: net.bridge.bridge-nf-call-iptables
        value: 1

    - name: Set ip_forward
      sysctl:
        name: net.ipv4.ip_forward
        value: 1

    - name: Reboot
      reboot:

- hosts: master
  become: yes
  tasks:
    - name: Install Kubectl
      apt:
        name: kubectl=1.29.*
        state: present
        force: yes
To run the Dependency Playbook, use the following from your Ansible Control Node:
ansible-playbook ~/ansible/playbook/kube_dependencies.yml -i ~/ansible/inventory/kube_inventoryOnce you have successfully deployed the dependencies across all of your nodes, we can go ahead and initialize your Master node with Kubernetes. Run the following to create kube_master.yml playbook under ~/ansible/playbooks/.
Please make sure to replace YOUR_USERPROFILE_NAME with the name of your user profile that is in your /home/ directory that you are installing Kubernetes under. (For example, I am using ‘kube_admin’).
- hosts: master
  become: yes
  tasks:
    - name: Create an Empty file for Kubeadm configuring
      copy:
        content: ""
        dest: /etc/kubernetes/kubeadm-config.yaml
        force: no

    - name: Configure container runtime
      blockinfile:
        path: /etc/kubernetes/kubeadm-config.yaml
        block: |
          kind: ClusterConfiguration
          apiVersion: kubeadm.k8s.io/v1beta3
          networking:
            podSubnet: "10.244.0.0/16"
          ---
          kind: KubeletConfiguration
          apiVersion: kubelet.config.k8s.io/v1beta1
          runtimeRequestTimeout: "15m"
          cgroupDriver: "systemd"
          systemReserved:
            cpu: 100m
            memory: 350M
          kubeReserved:
            cpu: 100m
            memory: 50M
          enforceNodeAllocatable:
          - pods

    - name: Initialize the cluster
      shell: kubeadm init --config /etc/kubernetes/kubeadm-config.yaml >> cluster_initialized.log
      args:
        chdir: /home/YOUR_USERPROFILE_NAME
        creates: cluster_initialized.log

    - name: Create .kube directory
      become: yes
      become_user: YOUR_USERPROFILE_NAME
      file:
        path: $HOME/.kube
        state: directory
        mode: 0755

    - name: Copy admin.conf to User's kube config
      copy:
        src: /etc/kubernetes/admin.conf
        dest: /home/YOUR_USERPROFILE_NAME/.kube/config
        remote_src: yes
        owner: YOUR_USERPROFILE_NAME

    - name: Install Pod Network
      become: yes
      become_user: YOUR_USERPROFILE_NAME
      shell: kubectl apply -f https://raw.githubusercontent.com/flannel-io/flannel/master/Documentation/kube-flannel.yml >> pod_network_setup.log
      args:
        chdir: $HOME
        creates: pod_network_setup.log
To run the master playbook, use the following from your Ansible Control Node:
ansible-playbook ~/ansible/playbook/kube_master.yml -i ~/ansible/inventory/kube_inventoryOnce we have successfully deployed this to the master node, we can jump into deploying the following to our worker nodes to connect our worker nodes to the master node. Let’s create kube_workers.yml under ~/ansible/playbooks/.
Please make sure to replace YOUR_MASTER_IP with the IP address of your master node and also replace YOUR_USERPROFILE_NAME with the name of your user profile that is in your /home/ directory that you are installing Kubernetes under.
- name: Configure Join Commands on Master Node
  hosts: master
  become: yes
  tasks:
    - name: Retrieve Join Command
      shell: kubeadm token create --print-join-command
      register: join_command_raw

    - name: Set Join Command
      set_fact:
        join_command: "{{ join_command_raw.stdout_lines[0] }}"

- name: Join Worker Nodes
  hosts: workers
  become: yes
  tasks:
    - name: Enable TCP port 6443 (On Master) is able to connect from Worker
      wait_for: "host=YOUR_MASTER_IP port=6443 timeout=1"

    - name: Join worker to cluster
      shell: "{{ hostvars['YOUR_MASTER_IP'].join_command }} >> node_joined.log"
      args:
        chdir: /home/YOUR_USERPROFILE_NAME
        creates: node_joined.log
To run the worker nodes playbook, use the following from your Ansible Control Node:
ansible-playbook ~/ansible/playbook/kube_workers.yml -i ~/ansible/inventory/kube_inventoryOnce the playbook runs successfully, you can validate the cluster is working properly by running the commands below from the Master Node:
kubectl get nodes
kubectl get all -A
We will now add the kube config of the master node to our /etc/kube/config of our proxy.
From the master node, you can run the command below to copy the config over to your proxy:
sudo scp /etc/kubernetes/admin.conf USERNAME@MASTER_NODE_IP:~/.kube/configYou can validate under your ~/.kube/config in your proxy machine to make sure you view the config and also run the following from your proxy to make sure you can access your cluster from your proxy:
kubectl get nodes
kubectl get all -A
The next step is to deploy the Kubernetes task manifest from our Ansible Control Node.
But overall, you can see how much time we can save on setting up and configuring a Kubernetes cluster using Ansible.
You can easily add another Ubuntu server in your Ansible inventory file and run the playbooks to add another node into your Kubernetes cluster. You have more control over the state of your Kubernetes Nodes.
Before we start, validate that you are able to ping your proxy from your Ansible control node to ensure you have connectivity.
Let’s modify our inventory file to include the proxy now (~/ansible/inventory/kube_inventory) that will contain the proxy IP or Host Name (if you have DNS configured).
Add your proxy to your inventory as below:
[master]
10.x.x.x

[workers]
10.x.x.x
10.x.x.x

[proxy-servers]
10.x.x.x #add your proxy IP or DNS name here.
Let’s create a simple playbook file as create_namespace.yml in ~/ansible/playbooks/ as the following to create a namespace in your Kubernetes cluster:
- name: Create K8S resource
  hosts: proxy-servers
  tasks:
  - name: Get K8S namespace
    kubernetes.core.k8s:
      name: my-namespace
      api_version: v1
      kind: Namespace
      state: present
You can also pass in your Kubernetes task manifest as a file into your Ansible playbook:
- name: Create a Namespace from K8S YAML File
  kubernetes.core.k8s:
    state: present
    src: /kube_manifests/create_namespace.yml
Now all you have to do is just run your ansible playbook command:
ansible-playbook ~/ansible/playbooks/create_namespace.yml -i ~/ansible/inventory/kube_inventoryOnce the playbook run is complete, go to your proxy and validate that you are able to see the namespace created by running the following:
kubectl get namespaceAnd there you have it: you have just used Ansible to deploy a Kubernetes task manifest to your Kubernetes cluster.
Here are some other playbooks (Deployments, Services, and Configmaps) you can test running from your Ansible Control node. You can utilize the following Application/Service Deployment task manifest to deploy a nginx application:
- name: Application Deployment
  hosts: proxy_servers
  tasks:
    - name: Create a Deployment
      kubernetes.core.k8s:
        definition:
          apiVersion: apps/v1
          kind: Deployment
          metadata:
            name: myapp
            namespace: my-namespace
          spec:
            replicas: 3
            selector:
              matchLabels:
                app: myapp
            template:
              metadata:
                labels:
                  app: myapp
              spec:
                containers:
                  - name: myapp-container
                    image: nginx:latest
                    ports:
                      - containerPort: 80

    - name: Expose Deployment as a Service
      kubernetes.core.k8s:
        definition:
          apiVersion: v1
          kind: Service
          metadata:
            name: myapp-service
            namespace: my-namespace
          spec:
            selector:
              app: myapp
            ports:
              - protocol: TCP
                port: 80
                targetPort: 80
            type: LoadBalancer
You can also manage your Kubernetes environment variables with Ansible using a configmap:
- name: Manage ConfigMaps and Secrets
  hosts: proxy_servers
  tasks:
    - name: Create ConfigMap
      kubernetes.core.k8s:
        definition:
          apiVersion: v1
          kind: ConfigMap
          metadata:
            name: app-configmap
            namespace: my-namespace
          data:
            config.json: |
              {
                "key": "value"
              }
    - name: Create Secret
      kubernetes.core.k8s:
        definition:
          apiVersion: v1
          kind: Secret
          metadata:
            name: myapp-secret
            namespace: my-namespace
          stringData:
password: mypasswordNowadays, we mostly navigate towards a PaaS solution for our Kubernetes cluster, as it will be hosted by Azure, AWS, GCP, or others. I want to briefly cover how you would connect an Azure AKS cluster to your Ansible – proxy workflow. The same process will follow for Amazon EKS and Google GKE with their dedicated CLI commands.
Let’s go to our Proxy machine and run the code below. We will install the Azure CLI tools and use ‘az login’ to log in to Azure. This will validate that we are able to connect to our AKS cluster from our proxy and make sure that we have the kube config in our proxy updated.
#Install Azure CLI (or any other cloud provider CLI tools):
curl -sL https://aka.ms/InstallAzureCLIDeb | sudo bash

#Login to Azure:
az login

#Add Azure AKS cluster to proxy ~/.kube/config
az aks get-credentials --name name_of_aks_cluster --resource-group name_of_aks_rg

#Test access to K8S cluster:
kubectl get nodes
kubectl get all -A
Once we validate we can access our AKS cluster nodes and other resources, we can move to the Ansible Control Node and run some of the previous playbooks against the proxy.
- name: Create K8S resource
  hosts: proxy-servers
  tasks:
  - name: Get K8S namespace
    kubernetes.core.k8s:
      name: my-namespace
      api_version: v1
      kind: Namespace
      state: present
Run your ansible playbook command:
ansible-playbook ~/ansible/playbooks/create_namespace.yml -i ~/ansible/inventory/kube_inventoryOnce the playbook run is complete, go to your proxy and validate you are able to see the namespace created by running the following:
kubectl get namespaceWe have confirmed we can run playbooks against our Azure AKS cluster.
One thing to note is that we replaced the existing /.kube/config with the Azure AKS cluster config. Typically, you will have a multi-cluster environment and will need to add different config files in your ~/.kube/ location and configure your Ansible playbooks to point to the correct config file using the following:
   - name: Set Kubernetes context
      k8s_auth:
        kubeconfig: /path/to/kubeconfig
register: kube_authImplementing Ansible in your CI/CD workflows consists of two main methods.
- Use Ansible in a Jenkins Pipeline setup for CI/CD, which allows for direct deployment and configuration of Kubernetes resources from within the pipeline. Jenkins can trigger Ansible playbooks as part of the deployment process and apply the changes directly to the Kubernetes cluster. This is an ideal approach if you are looking for a more hands-on, scriptable method to manage Kubernetes deployments.
- Integrate Ansible with a CI/CD GitOps tool for Kubernetes, such as ArgoCD or Flux, as these tools will focus more on the pre-processing steps that are needed to generate the Kubernetes manifests before deployment. Since ArgoCD/Flux focuses on reading the Git Repository for Kubernetes manifest file changes, you can add a step in your CI/CD pipeline to trigger an Ansible playbook to dynamically generate or update the manifest files in the repository based on configurations and environments through jinja2 templates. Ansible’s strength is that it can handle all idempotent operations, which ensures consistent deployments without unnecessary reconfigurations.
Read also: Why Generic CI/CD Tools Will Not Deliver Successful IaC
Ansible in a Jenkins CI/CD Pipeline
Here is an example of how you would use Ansible to deploy Kubernetes manifest in a Jenkins CI/CD Pipeline:
Jenkins file:
pipeline {
    agent any

    environment {
        ANSIBLE_HOST_KEY_CHECKING = "False"
    }

    stages {
        stage('Checkout') {
            steps {
                checkout scm
            }
        }

        stage('Build') {
            steps {
                echo 'Building application...'
                // Add your build commands here, e.g., for a Java project:
                // sh './mvnw clean package'
            }
        }

        stage('Test') {
            steps {
                echo 'Running tests...'
                // Add your test commands here
                // sh './mvnw test'
            }
        }

        stage('Deploy') {
            steps {
                echo 'Deploying application...'
                script {
                    ansiblePlaybook(
                        playbook: 'ansible/deploy-app.yml'
                    )
                }
            }
        }
    }

    post {
        success {
            echo 'Deployment successful!'
        }

        failure {
            echo 'Deployment failed.'
        }
    }
}
Ansible playbook:
---
- hosts: proxy_server
  gather_facts: no
  tasks:
    - name: Set up K8S Namespace
      kubernetes.core.k8s:
        state: present
        apiVersion: v1
        kind: Namespace
        metadata:
          name: my-namespace

    - name: Deploy Application
      kubernetes.core.k8s:
        state: present
        definition: "{{ lookup('file', 'kubernetes/deployment.yml') | from_yaml }}"
Integrating Ansible with a CI/CD GitOps tool
The following is a short example of how Ansible can be used alongside your ArgoCD setup to perform your pre-processing steps to create or update the Kubernetes manifest files in a Git repository:
Playbook to copy Jinja template over Kubernetes manifest application deployment:
---
- hosts: localhost
  tasks:
  - name: Generate Kubernetes Deployment Manifest using Template
    template:
      src: templates/deployment.yml.j2
      dest: manifests/deployment.yml
Sample Jinja Template:
apiVersion: apps/v1
kind: Deployment
metadata:
  name: {{ app_name }}
spec:
  replicas: {{ replicas }}
  selector:
    matchLabels:
      app: {{ app_name }}
  template:
    metadata:
      labels:
        app: {{ app_name }}
    spec:
      containers:
      - name: {{ app_name }}
        image: {{ image_name }}:{{ image_tag }}
        ports:
        - containerPort: {{ container_port }}
Sample variable file (for production environment) used for Jinja Template:
app_name: k8s-app-prod
replicas: 3
image_name: k8s-app-prod/image
image_tag: latest
container_port: 80
Now, create a step in your CI/CD pipeline build steps (Jenkins, GitHub Actions, Azure DevOps etc) to trigger the Ansible Playbook and perform a Git Commit and Push for your Git repository that contains the Kubernetes Manifest files.
If you have ArgoCD already set up, this should just trigger your ArgoCD workflow to sync and update the existing Kubernetes application. If you are deploying a new application, you can run the following Argo CD commands:
argocd app create k8s-app-prod \
  --repo https://github.com/username/your-repo.git \
  --path manifests \
  --dest-server https://kubernetes.default.svc \
  --dest-namespace default
Sync application:
argocd app sync k8s-app-prodOnce the sync is completed, you can monitor your Kubernetes deployment to ensure it is running as expected.
As you can see, this workflow would automate your deployment process by leveraging Ansible for configuration management and manifest creation and utilizing ArgoCD for continuous deployment, following GitOps principles.
Ansible is also great at managing updates for your resources in a Kubernetes cluster due to Ansible’s idempotent nature, which minimizes the risk of any configuration drift and ensures all of your kubernetes resources are in their desired state.
Ansible integrates with Kubernetes modules, which provides an easy way to communicate with Kubernetes API and perform update operations such as rolling updates and canary deployments.
The example below illustrates how you would deploy Rolling Updates to your Kubernetes cluster using Ansible. This update method deploys updates to your pods one by one. As one old pod goes down, a new pod with the preferred image goes up, which ensures minimal downtime and a smooth transition between old and new versions of your application.
---
- name: Execute a Rolling update for a K8S deployment
  hosts: proxy_servers
  tasks:
    - name: Update Kubernetes deployment
      kubernetes.core.k8s:
        state: present
        definition:
          kind: Deployment
          name: app-deployment
          namespace: my-namespace
          spec:
            template:
              spec:
                containers:
                  - name: my-app-container
                    image: nginx:latest
      register: update_result

    - name: Wait for rolling update to complete
      kubernetes.core.k8s_info:
        kind: Deployment
        name: app-deployment
        namespace: my-namespace
      register: deployment_info
      until: deployment_info.resources[0].status.updatedReplicas == deployment_info.resources[0].status.replicas
      retries: 60
      delay: 10

    - name: Display update result
      debug:
        msg: "Rolling update completed successfully"
You can also utilize Canary deployments, which focus on deploying the new version of your application to a canary group (small group of pods) and gradually increasing the traffic to the preferred version while monitoring the application’s performance.
Here is an example:
---
- name: Canary Deployment
  hosts: proxy_servers
  vars:
    new_version: "v2"

  tasks:
    - name: Deploy 'Canary' Version
      kubernetes.core.k8s:
        definition:
          apiVersion: apps/v1
          kind: Deployment
          metadata:
            name: myapp-canary
            namespace: my-namespace
          spec:
            replicas: 1 #using 1 replica for example
            selector:
              matchLabels:
                app: myapp
                version: canary
            template:
              metadata:
                labels:
                  app: myapp
                  version: canary
              spec:
                containers:
                  - name: myapp-container
                    image: "myapp:{{ new_version }}"
                    ports:
                      - containerPort: 8080

    - name: Update Service to include 'Canary' Version
      kubernetes.core.k8s:
        definition:
          apiVersion: v1
          kind: Service
          metadata:
            name: myapp-service
            namespace: my-namespace
          spec:
            selector:
              app: myapp
            ports:
              - protocol: TCP
                port: 80
                targetPort: 8080
You can also use Ansible to manage updates to your Kubernetes cluster nodes, such as updating the version of your kubelet, kubeadm, kubectl, containerd, networking, docker or any security tools. In the following examples, we perform these updates across all of the Kubernetes nodes.
- Kubeadm updates:
- name: Upgrade kubeadm
  apt:
    name: kubeadm=1.29.2
    state: latest
update_cache: yes- Kubectl updates:
- name: Upgrade kubectl
  apt:
    name: kubectl=1.29.2
    state: latest
update_cache: yes- Upgrading Kubernetes cluster networking:
- name: Upgrade CNI Plugins
shell: kubectl apply -f https://raw.githubusercontent.com/cilium/cilium/{{ cni_version }}/install/kubernetes/quick-install.yamlSpacelift supports both Ansible and Kubernetes and enables users to create stacks based on them. Leveraging Spacelift, you can build CI/CD pipelines to combine them and get the best of each tool.
It brings with it a GitOps flow, so, for example, your Kubernetes Deployments are synced with your Kubernetes Stacks, and pull requests show you a preview of what they’re planning to change. It also has an extensive selection of policies, which lets you automate compliance checks and build complex multi-stack workflows.
Another great advantage of using Spacelift is that you can manage more infrastructure tools like OpenTofu, Terraform, Pulumi, and AWS CloudFormation from the same place and combine their Stacks with building workflows across tools.
If you want to learn more about Spacelift, create a free account today or book a demo with one of our engineers.
Leveraging Ansible to deploy your Kubernetes environment and resources in your Kubernetes cluster can streamline your workflows and give you more control over all the pieces involved. From Node deployments to Kubernetes Task Manifest deployments, you have visual flexibility in managing these resources with Ansible. Ansible is fully supported amongst all CI/CD pipelines and can streamline all of your deployments even further with certain pre/post processing tasks that will ensure a smooth and automated flow of code to your Kubernetes clusters.
Manage Kubernetes Easier and Faster
Spacelift allows you to automate, audit, secure, and continuously deliver your infrastructure. It helps overcome common state management issues and adds several must-have features for infrastructure management.